background image

7

PAX A Series Quick Reference Guide

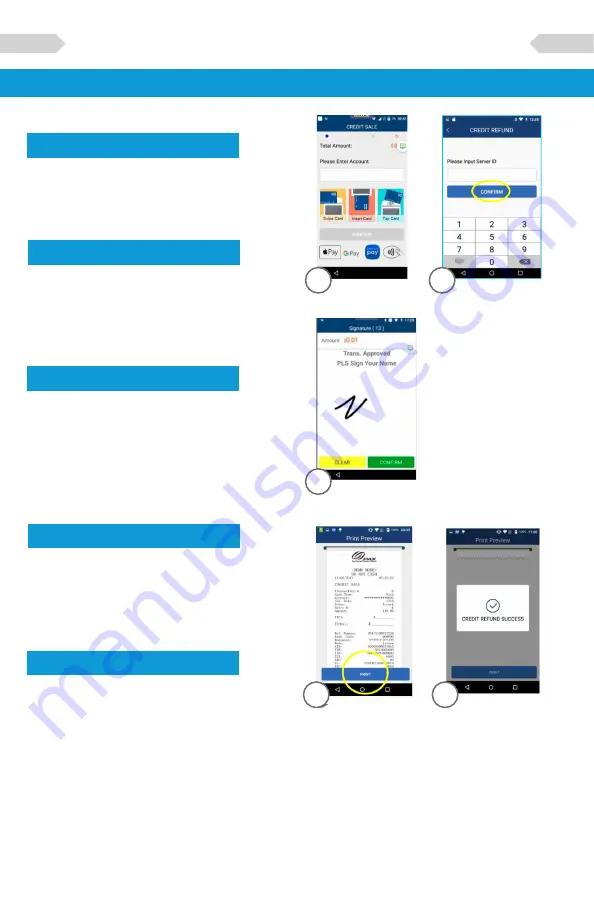
Step 4

Swipe or enter the card number.

Step 6

Once card holder signs on the 

screen, select 

[CONFIRM]

 to 

accept or 

[CLEAR]

 to clear the 

signature and retry the signature.

Step 5 

(Restaurant Only)

Enter the Server ID and select 

[CONFIRM]

.

CREDIT REFUND Cont.

Step 8

The terminal will display the 

transaction status.

4

8

5

6

5

Step 7

Select the 

[PRINT]

 button to 

print the receipts.

7

Summary of Contents for PAX A Series

Page 1: ...PAX Technology PAX A Series Quick Reference Guide PAX A80 PAX A920 support clearent com ...

Page 2: ...terminals that function as a countertop device packed with the latest PCI PTS 5 x and NFC contactless certifications and powered by the Android 6 0 operating system With a full range of communication options to choose from including Wi Fi Dial and Ethernet and an optional back up battery the PAX A Series terminals are always connected ensuring peak performance during business hours The PAX A Serie...

Page 3: ...the content quality accuracy or completeness of any information or materials contained in on these pages PAX Technology Inc does not endorse any content viewpoints products or services contained on these pages and shall not be held liable for any losses caused by reliance on the accuracy reliability or timeliness of such information Any person or entity that relies on any information obtained from...

Page 4: ...on the screen 4 Press the option for ADD OPERATOR Once in the settings menu you can use your finger to scroll down to reach the settings you want to configure The settings password is 9876 Once that is keyed into the terminal press the OK on the terminal screen the green keypad button will not work on this screen Either enter in another OPERATOR ID OR PRESS the BACK ARROW to return to the previous...

Page 5: ...NET OPTION to set the Ethernet setup Turn the ETHERNET OPTION ON Setting Date Time Setting Wi Fi Connection Setting Ethernet A80 Only 2 1 3 4 Choose the Wi Fi OPTION to set the Wi Fi setup 1 2 1 3 2 Choose the PASSWORD setting to update the Password Default password is 9876 but it is recommended that you change the password and keep it in a secure place If you turn this option OFF it will disable ...

Page 6: ...RTED Choose the REPORTS option in the function menu of the payment app To print the report that is set as the default report set in the parameters of the file build choose DEFAULT REPORT To set some customized filters for the report choose CURRENT REPORT Enter in the password and press either the ENTER key on the screen OR the green button on the terminal keypad The default password is the day s d...

Page 7: ...nformation or materials contained in on these pages PAX Technology Inc does not endorse any content viewpoints products or services contained on these pages and shall not be held liable for any losses caused by reliance on the accuracy reliability or timeliness of such information Any person or entity that relies on any information obtained from these pages does so at his her own risk PAX Technolo...

Page 8: ...ip or select CONFIRM to bypass tip entry and add the tip later Step 5 Restaurant Only Enter the Server ID and select CONFIRM Step 4 Insert swipe or manually enter the card number Step 6 Once card holder signs on the screen select CONFIRM to accept or CLEAR to clear the signature and retry the signature CREDIT SALE Step 2 Please enter the sale amount and select CONFIRM 1 3 5 2 4 6 ...

Page 9: ...refund amount and select CONFIRM CREDIT SALE Step 2 Select how the terminal will apply the refund Select BY CARD NUM to use the original card number or select RefNo to use the original transaction reference number Step 9 The terminal will display the transaction status 8 1 3 Step 7 Select the PRINT button to print the receipts 7 9 2 CREDIT REFUND ...

Page 10: ...igns on the screen select CONFIRM to accept or CLEAR to clear the signature and retry the signature Step 5 Restaurant Only Enter the Server ID and select CONFIRM CREDIT REFUND Cont Step 8 The terminal will display the transaction status 4 8 5 6 5 Step 7 Select the PRINT button to print the receipts 7 ...

Page 11: ...ure and retry the signature Step 4 Restaurant Only Enter the Server ID and select CONFIRM Step 5 Select CONFIRM if the displayed transaction is the one to be voided Scroll screen up to locate the confirm button CREDIT VOID SALE Step 3 Input the original transaction number and then select CONFIRM 1 5 3 4 2 6 Step 1 From the idle screen select the transaction type VOID SALE ...

Page 12: ...e PRINT button to print the receipts 7 CREDIT VOID SALE Cont FORCED SALE Step 2 Please enter the sale amount and select CONFIRM Step 3 Swipe or enter the card number Step 4 Enter the Auth Code of the original transaction and then select CONFIRM 1 3 2 4 Step 1 From the idle screen select the transaction type FORCED ...

Page 13: ...saction status 8 5 Step 7 Select the PRINT button to print the receipts 7 FORCED SALE Cont Step 5 Restaurant Only Enter the Server ID and select CONFIRM 5 Step 6 Once card holder signs on the screen select CONFIRM to accept or CLEAR to clear the signature and retry the signature 6 ...

Page 14: ...h select OK to close the batch or select CANCEL to stop the batch close Step 4 If prompted Close W Untipped select OK to zero out untipped transactions and close the batch or select CANCEL to stop the batch close Step 5 The terminal will display the batch close status CLOSE BATCH Step 2 Select the BATCH option 1 3 5 2 4 ...

Page 15: ... PAX A Series Quick Reference Guide Step 1 From the idle screen select the FUNC option Step 3 To reprint the last transaction select the PRINT LAST option REPRINT LAST Step 2 Select the PRINT option 1 2 3 ...

Page 16: ...desired transaction Step 5 The transaction details will be displayed Scroll the screen to display the Adjust option To adjust the tip select ADJUST Step 6 Enter the tip amount and select CONFIRM Step 7 To confirm the tip amount adjustment select OK To cancel the tip amount adjustment select Cancel Step 6 The terminal will display the transaction status Step 1 From the idle screen select the FUNC o...

Page 17: ... interference that may cause undesired operation This equipment complies with Part 68 of the FCC rules and the requirements adopted by the ACTA On the body of this equipment is a label that contains among other information a product identifier If requested this number must be provided to the telephone company RF Exposure Information This device meets the government s requirement for exposure to ra...

Page 18: ...clearent com 2020 Clearent LLC is a registered agent for Central Bank of St Louis MO and Wells Fargo Bank N A Concord CA ...

Reviews: