19
YOURx Flex Box
__________________________________________________________
Installation Manual
Direct: 763.476.6866 • National: 800.422.2537 • www.SeeClearfield.com • techsupport@clfd.net
Manual 019209 REV F - Jan 2019
Figure 2
Figure 3
Installing Additional FlexPorts
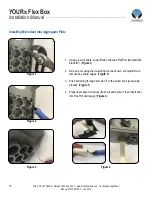
1.
Locate and, using pliers, remove tab associated to the
10mm or 14mm port that you will use. (
Figure 1
)
2. De-burr (using a de-burring tool/snips/knife) the port hole
for a smooth transition without damaging the fiber as it
enters the port. (
Figure 2
)
Note: MUST BE FULLY DE-BURRED FOR MPO
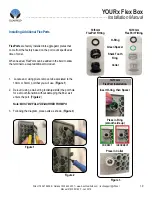
3. Following the diagram, place parts as shown. (
Figure 3
)
FlexPorts
are factory installed into aggregator plates that
come from the factory based on the port count specified at
time of order.
When needed, FlexPorts can be added in the field to allow
the terminal to accept additional microduct.
Press in Ring
(smooth side up)
CORRECT
INCORRECT
Insert O-ring, then Spacer
O-Ring
Green Spacer
Shark Tooth
Ring
Collar
10/6mm
FlexPort Fitting
14/10mm
FlexPort Fitting
14/10mm
FlexPort Installation
Press in Collar
Figure 1


