background image

©2014  Clearpath Robotics Inc.  All Rights Reserved. 

22 


FAQ 


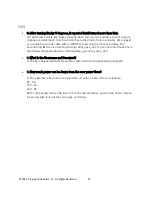
Q: After turning Husky 90 degrees, it reported that it turned more than that.


A:

A skid steer vehicle like Husky may slip when turning. The encoders cannot capture 

slippage and will report that the vehicle has turned more than in actuality. We suggest 
you couple the encoder data with an IMU that reports turns more accurately. The 
encoder and IMU can be combined using robot_pose_ekf. You can find information here 
http://www.clearpathrobotics.com/blog/blog_gps-using-pose_ekf/ 


Q:


What is the Username and Password?


A: Husky is shipped with the Username: administrator and password: clearpath 


Q:


How much power can be drawn from the user power lines?


A: The absolute maximum recommended currents on each rail are as follows: 
5V - 5A 
12V - 4A 
24V - 5A 
Each rail is protected by a 5A fuse. For continued protection against risk of fire replace 
fuses only with those of the same type and rating. 


Summary of Contents for HUSKY

Page 1: ...HUSKY HUSKY USER MANUAL UNMANNED GROUND VEHICLE ...

Page 2: ...uded 4 What s Required 4 Expansions 4 The Basics 5 Status Panel 6 Orientation References 7 Pinout References 7 System Specifications 8 Vehicle Equations 9 Control Modes 9 Safety 10 General Warnings 10 E Stop and Lockout 10 Electrical System 11 Lifting and Transport 11 Performance Recommendations 11 ...

Page 3: ...te PC 14 Connecting Power 15 User Bay Power Connections 16 Verification 16 Using ROS 17 Nodes 17 Topics 17 Workspace 18 Payloads 18 Battery Maintenance 19 Charging 19 Battery Care 19 Wheels 20 Chassis 20 Tips and Troubleshooting 20 Mechanical Tips 21 Troubleshooting 21 A Product Dimensions 23 B Service and Support 24 ...

Page 4: ...ors What s Required To use Husky you will require a PC capable of running Robot Operating System ROS If a computer option was purchased from Clearpath Robotics with Husky then the included laptop or minicomputer has already been configured with Ubuntu 12 04 and ROS Hydro plus appropriate ROS packages and other configuration for use with Husky Expansions To expand the capabilities of Husky consider...

Page 5: ...the key specifications of the Husky platform Figure 1 gives a tour of key Husky components Figure 1 Husky at a Glance Front Bumper Bar Wheel User Power Panel Extruded Aluminum Mounting Rail User Payload Area Lockout Emergency Stop Rear Bumper Bar Power Button Status Panel Battery Area Access Buttons ...

Page 6: ...correctly formatted motion commands and is ready to drive When yellow Husky is receiving commands but will not drive due to emergency stop or another error When red serial communications are currently timed out General error status Illuminates red when Husky will not drive due to an error state Such states include emergency stop insufficient battery power or an unspecified software error Emergency...

Page 7: ...he positive x direction The direction of the axes differs from those used for roll pitch and yaw in aircraft and care should be taken to ensure that data is interpreted correctly Pinout References Husky provides a female DE 9 connector for communication with a host device The pinout of this connector is shown in Figure 3 Pin Name Dir Description 2 RX IN Data from Platform 3 TX OUT Data to Platform...

Page 8: ...l Grade 30 58 slope Operating Ambient Temperature 10 to 30 C 14 to 86 F Operating Time 3 hours typical 8 hours standby no motion Battery 24V 20 Ah Sealed Lead Acid Battery Charger Short circuit over current over voltage and reverse voltage protection Charge Time 10 hours User Power 5V 12V 24V Each fused at 5A Communication RS 232 115200 Baud Wheel Encoders 78 000 ticks m Internal Sensing Battery s...

Page 9: ...used by switching the startup node in base launch from kinematic_node to torque_node In this mode a Twist message is used as well but the linear and angular values specified are multiplied by parameterized scaling factors and used for a current control feedback loop Raw Control may be used by switching the startup node in base launch from kinematic_node to raw_node Raw mode works similarly to torq...

Page 10: ...y is operating keep clear of the wheels paying particular attention to the pinch hazard which exists between each wheel and the end of the corresponding bumper bar E Stop and Lockout The red emergency stop button e stop and lockout are located on the back of Husky opposite the status panel shown in Figure 4 Power supply to Husky s motor drivers is enabled by a normally open relay which is closed i...

Page 11: ... the batteries properly or return the battery to Clearpath Robotics to do so Lifting and Transport For the safety of users and to maximize the lifetime of Husky please observe the following when manually transporting the robot Husky should be lifted by two persons firmly gripping the front and rear bumper bars The battery can be removed to lighten the load of a manual transport Ensure that Husky i...

Page 12: ...ontrol software The temperature is measured in the motor drivers and on the motor casings the coils inside the motor casings cannot be measured Therefore it is important to note that the temperature measured on the motor casings is a lagging indicator of the temperature of the coils inside the casing Be aware of the delay in heat propagation on the motors during heavy use The thermal limit of the ...

Page 13: ...ro installed The Husky software can be found at http ros org wiki Robots Husky Connecting Computer Husky s serial port is located in the user power panel accessible from the user area shown in Figure 6 The connector is a female DE9 suitable for connection directly to a USB serial adaptor or to a PC serial port via a straight through modem cable not a null modem cable How you connect the PC to Husk...

Page 14: ... to set up a ROS master environment In this situation Husky will need to be configured as the master To setup Husky as the master refer to http wiki ros org ROS Tutorials MultipleMachines Note if you purchased a PC from Clearpath Robotics Husky is already set as the master You can find the IP address of your remote PC using ifconfig To connect to the master on your remote PC enter export ROS_MASTE...

Page 15: ... 7 Ensure that it is firmly seated and clicks into place It will be difficult to connect it in the incorrect polarity 4 Replace the battery door cover ensuring that it clicks into place and is flush with the rear panel To power on Husky firmly press the power button located above the status panel It will illuminate blue and the status panel lights will show a brief test pattern The comm status lig...

Page 16: ...terface automatically upon startup 60 90 seconds after booting up the Husky comms light will change from red to green or yellow depending on e stop status indicating that ROS is up and has established communications with Husky To tele operate Husky plug a USB joystick into the included onboard computer and release the emergency stop After a few seconds ROS should recognize the joystick and begin p...

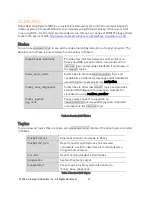
Page 17: ...o Husky husky cmd_freq Reports how frequently Husky has received commands useful to determine if commands were dropped over wireless encoder Dead reckoning feedback from Husky diagnostics System Diagnostic output husky data These topics provide system information to husky_base_diagnostic Table 4 Standard ROS Topics husky husky_kinematic Provides raw interface between serial protocol on Husky and R...

Page 18: ... of Husky edit the default workspace setup file located in etc ros setup bash Change the final line from the default to instead source your own workspace When this is done copy the launch file for your software into the robot_upstart folder which is located at etc ros hydro husky core d Now restart the Husky background service and your nodes should come up with the rest of Husky sudo service husky...

Page 19: ...y The battery charger shipped with Clearpath Robotics lead acid battery powered products uses a three state charge cycle 1 A fast high current initial charge until the battery voltage reaches 29 6V 2 A topping charge during which the battery charges at 29 6V constant voltage until the current decreases to 500 mA 3 A precision float charge during which the battery voltage is held at 27 6V This mode...

Page 20: ...Inspecting tires releasing pressure and inflating tires are completed through the tire s inflation stem Tire pressure should not exceed 20psi and lower pressure may be desired based on terrain requirements If a tire must be removed first unfasten the four M5 Socket Head Cap Screws that join the wheel to the axle hub and slide it off the axle When replacing the tire screws should be tightened to 3 ...

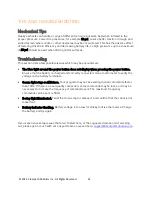
Page 21: ...ot display when pressing the power button Ensure that the battery is charged and correctly connected Use a multi meter to verify the voltage on the battery terminals Comm light stays red flickers Your program may not be sending motion commands faster than 10Hz If there is a poor quality connection some commands may be lost so it may be necessary to increase the frequency of commands sent The maxim...

Page 22: ... more accurately The encoder and IMU can be combined using robot_pose_ekf You can find information here http www clearpathrobotics com blog blog_gps using pose_ekf Q What is the Username and Password A Husky is shipped with the Username administrator and password clearpath Q How much power can be drawn from the user power lines A The absolute maximum recommended currents on each rail are as follow...

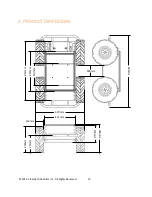
Page 23: ... 2014 Clearpath Robotics Inc All Rights Reserved 23 A PRODUCT DIMENSIONS 812mm 540mm 297mm 180mm 421mm 988mm 670mm 114mm 330mm 235mm 388mm 228mm ...

Page 24: ...tisfaction We are located in Kitchener Ontario and can accept phone calls from 9AM to 5PM EST Monday to Friday at our toll free number or emails at any time If you any questions or concerns visit our support knowledge base for more information or to get in touch with our support team 1 800 301 3863 support clearpathrobotics com ...

Reviews: