background image

  IMPORTANT - Read Anchoring Instructions

You must read the anchoring instructions packed with your kit prior to shelter assembly!

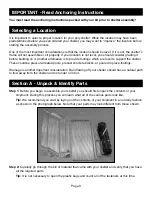
  Selecting a Location

It is important to select a proper location for your poly shelter. While the location may have been 
predetermined before you even ordered your shelter, you may want to “improve” the location before 
starting the assembly process.

One of the most important considerations is that the location should be level. If it is not, the shelter

ʼ

frame will not assemble or sit properly. If your location is not level, you should consider grading it 
before building on it. Another alternative is to provide footings which are level to support the shelter. 
These could be pressure-treated posts, precast concrete blocks, or poured in place footings.

Drainage is another important consideration. Rain flowing off your shelter should have a natural path 
to flow away from the shelter and not under or into it.

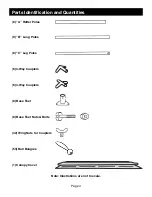
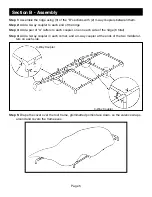
  Section A - Unpack & Identify Parts

Step 1:

 Before you begin to assemble your shelter you should first unpack the contents of your 

shipment. During this process you will learn what all of the various parts look like. 

Tip:

 We recommend you start by laying out the contents of your shipment in an orderly fashion 

as shown in the photograph below. Note that your parts may look different from those shown.

Step 2:

 Carefully go through the bill of material that came with your shelter and verify that you have 

all the required parts.

Tip:

 It is not necessary to open the plastic bags and count all of the fasteners at this time.

Page 3

Summary of Contents for 103434

Page 1: ...Instruction Manual Poly Shelters Backyard Canopy 10 Wide x 20 Long SKU 103434 2004 ClearSpanTM All rights reserved Reproduction prohibited without written permission Rev 21 June 04 ...

Page 2: ...and heavy rain and can not be responsible for damage caused by or to the canopy Proper anchoring is the responsibility of the buyer and owner user Ask your ClearSpanTM representative if you need assistance with anchoring choices ClearSpanTM will not be responsible for damage caused by failure to properly anchor the canopy Do not place or use any open flame or other heat source under or near the ca...

Page 3: ...e shelter These could be pressure treated posts precast concrete blocks or poured in place footings Drainage is another important consideration Rain flowing off your shelter should have a natural path to flow away from the shelter and not under or into it Section A Unpack Identify Parts Step 1 Before you begin to assemble your shelter you should first unpack the contents of your shipment During th...

Page 4: ... Quantities Note Illustrations are not to scale Page 4 8 A Rafter Poles 9 B Long Poles 8 C Leg Poles 6 3 Way Couplers 6 4 Way Couplers 8 Base Feet 8 Base Feet Nuts Bolts 42 Wing Nuts for Couplers 53 Ball Bungies 1 Canopy Cover ...

Page 5: ...Step 3 Add a pair of A rafters to each coupler one on each side of the ridge 8 total Step 4 Add a 3 way coupler in each corner and a 4 way coupler at the ends of the two middle raf ters on each side Step 5 Drape the cover over the roof frame grommetted portion face down so the valence wraps around and covers the frame eves Page 5 4 Way Coupler 3 Way Coupler ...

Page 6: ...at your bungies may be a different color than those shown Start in the corners Step 9 Once the corners are fastened place ball bungies through all the grommet holes and loop around the pipe as illustrated above Step 10 Anchor your shelter using an approved anchoring method While anchors are not supplied in your kit the type appropriate for your installation may be purchased from ClearSpanTM Call u...

Page 7: ...low snow or ice to accumulate on the cover Use a broom mop or brush to clear any ice or snow from the cover Clean your canopy with water and mild soap when necessary Never use bleach abrasives or strong cleaners on your canopy If the canopy is moved after construction inspect it thoroughly before reuse Page 7 ...

Reviews: