background image

1.  Verify that all parts are included in the shipment. 

Notify Customer Service for questions or concerns. 

 
2.  Read these instructions, the Must Read document, 

and all additional documentation included with the 
shipment 

before

 you begin assembling the shelter. 

 
3.  Gather the tools, bracing, ladders (and lifts if 

needed), and assistance needed to assemble the 
shelter. Check the weather 

before

 you install the 

main cover and any end panels. Do not install end 
panels (if equipped) and main cover on a windy or 
stormy day. 

 
4.  Re-evaluate the location and site based on the 

information and precautions presented in the 
documentation included with the shipment. 

 
5.  Lay out the site (if this has not been completed). 
 
6.  Assemble the frame components in the order they 

are presented in these instructions. 

 
7.  Assemble the frame including the struts. 
 
8.  Consult the Must Read document and properly 

anchor the assembled frame. 

 
9.  Assemble and install the cable assemblies (if 

equipped). These are typically found on larger 
shelters. Your shelter may include struts or other 
methods of bracing attached during the frame 
assembly procedure. 

 
10.  Install the End Wall framing. (These are optional 

items for some shelter types.) 

 
11.  Install, tighten, and secure the End Wall end panels 

and doors. (These are optional items for some 
shelters.) 

 
12.  Install, tighten, and secure the main cover. This 

applies to fabric covers that stretch over the frame 
assembly. 

 
13. Read the 

Greenhouse Care and Maintenance


information at the end of these instructions. 


LIST OF WORDS AND PHRASES  

 
Before you begin to assemble your shelter, it is 
important to become familiar with the words and phrases 
used in this instruction manual. 
 

The words and phrases below are common to most 
ClearSpan™ shelters and identify the different parts of 
the shelter. (Some are used in this document. Others 
may not apply to this particular shelter.) These terms are 
used to describe the shipped parts and can also be 
found on the materials list/spec sheets included with the 
shipment. To aid in the assembly, read through the 
following definitions 

before

 you begin to assemble your 

shelter. 
 

• 

Band Clamp: Clamp used to connect the end wall 
framing to the rafter pipe. In some cases, band 
clamps are used to connect diagonal struts to the 
assembled frame. 


• 

Clip or Fabric Clip: A short, half-section piece of 
conduit (cut lengthwise) used to secure the end 
panel cover to the leg or rafter assembly. The clip or 
fabric clip is typically fastened in place using self-
tapping Tek screw.  


• 

Conduit: An assembly of pipes used to secure the 
main cover and end panels (if equipped). Purlins 
and some strut assemblies also consist of 
connected pipes to form a conduit. Each pipe joint of 
a conduit assembly is secured with a self-tapping 
Tek screw. 


• 

Cross-connector: Any one of the metal brackets 
used to "connect" or secure a purlin to a rafter. 
Cross-connectors are typically pictured on the 
Pictorial Parts Guide page. 


• 

End Panel: Fabric or material used to cover the end 
wall assemblies. End wall assemblies are optional 
for many shelters. 


• 

Main Cover: Fabric or material used to cover the roof 
and, in some instances, the sides of the shelter.  


• 

Must Read Document: This document includes 
building and shelter anchoring instructions, steps for 
end wall reinforcement, safety precautions, and 
notices and warnings. The Must Read document is 
sent with all shelters and buildings. If you did not 
receive a Must Read document, contact Customer 
Service at 1-800-245-9881 to request one.      


Visit www.ClearSpan.com for additional products and customer assistance.

2 of 24

Summary of Contents for 103557

Page 1: ... Style 16 Wide x 8 High Pro Greenhouse Round Style ClearSpan All Rights Reserved Reproduction is prohibited without permission Revision date March 2006g Sku Numbers 104881 104882 103557 Diagram may show a different length ...

Page 2: ... determine whether your selected location is the best location Never erect the structure under power lines Identify whether underground cables and pipes are present before preparing the site or anchoring the structure Location should be away from structures that could cause snow to drift on or around the building Do not position the building in a place where large loads such as snow and ice large ...

Page 3: ... words and phrases below are common to most ClearSpan shelters and identify the different parts of the shelter Some are used in this document Others may not apply to this particular shelter These terms are used to describe the shipped parts and can also be found on the materials list spec sheets included with the shipment To aid in the assembly read through the following definitions before you beg...

Page 4: ...location and application Tape measure or measuring device Marker to mark locations on the pipes Variable speed drill and impact driver cordless with extra batteries works best Metal cutting saw Wrenches and impact socket set or an adjustable wrench Scissors utility knife tin snips Hammers and gloves Adjustable pliers and self locking pliers Ladders work platforms and other machinery for lifting de...

Page 5: ...onnector to the rafter and end wall frame Ground post shown above Baseboard is not used for all greenhouse models Diagram is for illustration only Fabric Clip is used to secure the end panels and roll up side panel if equipped to the cover conduit if needed It is secured using the Tek screw QH1330 Bracket Pictorial Parts Guide Not all parts are shown Visit www ClearSpan com for additional products...

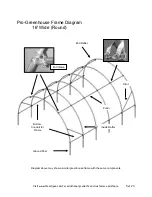
Page 6: ...use frame with the same components Pro Greenhouse Frame Diagram 16 Wide Round End Rafter Purlin Inside Rafter Ground Post Strut Bottom Conduit for Frame End Clamp Visit www ClearSpan com for additional products and customer assistance 5 of 24 ...

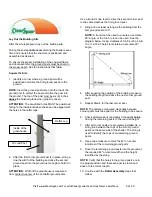
Page 7: ...st ground post 3 Sting a line at least as long as the building from the first ground post at 90 NOTE A transit can be used to ensure an accurate 90 angle or the 3 4 5 rule can be used See the diagram below Using multiples of 3 4 5 such as 6 8 10 or 12 16 20 helps to maintain an accurate 90 angle 4 After squaring the position of the building measure the building length and drive the next corner gro...

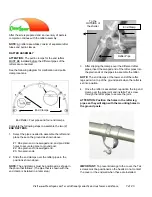
Page 8: ... NOTE The end clamps must be positioned as shown in the photo that follows The pipe that is shown with the end clamp is installed in a later step 3 After slipping the clamps over the different rafter pipes insert the swaged end of the rafter pipes into the plain ends of the pipes to assemble the rafter NOTE The end clamps at the lower end of the rafter legs will sit on top of the ground posts when...

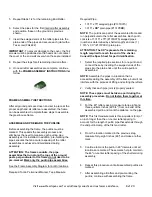
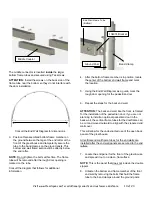
Page 9: ...rlins are part of the assembled frame and run perpendicular to the rafter assemblies Each purlin consists of 1 315 x 75 131S075 swaged pipes number is determined by shelter length and one 1 1 315 x XX 131P0XX plain pipe ATTENTION The XX represents the remaining length required to reach the end of the shelter Consult the Spec Sheet for part identification 1 Select the required pipe sections for one...

Page 10: ...at the measurements were made from when the purlin was pre marked 5 Insert the purlin pipe section through the top purlin clamp of the end rafter and through the cross clamp at the top of the middle or second rafter 6 Rotate the purlin pipe so that the first mark is visible near the clamp of the second rafter and position the plain end of the purlin flush with or slightly to the inside of the end ...

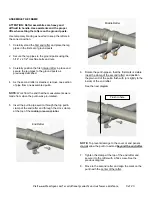
Page 11: ... or backward as needed to maintain this dimension 16 Repeat the above steps as needed to stand place and secure the remaining rafters to complete the frame assembly NOTE If the last rafter is plumb and the purlin extends beyond the end of the rafter cut the last section of purlin pipe to the required length DO NOT allow the purlin to extend beyond the end rafter Diagram may show a similar shelter ...

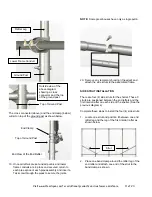
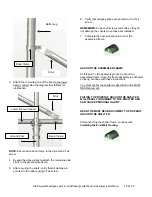
Page 12: ...5 struts are positioned between the end rafters and the first interior rafter on each side of the shelter See the previous diagrams Complete these steps to install the four 4 side struts 1 Locate one strut and position it between one end rafter leg and the leg of the first interior rafter as shown below 2 Place one band clamp around the rafter leg of the end rafter and attach one end of the strut ...

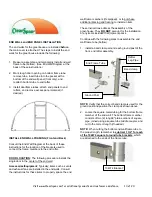
Page 13: ...alled 7 Complete the next procedure to anchor the assembled frame ANCHOR THE ASSEMBLED FRAME At this point in the assembly process anchor the assembled frame Once the frame assembly is anchored properly continue with these instructions You must anchor the shelter as described in the MUST READ document FAILING TO PROPERLY ANCHOR THE SHELTER WILL RESULT IN DAMAGE TO THE SHELTER AND CAN CAUSE PERSONA...

Page 14: ...e end walls Consult the instructions for these items to properly space the end wall frame members if equipped or to purchase additional bracing and framing to install an item These instructions address the assembly of the greenhouse They DO NOT account for the installation of any items included in equipment packs Continue with the following steps to assemble the end wall frame tube bottom 1 Instal...

Page 15: ...m as a guide mark the rough door opening for the pedestrian door 6 Repeat the steps for the back end wall ATTENTION The back end wall like the front is framed for the installation of the pedestrian door If you are not planning to install an optional pedestrian door in the back wall the vertical frame tubes for the doorframe can be cut and moved outward to align with the zippered end wall cover Thi...

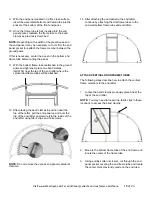
Page 16: ...on near the top of the rafter pull the end panel up and over the top of the end rafter and secure it to the inside of the end rafter using fabric clips and Tek screws NOTE Do not remove the excess end panel material at this time 13 After attaching the end panel to the end rafter continue by attaching the doorframe tubes to the end wall bottom frame tube and end rafter ATTACH VERTICAL DOORFRAME TUB...

Page 17: ...e bracket to one end of the vertical frame member Use a 5 16 drill bit to drill a hole through the tube and attach the bracket to the tube using a nut and carriage bolt 9 With the 104074 square to round tube bracket attached to the top of the frame member above attach the frame member to the band clamp on the rafter Do not tighten at this time 10 Verify that the vertical end wall frame tube is plu...

Page 18: ...led front end wall For the following procedure the rough door opening is cut in the end panel and the material is wrapped around each frame member of the doorframe before the pedestrian door is installed Complete the following steps 1 Using the frame tubes of the door opening as a guide use a utility knife or scissors to cut through the end panel and remove the material from the opening where the ...

Page 19: ...ntal frame tube 6 With the door in position secure it to the doorframe tubes using Tek screws and fender washers inserted from the outside through the doorframe and into the doorframe tubes To better show the door and end wall framing the end panel is not shown in the above diagram 7 After the front end wall is completed repeat the procedure for the back end wall NOTE When inserting the end frame ...

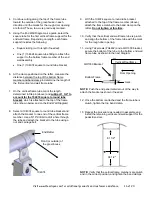
Page 20: ...s for the cover conduit and assemble them as needed NOTE The cover conduit assemblies are identical to the purlins and frame conduit assembled earlier and attached to the frame These cover conduits are inserted into the pockets sewn into the main cover The conduits are used to tighten and secure the main cover 3 After assembling the cover conduits locate the main cover and unfold it on a clean smo...

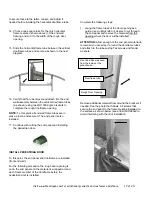
Page 21: ... this time Diagram may show a slightly different application 10 Place the D Ring and straps on the ground next to the rafter they will be attached to The D Rings and straps are placed evenly along the same side of the frame In the above diagram D Rings and straps are attached on the rafters identified by the arrows 11 On the side where the D Rings and straps are located lift the cover skirt and cu...

Page 22: ...tly tighten NOTE It may be necessary to remove excess strap if it binds up in the ratchet The above diagram is used for illustration only It shows a different but similar greenhouse frame 17 Repeat the steps for the remaining ratchets 18 Using additional help if needed tighten the main cover beginning with the ratchets along the side of the greenhouse frame 19 After the side ratchets are tightened...

Page 23: ...objects that can accumulate on the greenhouse Use tools that will not damage the cover when removing debris Remove snow to prevent excess accumulation Use tools that will not damage the cover when removing snow Check the contents of the shelter to verify that nothing is touching the cover that could cause damage If the shelter is moved inspect all parts and connections before using Depending on th...

Page 24: ...ront and Back End Wall Frame Diagram 16 Round Pro 16 Center to Center 81 1 2 36 1 2 Inside rough door dimensions are shown Visit www ClearSpan com for additional products and customer assistance 23 of 24 ...

Page 25: ...Pro Greenhouse 16 Round Style 104881 16 W x 8 H x 16 L 104882 16 W x 8 H x 20 L 103557 16 W x 8 H x 24 L Visit www ClearSpan com for additional products and customer assistance 24 of 24 ...

Reviews: