CLEARSPAN
™
VALUE LINE
14
Revision date: 03.10.08
END CONDUIT ASSEMBLY
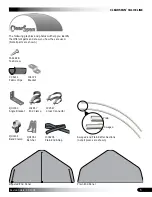
Gather the parts:
Pipe 1.315'' x 45.5'' plain
Pipe 1.315'' x 75'' swaged
Duct tape
Tek screws
Complete the following steps:
Locate the end conduit pipes. Each end conduit
consists of three (3) 75” pipe and one (1) 45.5” pipe.
Two (2) end conduits are required.
Assemble an end conduit by connecting three (3)
swaged pipes and one (1) plain pipe.
Secure each joint using Tek screws and tape over the
Tek screws to protect the end panel.
•
•
•
•
1.
2.
3.
Repeat assembly for the remaining end conduit.
4.
PREPARE END PANELS
CAUTION:
To prevent damage, do not install end
panels on a windy day.
Gather the parts:
End panel solid (plain)
End panel 3-zip (zippered)
End conduit assemblies (2)
QH1330 Angled brackets
Tek screws
Assembly Procedure:
Locate the end panels, unfold each panel at the base
of the assembled frame (where they will be installed)
with the inside surface facing up.
•
•
•
•
•
1.
On the zippered end panel, insert the end conduit
through the two side panels of the end panel (as shown
below) and
not through the door sections
.
2.
End Conduit
through Side
Panel
End Conduit
through Side
Panel
ATTACH END CONDUIT ASSEMBLIES
Using two (2) QH1330 angled brackets, secure one
(1) angled bracket to each end of the end conduit and
secure the conduit to the legs of the end rafter. See the
following diagram.
1.
NOTE:
It may be necessary to cut the panel to attach
the bracket to the end panel conduit and to the end
rafter leg.
Repeat the steps for the remaining end panel.
Attach the end panels to the end rafters as described in
the next procedure.
2.
3.
End Conduit
Tek screw
End panel not
shown.
Angled Bracket
Slide the remaining end conduit assembly into the hem
at the bottom of the solid (plain) end panel.
Continue with the next procedure.
3.
4.


