background image

13

Revision date: 08.08.14

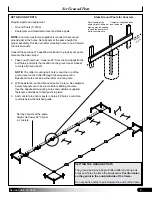
Finished Grade

Rope or 

Cable

Frame Assembly

FRAME ASSEMBLY

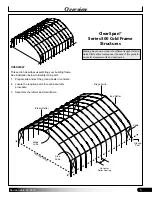
Use the diagrams and information that follows to assemble the main frame.

ATTENTION:

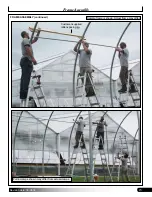
 Rafters are heavy. 

Always lift rafter from two separate points to prevent damage and injury.


Examine the site to determine the best way to move the rafters into position and to set them onto the ends of each set 

of ground posts. Do not set rafters into position until the ground post concrete has set.

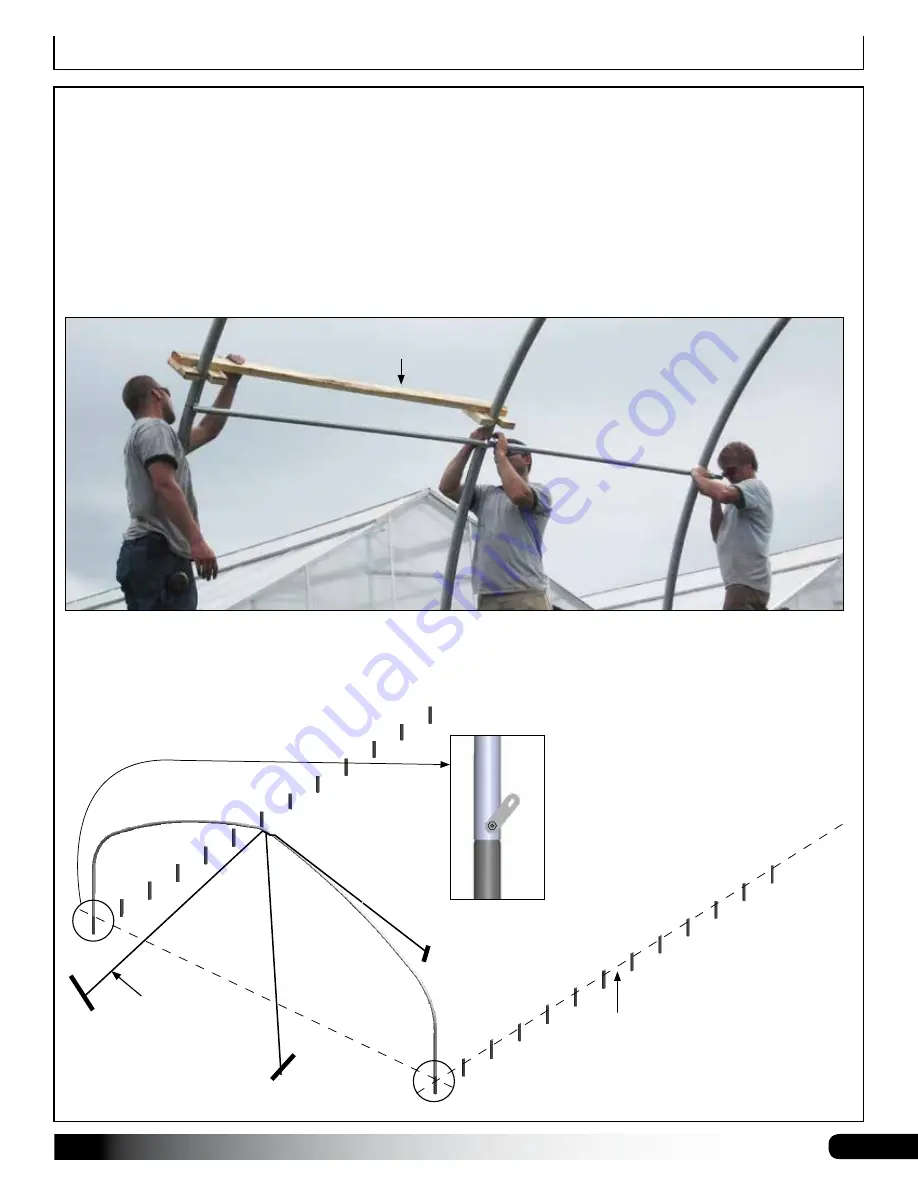
Optional, but recommended—especially for long buildings: Build a Rafter-Spacing Jig. (Customer supplies materials.)

A spacing jig saves time and helps to evenly space the rafters. Jig sets the on-center spacing of rafters. Examine the 

photo below and use it to build a jig to space rafters during purlin installation. Use 2" x 4" lumber and wood fasteners. 

Customer-supplied 

rafter-spacing jig.

ATTENTION:

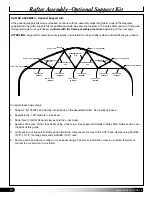
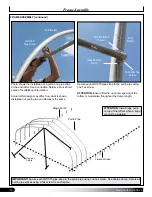
 Anchor the first rafter in place using bracing, rope/cable, or a lift. 

Do not allow the first rafter to stand 

without bracing until additional rafters are set and purlins are installed

.

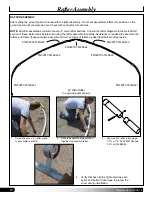
Connect rafters to ground posts using 105370B (1/2" x 4-1/2") bolts and FALB08B nuts. 

Position nuts to the inside.

IMPORTANT:

 Plumb the end rafter before 

bracing it in place and installing other rafters.

ATTENTION:

 Before adding 

the nut to the 1/2" bolt, slide a 

PGBRKAAS01 cable bracket onto 

the bolt 

at each end rafter

. Then 

add the nut and tighten. See also 

the details on the next page.

Summary of Contents for 500 Cold Frame Series

Page 1: ...1 Revision date 08 08 14 2014 ClearSpan All Rights Reserved Reproduction is prohibited without permission Series 500 Cold Frame 42 Wide 42 Wide Series 500 Cold Frame All Standard Lengths ...

Page 2: ...re preparing the site setting ground posts if equipped or anchoring the structure Location should be away from structures that could cause snow to drift on or around the building Do not position the structure where large loads such as snow and ice large tree branches or other overhead obstacles could fall Always check local building codes before you begin and follow codes as instructed SITE After ...

Page 3: ... Complete and return all warranty information as instructed if present REQUIRED TOOLS The following list identifies the main tools needed to assemble the shelter Additional tools and supports may be needed depending on the structure location and application Tape measure or measuring device and marker to mark locations on the pipes and rafters Variable speed drills and impact drivers Cordless with ...

Page 4: ... repair Replace all damaged or broken components immediately Check connections and all fasteners to verify that they remain tight and in good condition Do not climb or stand on the building at anytime Inspect the anchoring system to verify that all components remain tight and in good condition Remove debris and objects that accumulate on the building Use tools that will not damage the cover if equ...

Page 5: ...ection describes assembling your building frame See illustration below to identify main parts 1 Prepare site and set the ground posts in concrete 2 Locate the required parts for each assembly procedure 3 Assemble the rafters and main frame Finished Grade End Rafter Interior Rafter Ridge Purlin Cable Ground Post On Center Rafter Spacing Side Purlin Ridge Purlin ClearSpan Series 500 Cold Frame Struc...

Page 6: ...ioned drive in a stake and string a line the exact width of the building and stake in place Width of the rafter is measured from center to center of the rafter pipes ground posts 2 After the first corner stake is in place string a line the width of the building center to center and drive the second corner stake into the ground 3 String a line at least as long as the building 90 from the line betwe...

Page 7: ... the ground Doing so will damage the swaged end making it difficult if not impossible to set rafter onto the posts during frame assembly Complete these steps 1 Stake the outline of the building using string line and batter boards Set batter boards 3 back from the building corners Check to ensure that the building layout is square Cover or panels if equipped will not install properly if the buildin...

Page 8: ...12 Set all ground posts 24 in concrete Consult local building codes and qualified contractors for additional details when digging the post holes and setting the ground posts Follow established codes and construction practices CONCRETE PIER 12 Optional Before setting the posts drill a hole through the bottom of each ground post 2 3 from the end and insert a 6 8 length of rebar through it This will ...

Page 9: ...on Baseboard holes are below the rafter mounting hole 2 With assistance set and brace all posts in place See diagram below All posts are to be plumb before adding concrete Use the baseboard mounting holes and customer supplied fasteners and stakes to hold posts in place 3 Add concrete to anchor posts in holes Fill hole so concrete remains below the finished grade Stake Ground Posts for Concrete Fi...

Page 10: ...ly for details Assistance is required to assemble the rafters and frame If space allows assemble all main sections of rafters as described below and set aside 1 Select the seven 7 rafter pipes to assemble one rafter 3 Secure each rafter joint using a 1 2 x 4 1 2 bolt 105370B and 1 2 nut FALB08B 2 Slide the separate pipe sections together to assemble rafter 4 Verify that each bolt is tight and wrap...

Page 11: ...fter and mark the location 6 Loosely install QH1070 clamps Tighten clamps after purlins are installed See connection details in the Quick Start section at the back of this manual 4 2 5 8 4 7 3 16 ATTENTION Measure from the mounting bolt to the rafter and mark the location QH1070 Pipe Strap QH1070 Pipe Strap 1 2 Mounting Bolt at Rafter Splice 1 2 Mounting Bolt at Rafter Splice See full Rafter Profi...

Page 12: ...e 3 QH1404 band clamps onto the cross beam 4 Secure each splice of the cross beam using a Tek screw See support kit details in Quick Start Guide section near the back of this guide 5 Verify position of support kit clamps and install web components Secure to the 3 50 band clamps using FAH322 5 16 x 3 1 2 carriage bolts and FALB32B 5 16 nuts 6 Secure each band clamp to rafter or cross beam using a T...

Page 13: ...lps to evenly space the rafters Jig sets the on center spacing of rafters Examine the photo below and use it to build a jig to space rafters during purlin installation Use 2 x 4 lumber and wood fasteners Customer supplied rafter spacing jig ATTENTION Anchor the first rafter in place using bracing rope cable or a lift Do not allow the first rafter to stand without bracing until additional rafters a...

Page 14: ...the end bays only attach two cable brackets to each rafter Use rafter mounting bolts to secure brackets Close up shows the installed cable brackets Attach brackets to inside surface of the first two rafters at each end of the frame during assembly Install 1 2 nuts to the inside of the frame building Cable assembly and installation is shown later in this guide FRAME ASSEMBLY continued Finished Grad...

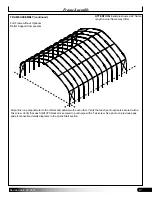
Page 15: ...15 Revision date 08 08 14 Frame Assembly FRAME ASSEMBLY continued Customer supplied rafter spacing jig Sample frame is shown Actual frame may differ Purlin clamps shown may differ from actual clamps ...

Page 16: ... section for additional information Actual rafter design may differ from what is shown Installation of purlin pipe and clamps is the same QH1070 Pipe Strap Purlin End Rafter FA4482B Tek Screw FA4482B Tek Screw Purlin FA4482B Tek Screw End Rafter IMPORTANT Secure each QH1070 pipe strap to the purlin pipe using one Tek screw See photos above Secure all purlin pipe splices using a Tek screw for each ...

Page 17: ...ws a 48 frame length Actual frame may differ All purlins run perpendicular to the rafters and parallel with each other Verify that each purlin splice is secured with a Tek screw Verify that each QH1070 bracket is secured to purlin pipe with a Tek screw See photo on previous page and all connection details diagrams in the Quick Start section ...

Page 18: ...nue adding baseboards to complete the first run Splices are made between posts as shown in the drawing below Use a short section of baseboard to secure separate baseboards at a splice See diagram below Repeat steps to install the second run of baseboard on the remaining side of the frame NOTE The boards should be at ground level or slightly into grade to create a good seal between the board and fi...

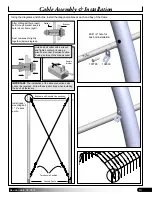
Page 19: ...drilling bolt hole insert bolt through bracket and into hole in door frame right Bracket Seat components tightly together below diagram Rafter IMPORTANT The installation of the blind connection bolts cannot be reversed Follow these instructions when installing the box bolt fasteners Drill 1 2 hole for box bolt installation 108503 107795 Purlin Cable Assembly Installation Install upper mounting bol...

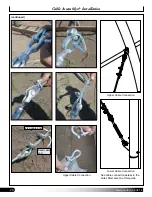
Page 20: ...e 08 08 14 Live cable end Dead cable end Cable Assembly Installation continued Upper Cable Connection Lower Cable Connection See cable connection details in the Quick Start section of this guide Upper Cable Connection ...

Page 21: ...nnel running along the sides of the frame either near ground level as shown in the example below or a few feet above depending on application and personal preference Attach u channel to the top of each end rafter Sample building shows an optional end wall kit Spring wire used to secure film cover in u channel Diagrams below show attaching u channel to the end rafter and to the customer supplied ba...

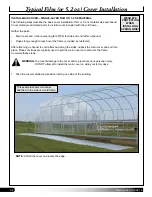
Page 22: ...fter attaching u channel to end rafters and along the sides unpack the main cover and pull into place Ropes or straps are typically used to pull the main cover onto and over the frame Complete these steps 1 Take the cover material and position it along one side of the building NOTE Unfold the cover and locate the edge Typical Film or 5 2 oz Cover Installation WARNING To prevent damage to the cover...

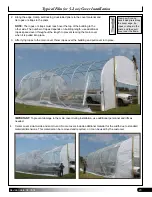
Page 23: ...ace IMPORTANT To prevent damage to the main cover during installation use additional personnel and lifts as needed 4 Center cover side to side and end to end Some covers include additional material for the width due to standard material dimensions This material can be removed and recycled or it can be used by the customer Clamp self locking duck billed pliers along the cover edge tie ropes or stra...

Page 24: ...the cover material is cut longer wider than required to cover the building For easier anchoring allow approximately 10 to extend past the edge of the end rafter as the cover is anchored Remove the ropes after the cover is secure 6 Continue down both edges of first end rafter until main cover is secured to the first end rafter 7 Move to the other end pull cover tight and repeat steps to secure cove...

Page 25: ...25 Revision date 08 08 14 Quick Start Guide Frame length of your building may differ from what is shown Finished Grade 42 Wide Frame ...

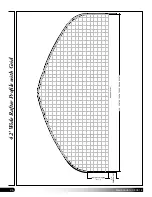
Page 26: ...26 Revision date 08 08 14 42 Wide Rafter Profile with Grid 42 0 CENTER TO CENTER OF GROUND POSTS 5 7 1 2 SIDEWALL HEIGHT 2 0 EMBEDMENT GROUND LEVEL ...

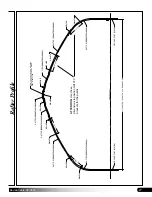
Page 27: ...C3514S421 RAFTER PG500TC3514S421 RAFTER PG500TC3514S422 RAFTER PG500TC3514S422 RAFTER PG500TC3514S423 SPLICE RAFTER PG500TC3514S423 SPLICE SPLICE SPLICE SPLICE SPLICE PG500TC3514S424 RAFTER NOTE PEAK PURLIN TO BE MOUNTED ON TOP OF STRUCTURE IF A RIDGE VENT IS INSTALLED 4 2 5 8 4 7 3 1 6 4 2 5 8 4 7 3 1 6 ATTENTION Use these dimensions to position QH1070 brackets for the purlins ...

Page 28: ...ROLL UP OR DROP DOWN CONDUIT ASSEMBLY 131S075 7 CUT TO FIT PURLINS 131S147 PURLINS 131S147 PURLINS 131S147 36 0 CENTER TO CENTER OF GROUND POSTS SPACING 4 0 RAFTER TYP GROUND LEVEL ATTENTION Baseboard and related fasteners are supplied by the customer ...

Page 29: ... 131S147 PURLINS 131S147 48 0 CENTER TO CENTER OF GROUND POSTS SPACING 4 0 RAFTER TYP GROUND LEVEL ROLL UP OR DROP DOWN CONDUIT ASSEMBLY 131S075 9 CUT TO FIT Side Profile 48 Length ATTENTION Baseboard and related fasteners are supplied by the customer ...

Page 30: ...OLL UP OR DROP DOWN CONDUIT ASSEMBLY 131S075 11 CUT TO FIT PURLINS 131S147 PURLINS 131S147 PURLINS 131S147 60 0 CENTER TO CENTER OF GROUND POSTS SPACING 4 0 RAFTER TYP GROUND LEVEL ATTENTION Baseboard and related fasteners are supplied by the customer ...

Page 31: ...OLL UP OR DROP DOWN CONDUIT ASSEMBLY 131S075 13 CUT TO FIT PURLINS 131S147 PURLINS 131S147 PURLINS 131S147 72 0 CENTER TO CENTER OF GROUND POSTS SPACING 4 0 RAFTER TYP GROUND LEVEL ATTENTION Baseboard and related fasteners are supplied by the customer ...

Page 32: ...6 0 ROLL UP OR DROP DOWN CONDUIT ASSEMBLY 131S075 17 CUT TO FIT PURLINS 131S147 PURLINS 131S147 PURLINS 131S147 CENTER TO CENTER OF GROUND POSTS SPACING 4 0 RAFTER TYP GROUND LEVEL ATTENTION Baseboard and related fasteners are supplied by the customer ...

Page 33: ...R TO GROUND POST VIEW 1 CONNECTION CABLE TO GROUND POST VIEW 5 CABLE ASSEMBLY CONNECTION VIEW 6 PURLIN SPLICE CONNECTION CABLE TO RAFTER CONNECTION VIEW 3 VIEW 4 PURLIN CONNECTION VIEW 7 VIEW 2 RAFTER SPLICE CONNECTION F i n i s h e d G r a d e ...

Page 34: ...8503 1X 1 4 BOX BOLT 1X 1 4 SHACKLE FIELD DRILL HOLE TO 1 2 VIEW 6 CABLE TO RAFTER CONNECTION RAFTER 1X 1 2 NUT 1X 1 2 X 4 1 2 HEX BOLT GROUND POST VIEW 1 RAFTER TO GROUND POST CONNECTION PURLIN 3X 14 X 1 TEK SCREW PIPE STRAP QH1070 TYP RAFTER RAFTER RAFTER 1X 1 2 X 4 1 2 HEX BOLT 1X 1 2 NUT VIEW 2 RAFTER SPLICE CONNECTION 1 2 TURNBUCKLE 104189 1 4 CABLE CLAMPS AS1004 1 4 CABLE AR1060 1 4 THIMBLE ...

Page 35: ...AND CLAMP 105238 BAND CLAMP 105238 BAND CLAMP 105238 BAND CLAMP 105238 BAND CLAMP 190S099 CROSS BEAM 190S099 CROSS BEAM 190S099 CROSS BEAM 190S099 CROSS BEAM WEB WEB ST09275D13G17S1 WEB ST09275D13G17S1 WEB ST06450D13G17S1 WEB 190P036 CROSS BEAM 42 0 CENTER TO CENTER OF GROUND POSTS GROUND LEVEL 42 Rafter Profile with Optional Support Kit ...

Page 36: ...36 Revision date 08 08 14 DETAIL A DETAIL C DETAIL B DETAIL D GROUND LEVEL 42 Rafter Profile with Support Kit ...

Page 37: ...TAIL C WEB TO RAFTER CONNECTION DETAIL D WEB TO CROSS BEAM CONNECTION RAFTER CHORD 2X 14 X 1 TEK SCREW BAND CLAMP 105238 CROSS BEAM 4X 14 X 1 TEK SCREW RAFTER CHORD BAND CLAMP 105238 CROSS BEAM 1X 14 X 1 TEK SCREW CROSS BEAM WEB WEB QH1404 CROSS BEAM BAND CLAMP 1X 14 X 1 TEK SCREW FASTENERS FAH322 5 16 x 3 1 2 carriage bolt FALB32B 5 16 nut ...

Reviews: