34
Revision date: 09.18.14
CLEARSPAN
™
GRO-MAX GOTHIC HIGH TUNNELS
TWIST-OF-THE-WRIST ASSEMBLY (continued)
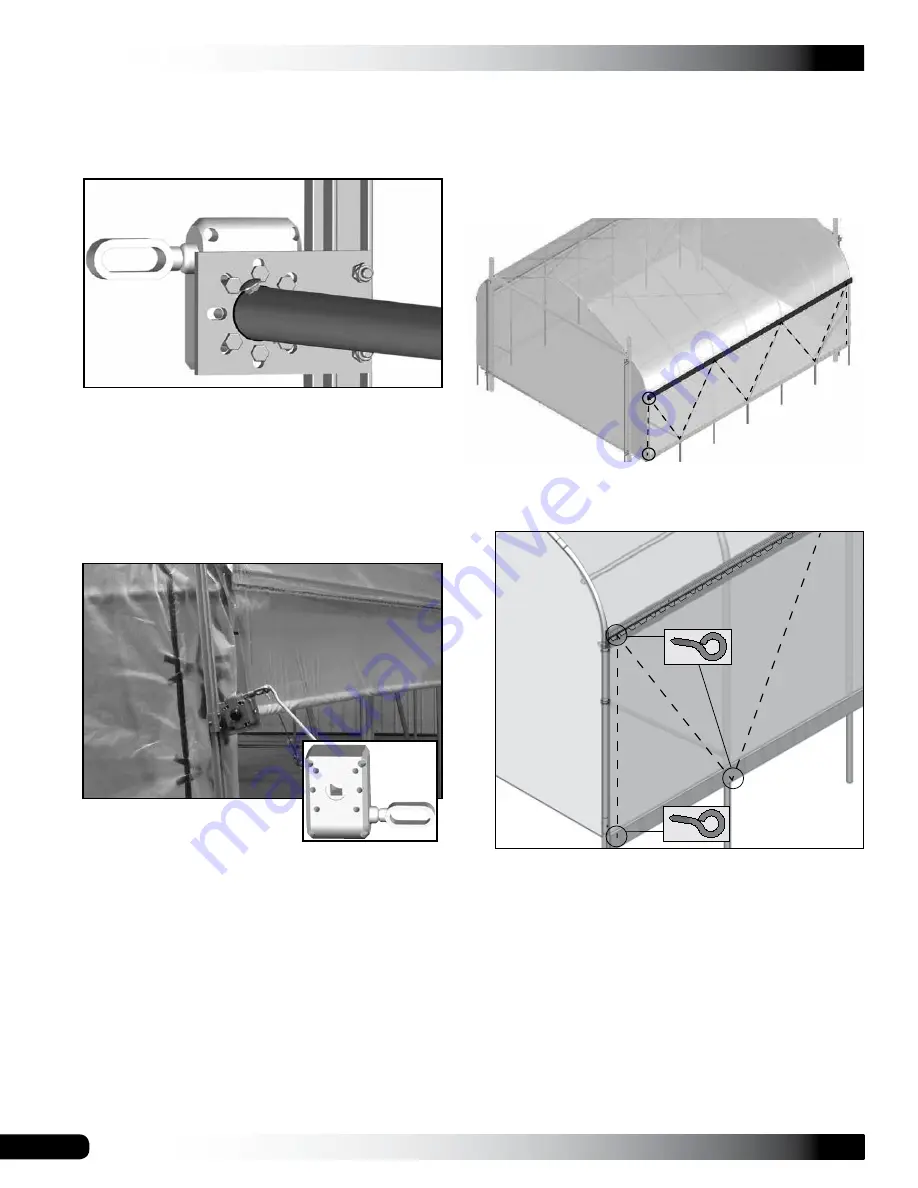
13. Slide the Twist-of-the-Wrist assembly onto the
aluminum channel from the ground end. (This is the
free end of the channel.)
14. Using the conduit as a guide, adjust the aluminum
channel on the threaded rod so the channel runs
parallel with the end rafter. In some instances, you
may need to trim the conduit.
15. Attach the roll-up conduit to the square shaft of the
assembly by inserting a 1/4" x 2" bolt (FAH005B)
through the hole in the conduit and tubing adapter.
Tighten the nut.
16. Test the operation of the Twist-of-the-Wrist assembly
and repeat the steps for the remaining assembly.
NOTE:
If the cover rolls in the desired direction, but
you want to turn the crank in the opposite direction for
the same result, unbolt, reposition the gearbox, and
remount it
on the same side of the mounting bracket
.
17. Repeat the steps to install the Twist-of-the-Wrist
Assembly for the remaining roll-up side curtain.
18. Once both assemblies are installed, continue with the
installation of the anti-billow rope.
Photo shows a different model and
is used for illustration purposes only.
INSTALL THE ANTI-BILLOW ROPES
The anti-billow ropes secure curtains when they are fully
or partially open. Using the diagrams below, complete the
anti-billow rope installation.
ATTENTION: INSTALL THE ANTI-BILLOW ROPE IN
SHORT SECTIONS ALONG EACH SIDE TO KEEP THE
CURTAIN SECURE IN CASE ONE ROPE BREAKS.
1. Beginning at
one end rafter
, take two (2) eye screws
and align and attach one to the baseboard and one to
the ribbon board.
2. Using the sample diagrams as guides, move to the next
rafter and attach the eye screw to either the baseboard
or the ribbon board, depending on the pattern.
3. Continue installing the eye screws until you reach the
other end rafter and finish the installation by repeating
Step 1. Install eye screws for the remaining side.
4. Install the anti-billow rope
in short lengths along each
side
. Thread the free end of the rope through the end
rafter eye screws and through the eye screws at two to
three interior rafters. Cut the rope and tie the ends to
the eye screws.
5. Repeat this pattern of
installing short rope lengths
for the remainder of the first side and the other side.
Dashed line shows position
of anti-billow ropes.
ROPE
#1
ROPE
#3
ROPE
#2


