
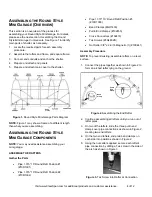
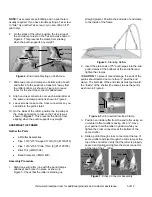
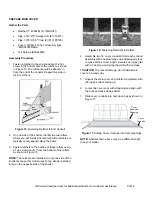


ATTACH END CONDUIT ASSEMBLIES
1. Place the end conduits of end panels in position.
2. Insert the bottom of the end rafters into the short tee
of the end conduit.
3. Tighten the Allen screws to secure the short tee to
the end rafter.
Figure 13.
Attaching the End Conduit
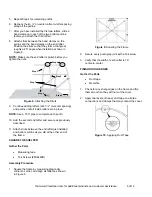
ANCHOR THE SHELTER
At this point, you must anchor the shelter. Consult the
MUST READ document for anchoring information and
suggestions. Please call customer service at
1-800-245-9881 for additional anchoring information.
! CAUTION:
The anchor assembly is an integral part of
the shelter construction. Improper anchoring can cause
shelter instability and failure of the structure to perform
as designed. Failing to anchor the shelter properly
will
void the manufacturer's warranty
and can cause serious
injury and damage.
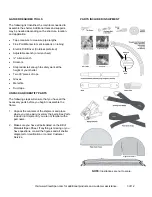
ATTACH END PANEL ASSEMBLIES
Gather the Parts
•
End Panel Assemblies (2)
•
Fabric Clips (#CC6212)
•
Tek Screws (#FA4482B)
•
Measuring Tape
•
Scissors
Assembly Procedure
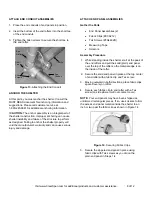
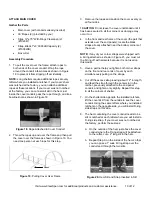
1. While standing inside the shelter, start at the peak of
the end rafters and pull the solid (plain) end panel
over the top of the rafter so the material edge is on
the inside of the rafter.
2. Secure the solid end panel in place at the top center
of end rafter with a fabric clip and Tek screw.
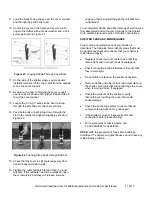
3. Moving outward in both directions, place fabric clips
spaced evenly on rafter.
4. Secure each fabric clip to end rafter with a Tek
screw (on side where it will not contact cover).
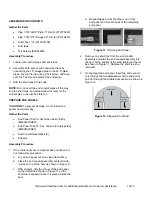
NOTE:
Your end panels may have been shipped as
untrimmed rectangular pieces. If so, use scissors to trim
the excess end panel material inside the shelter to an
inch or two past the fabric clip as shown in Figure 14.
Figure 14.
Securing Fabric Clips
5. Secure the zippered end panel in place using
fabric clips with Tek screws as you did on the
plain end panel in Steps 1-4.
End
Rafter
Purlin
Allen
Screws
End
Conduit
Short
Tee
Visit www.ClearSpan.com for additional products and customer assistance.
8 of 12


