38
Revision date: 02.10.10
INSTALL THE DROP-DOWN PANEL (continued)
Move to the axle and drive two (2) FA4482 Tek screws
8.
with neo-bonded washers (102921) into the axle
conduit where the cord is located.
Do not fully seat
the Tek screws to the conduit.
Allow space to remain
between the washer and conduit.
Verify that the panel conduit remains against the
9.
baseboard and pull the slack from the cord.
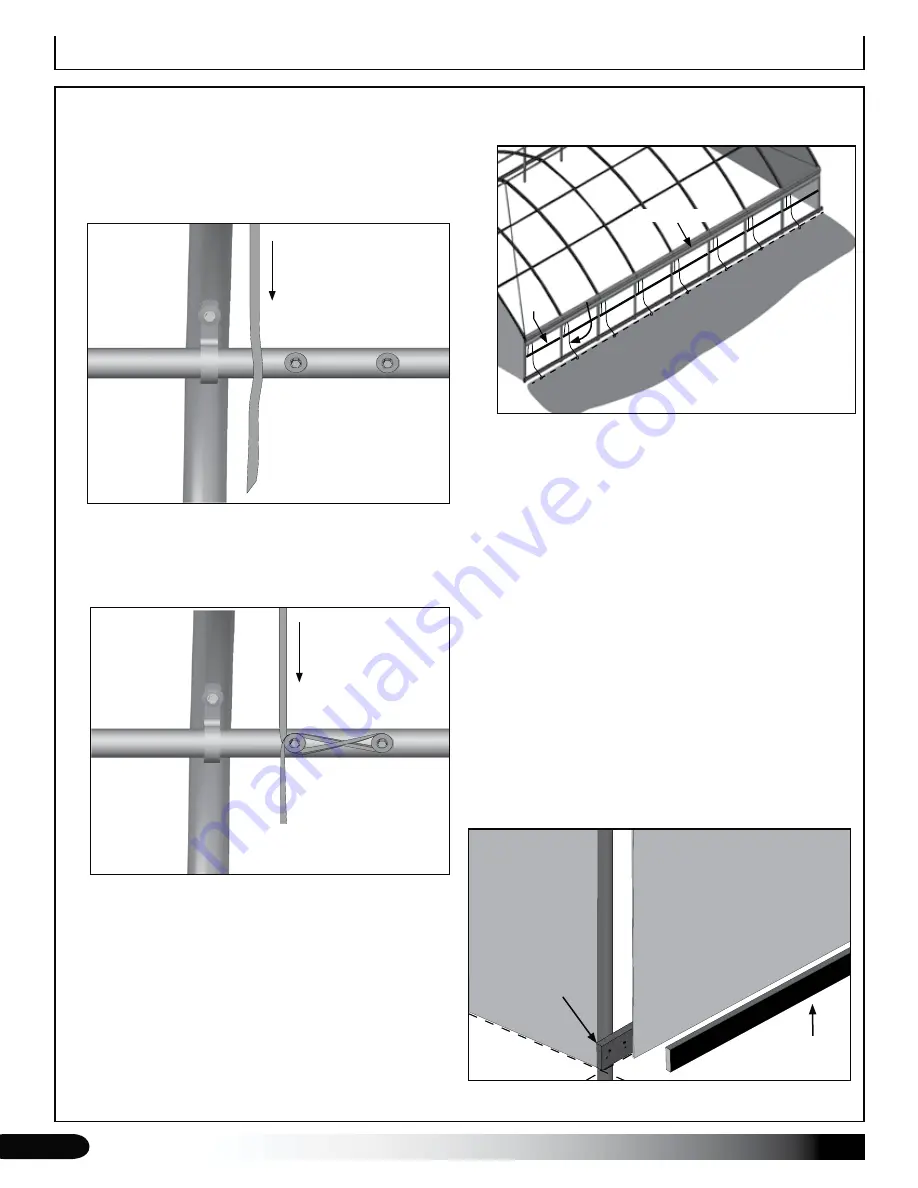
Weave the cord around the Tek screws as shown and
10.
tighten the screws to secure the cord to the axle.
Move to the next pulley position and repeat the steps
11.
to measure, cut, and attach another cord to the panel
and axle conduit.
ATTENTION:
If the cord length was correct for the
first, cut additional cords to the same length. To
ensure that the panel remains level during operation,
verify that additional cords are wrapped around the
axle conduit in the same direction and manner as the
first cord.
Repeat the above steps until all cords are attached to
12.
the first panel along one side of the shelter.
Diagram shows cords attached to the panel conduit
and to the axle. Dashed line shows the position of the
panel conduit.
Continue by attaching the lower panel edge to the
13.
baseboard for the first panel installation.
Attach Lower Edge of the Panel to Baseboard
After tying all cords to the panel and axle conduits for the
first panel assembly, secure the free edge (bottom) of the
panel to the baseboard.
Use customer-supplied dimension lumber as a retaining
board for the lower edge of the panel. The retaining board
must be at least 1" x 2" to adequately secure the panel to
the baseboard. See the diagram below for an example.
View shown from outside the shelter.
Ground Level
Panel
Optional
End Panel
Retaining Board
(minimum 1" x 2")
Baseboard
Drop-Down Sides Installation
Panel
Axle
Panel Pocket with Conduit
Cord
Ribbon Board
From
pulley
From
pulley


