background image


ООО "Бассейн-Сервис" – продажа и монтаж оборудования для бассейнов.


Тел: 8 (800) 700-65-50

www.bassein-servis.ru


INSTALLATION PROCEDURES


TOOLS AND MATERIALS REQUIRED


Channel lock wrench 

Hacksaw or backsaw


Screws & anchors 

Utility knife


Crescent Wrench 

Teflon tape 

Flexible conduit 

Hammer 

Screwdriver 

PVC cleaner/primer 

1/2" straight conduit connector 

Voltage Meter 

Drill & Drill Bit 

PVC cement 

wire stripper


COMPONENTS OF THE SPA-1R IONIZER


Spa Unit Control Box


1 1/2" long set of electrodes mounted in a 2" PVC threaded plug. 
2 - 2" x 1 1/2" PVC reducer bushings


2" tee, slip/slip/threaded


Set of Mounting Flanges & screws 
Copper-Ion Test Kit


Warranty Card


Quick Chart (blue sheet) 
Installation & Spa Care Manual


MOUNTING THE FLOW CELL TEE


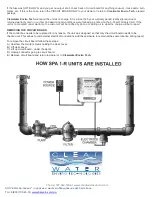
1.) Locate a space for the electrode chamber (2" tee, slip/slip/threaded). The tee should be installed after the pump and either 
before or after the filter. After the filter is preferred, but it will work fine if installed before the filter.


2.) Turn off the pump and close all valves. Disconnect all sources of power going to the timer or pump.


3.) Using a hacksaw or backsaw, cut a 4-inch gap in the section of pipe if 1 1/2" pipe exists, or cut out a 3" gap if a 2-inch pipe 
exists.


4.) Sand the burrs off the pipe. Dry the pipe and clean the ends with PVC primer/cleaner.


5.) If 1 1/2" pipe exists, cement the 2" to 1 1/2" reducer bushings into the tee (included with the purifier).


6.) The tee should be mounted on the return line after the pump and mounted slightly downward so that no air-pocket can 
form in the electrode chamber. If there is not enough "give" to allow insertion of the tee, install unions.


7.) Screw the electrodes into the tee. Generously wrap teflon tape around the electrodes several times before installing to 
prevent leaks.


INSTALLING THE SPA CONTROL BOX - VOLTAGE SETTING


1.) Before mounting the spa control box, you must determine the voltage at the installation site. By using your voltage meter, 
determine if the voltage is 115 V or 230 V.


ALL UNITS ARE FACTORY SET AT 230 V. IF THE INSTALLATION CALLS FOR A 115 V SETTING YOU WILL NEED TO 
MAKE AN ADJUSTMENT TO THE UNIT.


A.) Unscrew the two (2) screws holding the clear cover. 
B.) Lift up the clear cover.


C.) There is no need to disconnect the cover.


D.) Lift printed circuit board up and turn over. Do not disconnect any wires. Very important! 
E.) Locate switch on printed circuit board (below transformer) where 230-115 VAC is printed. 
F.) Flip switch to 115 V AC location.


G.) Place printed circuit board in place again. 
H.) Close clear cover

.


I.) Tighten in the two (2) screws to hold collar in place.


TO KEEP THE CLEAR LID FROM SCRATCHING, KEEP PLASTIC SHEET ON TILL INSTALLED.


2.) Mount the brackets to the back of the spa control box. Use enclosed screws.


3.) Mount the spa control box to the wall allowing for the power cable wire to reach the source of power, and the electrode 
wire to reach the electrode chamber. Use proper anchors and screws to mount.


4.) Make sure the surface is flat, firm and as close to the power source as possible.


5.) Connect the two-conductor gray wire coming from the purifier to the electrode's two terminals. It does not matter which 
wire is connected to the terminals.


Summary of Contents for MineralPURE SPA-1R

Page 1: ...с продажа и монтаж оборудования для бассейнов Тел 8 800 700 65 50 www bassein servis ru INSTALLATION SPA CARE MANUAL MODEL SPA 1R Outdoor Unit FOR ALLSPAS UP TO 2 000 GALLONS Phone 727 562 5186 www clearwater enviro com ...

Page 2: ...m CHLORINE OR BROMINE Always make sure there is some chlorine or bromine in the spa when first starting up the system as it may take several hours to fully ionize a spa Never add granular chlorine like HTH directly into the spa s water with the ionizer on It MUST be dissolved first or poured directly into the skimmer with the pump on Always make sure the water is clear before installing the ionize...

Page 3: ...ScaleBlaster to the system CYANURIC ACID Cyanuric acid is not required with the Clearwater Spa Purifier If the cyanuric acid level is over 150 ppm the spa should be partially drained and refilled with fresh water TOTAL DISSOLVED SOLIDS The Clearwater Spa Purifier requires some conductivity in the water for ionization to take place For the system to perform on maximum capabilities the TDS needs to ...

Page 4: ...If it is from copper pipe the copper was leached from a low pH of 7 0 or less Make sure the pH is maintained over 7 0 to prevent further copper leaching from the pipes You will only find copper piping near a heater or on very old houses If the source is from a copper based algaecide you can try shocking the spa with a lot of liquid chlorine to burn it out or simply start the ionizer up very low an...

Page 5: ... downward so that no air pocket can form in the electrode chamber If there is not enough give to allow insertion of the tee install unions 7 Screw the electrodes into the tee Generously wrap teflon tape around the electrodes several times before installing to prevent leaks INSTALLING THE SPA CONTROL BOX VOLTAGE SETTING 1 Before mounting the spa control box you must determine the voltage at the ins...

Page 6: ...his is all complete open up all valves and turn the power on Check for water leaks and all electrical connections for proper and firm connections SETTING THE CONTROL BOX Turn the control knob in a clockwise direction to turn the unit on To get the spa ionized as quickly as possible turn the control knob to Max so that you obtain the highest output With the proper pH readings the spa should be full...

Page 7: ...pa was just shocked with a lot of chlorine or bromine this can give you an improper test kit reading Always test the copper ion level before adding anything to the spa 9 Metal out removers As mentioned in the Sequestering Agent Level section in this booklet there are a few metal out removers or stain removers that can tie up the copper ion levels Test with a Sequestering Agent test kit or send wat...

Page 8: ... noted on the 5 Year Warranty Card If the unit is not covered under warranty the customer will be notified by phone or writing as to what the charge will be to repair REMOVING THE CIRCUIT BOARD If the control box needs to be replaced for any reason the unit was designed so that only the circuit board needs to be checked out This allows for all external electrical connections and the enclosure to r...

Reviews: