background image

8

STEPS FOR A SUCCESSFUL INSTALLATION:

1. PREPARING FOR YOUR SPA

Prior to receiving your new spa, you will want to prepare 

an area for installation.  You will need to arrange to have 

your spa placed in the desired location and prepare the 

location  for  the  connection  of  the  electrical  circuits.  In 

most  cities,  permits  are  required  for  the  installation  of 

electrical circuits.

Make  certain  to  review  the  path  that  your  spa  will  take 

through your property along with the size of the spa to 

ensure  you  have  enough  space.    If  there  are  stairs  or 

other obstacles that the spa will have to travel over to get 

to the site, additional clearance may be required.

We have listed some key things to consider while installing your spa that will help 

eliminate some of the unforeseeable situations that could hinder your spa 

installation.

Important
installation
highlights!


• Avoid installing too close to a

ny

 structure.

• Leave enough room around all sides to allow access to service


panels.

Install on a level, load-bearing surface.

Install at least 5 feet from ground conductors.

Use non-conductive conduit for all wiring.

If installing below the surface of a deck, leave enough room  to access 

and remove service panels.

We recommend a  level 4" thick concrete pad if you are installing on land (rather 

than on a deck or platform). The dimensions of the pad should at least match the 

outside dimensions of your spa. You should also accommodate for any steps or 

obstructions around the spa. Please allow a few days for curing the cement when 

scheduling your delivery date.

Balconies and decks are not recommended for spa installations; but if you choose 

one as your location, keep in mind that a large filled spa with six adults can weigh 

as much as three tons. Balconies and decks must be constructed to current state 

and local building codes and must support at least 100 pounds per square foot.

If you are building a deck around your spa, be sure that it does not cover up any 

of the service panels.  If you are building stairs for the spa, it is recommended that 

they be installed in such a way that they can be moved out of the way if access to 

the service panels is required.

The most important thing to remember is to plan your installation so that it will 

be easy to move the spa from the delivery truck to the installation site.  Spas are 

typically transported on a mover’s dolly lying on their side.  Check for adequate 

gate clearance and remove any fence panels if necessary to allow access to the 

installation site.

Summary of Contents for Beachcraft Series

Page 1: ...Clearwater Spas SPA MANUAL 50 HZ Resort Series Beachcraft Series XS Series P O Box 2140 Woodinville WA 98072 www clearwaterspas com spa manual Euro 2 8 17 relax refresh renew...

Page 2: ...t notice Copyright Clearwater Spas 2014 All rights reserved Specifications may change without notice International products may be configured differently to meet local electrical requirements Copyrigh...

Page 3: ...OPSIDE CONTROL TURNING ON YOUR SPA 18 Topside Control Button Reference Display TP600 20 Topside Control Button Reference Display TP950 TP800 35 WATER PURITY FILTRATION 35 Keeping The Water Clean 35 Sp...

Page 4: ...pa Skirt 48 The Shell 48 Spa Cover 49 Winterizing 50 Draining The Spa 52 Energy Efficiency Green Technology 53 APPENDIX A 53 Troubleshooting 53 System Trouble 53 Controls 54 Pumps 54 Jets 54 Water 56...

Page 5: ...nual are important maintenance and start up procedures as well as safety precautions that must be followed to ensure the life of your spa and the safety of the people using it Failure to follow start...

Page 6: ...e GFCI does not perform correctly there may be a ground current flow ing indicating the possibility of electric shock Disconnect the power until the fault has been identified and corrected Electrical...

Page 7: ...nd knowledge unless they have been given supervision or instruction Children should be supervised to ensure that they do not play with the spa or use it without supervision Parts containing live elect...

Page 8: ...ve enough room to access and remove service panels We recommend a level 4 thick concrete pad if you are installing on land rather than on a deck or platform The dimensions of the pad should at least m...

Page 9: ...he circuit breaker in the sub panel 240 volt models Never let water into the sub panel 240 volt models or into the electrical outlet that your spa is plugged in to If you have 240 volt model the spa s...

Page 10: ...is the best for long term there are other options available as long as the surface is level prior to delivery The alternatives include 5 8 Minus Crushed Packed Rock or a deck that is rated for the loa...

Page 11: ...l panel Remember safety comes first for you and your customer Please take all necessary precautions before attempting any repairs Wiring checks are the first step to ensure safety and proper function...

Page 12: ...pping prob lems can be attributed to incorrect wiring of the R C D A clear understanding of the correct configuration is essential Please refer to the figure on page 15 as needed Wiring Check for R C...

Page 13: ...t The voltage should be 230V Probe the blue wire and the green ground wire The meter should read 0 V Probe the brown wire and the R C D neutral bar The voltage should read 230 V Recheck voltage under...

Page 14: ...Ground Blue Neutral Brown Hot Blue Neutral Green Yellow Ground Green Yellow Ground Brown Hot Spa System Box Detail Blue Neutral Brown Hot Grounding Lug Brown Hot 230 VAC Live Wire Neutral Ground Brow...

Page 15: ...r rating 2x16A max each phase line DUAL SERVICE FEED Setup 8 Programmation 8 Konfiguration 8 Pump 1 and Pump 2 are on line 2 Heater and Pump 3 and Pump 4 are on line 1 Pump 1 is on line 2 Heater and B...

Page 16: ...IMPORTANT Service must include a neutral wire with a line to neutral voltage of 230VAC BP systems automatically detect 50Hz vs 60Hz continued ELECTRICAL SERVICE CONFIGURATION OPTION For DIP Switch Co...

Page 17: ...e the filter compartment before filling with water Filling the spa through the filter housing will help to prevent air locks trapped pockets of air in pumps on start up Identify your filter housing an...

Page 18: ...on Cool or Warm will exit Priming Mode manually When Priming Mode ends the circulation pump will start However the temperature will not show for a few minutes Once the water temperature is recognized...

Page 19: ...t temperatures The High Range is indicated in the display and might be set be tween 80 F and 104 F The Low Range is indicated in the display and might be set between 50 F and 99 F Using the Low Range...

Page 20: ...e 1 TP950 control panel Spa Model Resort Series Signature Package U S Canada European Figure 2 TP800 control panel 2 pumps Spa Models Beachcraft Series Signature Package U S Canada Figure 3 TP800 cont...

Page 21: ...985_F 12 08 11 2 Manufactured under one or more of these patents U S Patents 5332944 5361215 5550753 5559720 5 883 459 6253227 6282370 6590188 6976052 6965815 7030343 7 417 834 b2 Canadian Patent 2342...

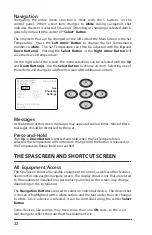
Page 22: ...emperature can then be adjusted with the up and down buttons Pressing the Select button or the Right Arrow button will save the new set temperature On the right side of the screen the menu selections...

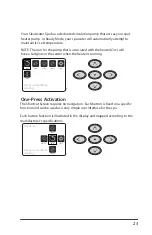
Page 23: ...led using the center Select Button Some devices like pumps may have more than one ON state so the icon will change to reflect the state that the equipment is in Below are some examples of 2 speed Pump...

Page 24: ...to the desired item on any Screen When the desired item is highlighted press the Select Button Press the button for that device while on the Shortcuts Screen if the device is one of the 4 functions a...

Page 25: ...ing during programmed filter cycles Since polling does not occur the temperature display may not show a current temperature until the heater pump has been running for a minute or two While Pump 1 High...

Page 26: ...k button on the Priming Mode Screen Note that if you do not manually exit the priming mode as described above the priming mode will be automatically terminated after 4 5 min utes Be sure that the pump...

Page 27: ...ling during filter cycles during freeze conditions or when another pump is on The specific Circulation Mode that is used has been determined by the Manufac turer and cannot be changed in the field Oth...

Page 28: ...will appear on the display if no Time of Day is set On the Settings Screen select the Time of Day line On the Time of Day screen simply navigate right and left to select the Hour Minutes AM PM and 12...

Page 29: ...tration Using the same navigation and adjustment as Setting the Time Filter Cycles are set using a start time and a duration Each setting can be adjusted in 15 minute increments The panel calculates t...

Page 30: ...that Filter Cycles are edited see page 10 Specific Buttons for Specific Devices If the panel has dedicated function buttons TP800 or the spa has an Auxiliary Panel s installed pressing those buttons w...

Page 31: ...ng All material copyright of Balboa Water Group Restricting Operation Unlocking An Unlock Sequence using the navigation buttons can be used from the Lock Screen The Unlock Sequence is the same for bot...

Page 32: ...and can be used to reset the automatic test feature If the GFCI Test Feature is reset the device will trip within 7 days See Page 16 Fault Log Back Entry 2 Message Code M026 1 Days Ago 2 21PM Rest Mod...

Page 33: ...CE Systems Only Displays a heater kilowatt rating as programmed into the control system software 1 3 or 3 6 Heater Type Displays a heater type ID number Dip Switch Settings Displays a number that repr...

Page 34: ...tems do not have an RCD Test Feature due to the nature of the electrical service Some UL registered systems do not have the GFCI Test Feature activated The end user must be trained how to properly tes...

Page 35: ...e and open it all the way to allow the tub to drain all the way Use a shop vac to remove any standing water and debris at the bottom of the tub Refer to the maintenance section for instructions on cle...

Page 36: ...sodium bromide and bromine tablets The bro mide ion has no effective disinfectant or sanitizing capabilities without the use of non chlorine shock potassium monopersulfate Potassium monopersulfate is...

Page 37: ...g system to work more effectively CLARIFIER A compound used to remove dissolved solids metals dirt oils or other contaminants from spa and pool water SCUM BALL A softball sized ball that is kept in th...

Page 38: ...ed in water Wa ter with low hardness can lead to corrosion of metal parts Water with high level of hardness can cause scale calcium crust build up on spa surfaces and clog filters heaters and pumps WA...

Page 39: ...allons the regular dose of chlorine It is a good idea to wait for 8 hours before enter ing your spa after superchlorinating the water Remember that keeping your spa water healthy keeps you your family...

Page 40: ...nder it is important to first turn off the power to the spa Leaving the power on while changing the filters could allow ob jects to be drawn into the heater and or pump and may damage your equipment F...

Page 41: ...ply the spa water with ozone which is an extremely effective oxidant that will kill bacteria and microorganisms The Ozonator will distribute ozone into your spa automatically during the filter cycles...

Page 42: ...ey Lockout will reactivate in 20 seconds after the last operational release of a push button key The three digit Seven Segment Display will display Loc for 0 5 seconds when Key Lockout is reactivated...

Page 43: ...ne sanitizer level to remain For continued water care adjust the Genesis control dial as needed to remain in the true ok range 0 1 and balance your water regularly Continue to test the water at least...

Page 44: ...ds to enter maintenance lev el adjustment mode Your mainte nance value was set at the factory and should read 15 to start Leave the in clear system running for 24 hours to allow the bromine level to s...

Page 45: ...is too low or too high after the Boost period the Boost level should be adjusted the next time the spa is used For example if bromine level is higher than 5 PPM after a Boost of 2 lower the Boost leve...

Page 46: ...pecially in environments where there are trees overhead or nearby Refer to the next section for jet cleaning instructions Most of the jets are easiest to adjust or remove when the pumps are off NOTE J...

Page 47: ...hat flows through the jets By introducing air into the jets they ef fectively double their power Because there are so many tub models it would be impractical to describe which air controls correspond...

Page 48: ...ate The RIM cabinet is designed to withstand impacts heat cold and rain while retaining the long lasting look of elegance If access to the plumbing motors or the controller is required remove the scre...

Page 49: ...r freeze protection Access motor area by removing the outer front panels to the right and left of the controller panel and unscrew the plumbing collars from the pumps Leave union couplings disconnecte...

Page 50: ...e drain is located in the lower right hand corner of the cabinet under the topside control panel This position is the inner most closed position Step 3 Screw on a garden hose Place the other end of th...

Page 51: ...the drain step 3 remove the hose step 2 screw on the cap step 1 Step 1 Remove Cap Using your hand unscrew the cap to the drain Step 2 Attach Hose Screw on a garden hose Place the other end of the hos...

Page 52: ...CEC Energy Efficient Recycling Program Manufacturing Clean Water Clean Air Certified CEC California Energy Commission CEC Certified All of Clearwater Spas are certified to California s Energy Commissi...

Page 53: ...cian should inspect for wiring mistakes C House circuit breaker tripped to off position Reset circuit breaker GFCI tripped to off position Reset GFCI If still tripping Check installation guide for pro...

Page 54: ...open all jets Motor will reset automatically C Defective start switch Contact customer service D Blockage in line Contact customer service E Kink in hose Remove service panels and check for a kinked...

Page 55: ...rosion in equipment PH too low adjust to 7 2 to 7 6 with pH Up Brown water Iron present in water Superchlorinate and add Oxy Shock Add metal remover Blue green water Copper present in water Usually on...

Page 56: ...ther contaminants found in some areas Q How do I know if my ozonator is working A During a filter cycle a green LED light on the ozonator will light and bubbles will move through the clear water line...

Page 57: ...57 NOTES...

Page 58: ...58 NOTES...

Page 59: ...herwise including implied war ranties for merchantability and fitness for a particular purpose are limited to the terms set forth in this warranty Exterior structural integrity of the cabinet is warra...

Page 60: ...Clearwater Spas environmental commitment begins with our exclusive E Smart Technology spa manual Euro 2 8 17 Energy Efficient Recycling Program Manufacturing Clean Water Clean Air Certified CEC...

Reviews: