background image

47

48

Step 10

Check for secure installation. Gripping car 

seat at top of armrests, pull car seat front 

to back and left to right to check for secure 

installation as shown in 

Figure 65

. Vehicle 

belt MUST stay tight and child restraint 

should not move more than 2.5 cm (1”) in 

any direction.

•  If vehicle belt does not stay tight, try 

installing the car seat using Rear-Facing 

Belt Lock-off. Go back to 

Step 6

.

•  If vehicle belt still does not stay tight or 

car seat cannot be securely installed, try 

a different vehicle seat location or install 

using UAS, see “Installing Rear-Facing 

Car Seat With UAS” on page 34.

Step 11

Verify that the Rear-Facing Level Reference 

Line appropriate for the child’s weight is 

parallel to the ground as shown in 

Figure 55.

Step 12

Install Seat Cushion, see “Removing/Installing 

Seat Cushion” on page 72.

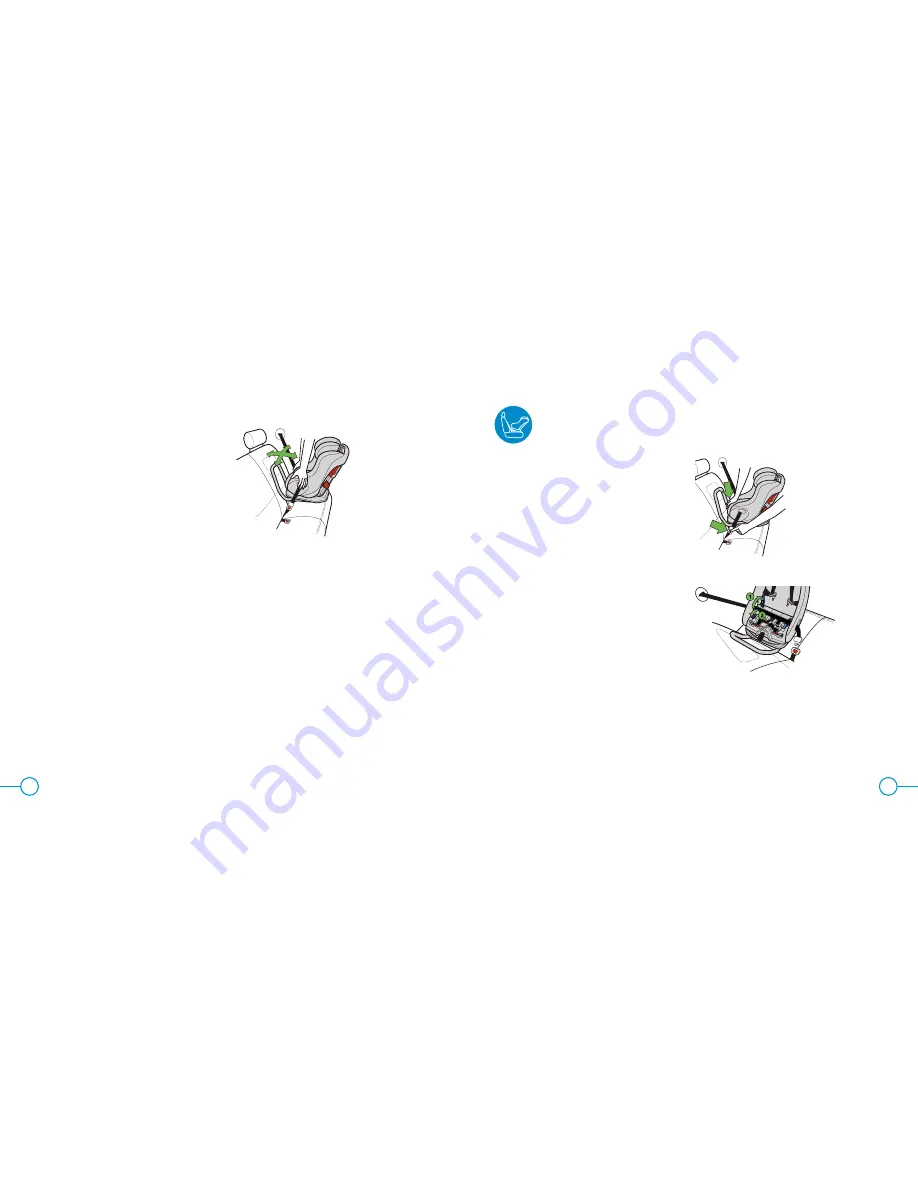
Figure 67

Step 1

Unbuckle vehicle belt. 

•  Pressing down in center of car seat to 

reduce tension on vehicle belt will make 

it easier to unbuckle vehicle belt as 

shown in 

Figure 66

.

Step 2

Remove Seat Cushion, see “Removing/

Installing Seat Cushion” on page 72.

Step 3

If used, open Rear-Facing Belt Lock-off as 

shown in 

Figure 67

Remove vehicle belt from Rear-Facing 

Belt Path.

Step 4

Remove this car seat from vehicle.

Step 5

Install Seat Cushion, See “Removing/

Installing Seat Cushion” on page 72.

Figure 66

Removing Rear-Facing Car Seat Installed With Vehicle Belt

Figure 65

Summary of Contents for Car Seat

Page 1: ...s labels can result in serious injury or death to the child in a sharp turn sudden stop or crash C03 1422 B1 CA November 2014 Fllo Instruction Manual This car seat is designed for use either Rear Facing or Forward Facing by children who meet all of the following requirements HEIGHT WEIGHT AGE 64 110 cm 25 43 in 6 4 18 1 kg 14 40 lb Able to sit upright alone HEIGHT WEIGHT AGE 76 124 cm 30 49 in 10 ...

Page 2: ... is through Crotch Strap Slot at or behind and closest to the child s crotch Harness is buckled and snugly adjusted on child When Using This Car Seat in Forward Facing Mode Child weighs between 10 and 29 5 kg 22 and 65 lb height is between 76 to 124 cm 30 and 49 in and is at least 1 year of age Car seat is securely installed in a vehicle rear seat without the Anti Rebound Bar If car seat must be i...

Page 3: ...Seat With UAS 34 Removing Rear Facing Car Seat Installed With UAS 40 Installing Rear Facing Car Seat With Vehicle Belt 41 Removing Rear Facing Car Seat Installed With Vehicle Belt 48 Installing Removing Forward Facing Car Seat 49 Installing Forward Facing Car Seat With UAS 51 Removing Forward Facing Car Seat Installed With UAS 57 Installing Forward Facing Car Seat With Vehicle Belt 59 Removing For...

Page 4: ...Slots 18 UAS Belt 19 UAS Push on Connector 20 Rear Facing Belt Lock offs 2 4 18 16 17 3 3 5 19 19 20 20 7 8 9 1 10 11 6 15 14 13 12 Car Seat Features Back 21 Seat 22 Top Tether 23 Tether Adjuster 24 Tether Hook 25 Tether Storage behind manual 26 Forward Facing Shoulder Belt Lock offs 27 Forward Facing Belt Guides 28 Shoulder Harness Access Panel 29 Shoulder Harness Straps 30 Metal Harness Plate 31...

Page 5: ... or call 1 866 656 2462 or register online at http www clekinc ca register For recall information call Transport Canada s Road Safety Information Centre at 1 800 333 0371 or go to http www tc gc ca eng motorvehiclesafety safedrivers childsafety notices menu 907 htm Registration Recall Information WARNING Child restraints could be recalled for safety reasons You must register this restraint car sea...

Page 6: ...occur Failure to properly install or use this car seat or follow these warnings and instructions and those on this car seat s labels can result in serious injury or death of the child in a sharp turn sudden stop or crash Do not install or use this car seat until you read and understand the instructions in this manual and in your vehicle owner s manual Do not let others install or use this car seat...

Page 7: ...eft in the sun and can burn your child s skin WARNING DEATH or SERIOUS INJURY can occur continued Always use the Buckle Pad supplied with this car seat for children weighing up to 10 kg 22 lb Never use the longer Crotch Strap length in the rear Crotch Strap Slot Never use this seat without the Headrest Do not use this child restraint with motorized or door mounted belt systems When installing this...

Page 8: ...ng less than 10 kg 22 lb Failure to choose the correct car seat mode Rear Facing or Forward Facing and to properly secure this seat and your child can increase the risk of injury or death Never use this seat with children not able to sit upright alone Their head may fall forward which could restrict their ability to breathe When Using This Car Seat in Rear Facing Mode All infants less than one yea...

Page 9: ...he highest set of Shoulder Harness Slots in the car seat s seat back your child is too large for this car seat If child weighs more than 18 1 kg 40 lb or the weight limit specified for UAS use in your vehicle owner s manual this car seat must be installed with the vehicle belt and Top Tether Figure 3 Figure 4 The top of the child s head must be at least 2 5 cm 1 below the top of the car seat s Hea...

Page 10: ...ng front of seat 1 and raise or lower the Headrest into the desired position 2 as shown in Figure 6 Step 2 Check for proper adjustment of Headrest The bottom of the Headrest must always be at or above the Harness Slots in use Rear Facing The top of the child s head must be at least 2 5 cm 1 below the top of the car seat s Headrest as shown in Figure 7 If the top of the child s head is less than 2 ...

Page 11: ...t as shown in Figure 16 Step 4 Install the Seat Cushion see Removing Installing Seat Cushion on page 72 Figure 14 Figure 13 Figure 15 Figure 16 Figure 9 Crotch Strap Adjustment Check position of Crotch Strap The Crotch Strap must be through the Crotch Strap Slot located at or behind and closest to the front of the child s crotch as shown in Figure 9 Step 1 Remove the Seat Cushion see Removing Inst...

Page 12: ...EADING Step 1 Loosen Harness to largest size While lifting up on Harness Adjuster Tab pull out on Shoulder Harness Straps until they stop as shown in Figure 19 WARNING DEATH or SERIOUS INJURY can occur To prevent ejection in a crash the loops at the end of the Shoulder Harness Straps must be properly attached to the Metal Harness Plate To prevent loose Harness and risk of ejection in a crash Harne...

Page 13: ...m of seat back cover 1 as shown in Figure 23 1 Figure 23 Step 2 Remove Top Tether from storage See Top Tether Storage on page 78 Step 3 Remove Shoulder Harness Access Panel from back of car seat Twist the access panel lock counter clockwise and pull to remove as shown in Figure 20 Step 4 Remove loops at ends of Shoulder Harness Straps from Metal Harness Plate by sliding strap out through slot in M...

Page 14: ...store the Top Tether See Top Tether Storage on page 78 Figure 27 Figure 24 Step 3 Attach desired loops at end of Shoulder Harness Straps to Metal Harness Plate by sliding strap into slot in plate as shown in Figure 24 TO LENGTHEN THE SHOULDER HARNESS WEBBING For larger children to make the Harness longer attach the Metal Harness Plate to the loop at the end of the Shoulder Harness Strap as shown i...

Page 15: ...symbol located near the crease between the vehicle seat back and vehicle seat cushion as shown in Figure 30 If covered the top tether anchor locations may be identified by a symbol as shown in Figure 31 Figure 29 Figure 30 Figure 31 Vehicle Seat Location Requirements Before using this car seat reference your vehicle owner s manual for Car seat installation instructions Information about air bags a...

Page 16: ... orientado hacia atrás en el asiento delantero del vehículo que tenga una bolsa neumática de seguridad El niño podría MORIR O SUFRIR LESIONES GRAVES El asiento trasero es el lugar más seguro para los niños de 12 años o menores Install this car seat only on vehicle seats that face forward NEVER install this car seat on vehicle seats facing sideways or backwards as shown in Figure 32 Only use this c...

Page 17: ...ls the lap belt back in when released as shown in Figure 36 If this type of lap belt is equipped with an Emergency Locking Retractor ELR it should NEVER be used with a car seat If this type of lap belt is equipped with an Automatic Locking Retractor ALR or a Switchable Locking Retractor SLR it can be used See your vehicle owner s manual for more information on SLR retractor belts To check if your ...

Page 18: ...on at a fixed length when the belt is pulled tight This type of lap shoulder belt is compatible It may still have a switchable locking retractor SLR See your vehicle owner s manual for more information on installing a child seat using the vehicle belt Figure 38 Figure 38a Installing Removing Rear Facing Car Seat WARNING DEATH or SERIOUS INJURY can occur Never use this car seat Rear Facing in a veh...

Page 19: ... 40 lb and whose height is between 64 and 110 cm 25 and 43 in Installing Rear Facing Car Seat With UAS WARNING DEATH or SERIOUS INJURY can occur Only use the car seat UAS system in vehicle seating locations designated by the vehicle manufacturer for use with UAS and that have a standard anchor spacing of 280 mm 11 in UAS Push on Connectors must be secured to the vehicle UAS lower anchors only Conn...

Page 20: ...gle DO NOT install or use this car seat while the vehicle seat back is excessively reclined as shown in Figure 41 Figure 40 Figure 39 Figure 41 lowered recline foot Raised recline foot Step 4 Remove Seat Cushion see Removing Installing Seat Cushion on page 72 Remove UAS belt from its storage location under the Seat Cushion see UAS Belt Storage on page 76 Lengthen the UAS belt by pressing the adjus...

Page 21: ...ound If using with an older child who is over 10 kg 22 lb position the seat with the more upright Reference Line bottom line parallel to the ground Figure 45 Figure 45a Figure 47 Step 9 Secure UAS Push on Connectors to the vehicle UAS lower anchors For each connector Position red release button of UAS Push On Connector facing away from car seat Align UAS Connector with the vehicle UAS anchor and p...

Page 22: ...hild s weight is parallel to the ground as shown in Figure 46 Step 13 Install Seat Cushion see Removing Installing Seat Cushion on page 72 Figure 49 Removing Rear Facing Car Seat Installed With UAS Figure 50 Figure 51 Step 1 Loosen UAS Belt by pressing the adjuster button on the UAS Belt adjuster and pulling out on UAS Belt as shown in Figure 50 Pressing down in center of car seat to reduce tensio...

Page 23: ...rd facing vehicle seating location which has a vehicle belt which can be used with this car seat Figure 52 lowered recline foot Raised recline foot Figure 54 Figure 54a Step 3 If the vehicle seat back is adjustable make sure the seat back is locked in a more upright position Refer to vehicle owner s manual for recommended seat back angle DO NOT install or use this car seat while the vehicle seat b...

Page 24: ...Step 7 and install your car seat WITHOUT using a Rear Facing Belt Lock off Refer to the Child Restraint section of your vehicle manual to understand what type of belt system your vehicle is equipped with Figure 57 Figure 57b Figure 57a 2 1 Figure 59 Figure 58 Step 8 Route vehicle belt through the Rear Facing Belt Path and under all four Belt Tabs shown in Figure 57a and buckle vehicle belt as show...

Page 25: ... Facing Lock off Tighten vehicle belt to secure the car seat Engage the vehicle s ALR by slowly pulling the vehicle belt all the way out until it stops Then feed the belt back into the retractor Figure 62 Figure 63 Figure 64 Press down in center of car seat to depress the vehicle cushion and pull the shoulder portion of lap shoulder belt to tighten as shown in Figure 61 feeding any remaining belt ...

Page 26: ...n page 34 Step 11 Verify that the Rear Facing Level Reference Line appropriate for the child s weight is parallel to the ground as shown in Figure 55 Step 12 Install Seat Cushion see Removing Installing Seat Cushion on page 72 Figure 67 Step 1 Unbuckle vehicle belt Pressing down in center of car seat to reduce tension on vehicle belt will make it easier to unbuckle vehicle belt as shown in Figure ...

Page 27: ...ld and others in a sharp turn sudden stop or crash Use only with children who are at least 1 year of age weigh between 10 and 29 5 kg 22 and 65 lb and whose height is between 76 and 124 cm 30 and 49 in WARNING DEATH or SERIOUS INJURY can occur continued When installing this child restraint Forward Facing it must be secured by the Top Tether strap AND either the UAS belt or the vehicle seat belt as...

Page 28: ...cle owner s manual for that vehicle Always install with a Top Tether NEVER install this car seat forward facing using UAS when your child weighs more than 18 1 kg 40 lb or the weight specified for UAS use in your vehicle s owners manual Figure 69 Step 1 Check that the Recline Foot is in the Forward Facing position If needed grasp forward edge of Recline Foot and rotate towards the back of the seat...

Page 29: ...71 Place Top Tether Hook in the seat of the car seat Figure 71 Step 5 If stored remove UAS lower connectors from storage See UAS Belt Storage on page 76 Pull UAS Belt and Lower Connectors out the right side of the Rear Facing belt path as shown in Figure 72 Step 6 Route UAS belt through the Forward Facing Belt Path as follows Holding the UAS lower connector closest to the adjuster route UAS belt t...

Page 30: ...secure it Press down in center of car seat to depress the vehicle seat cushion and pull on the end of the UAS belt to tighten as shown in Figure 76 Figure 76 Figure 75 Figure 74 Figure 77a Figure 77 Figure 51 Figure X Figure X Step 10 Attach Tether Hook to vehicle top tether anchor as shown in Figure 77 or 77a and pull firmly on free end of strap until Top Tether is snug Refer to vehicle owner s m...

Page 31: ...ure 81 Pressing down in center of car seat to reduce tension on UAS Belt will make it easier to loosen UAS Belt Removing Forward Facing Car Seat Installed With UAS Figure 59 Figure 60b Step 4 Remove each UAS Push on Connector from vehicle lower anchors by pressing and holding the red release button while pulling the UAS push on Connector as shown in Figure 82 Step 5 Remove car seat from vehicle St...

Page 32: ...t bottom If the Anti Rebound Bar is attached remove it now see Installing Removing Anti Rebound Bar on page 73 Figure 83 lowered recline foot Raised recline foot Step 2 Select a Forward Facing vehicle seating location which has a vehicle belt which can be used with this seat and a top tether anchor point as shown in Figure 84 Step 3 If the vehicle seat back is adjustable make sure the seat back is...

Page 33: ...Figure 87 Figure 88 Figure 89 Figure 89a Step 7 Center car seat in the vehicle seating position chosen and tighten vehicle seat belt to secure the car seat Press down in center of car seat to depress the vehicle cushion and pull end lap belt only or shoulder portion of lap shoulder belt to tighten as shown in Figure 90 lap belt only or Figure 91 lap shoulder belt If using a lap shoulder belt while...

Page 34: ... direction If vehicle belt does not stay tight or car seat cannot be securely installed try a different vehicle seating location or install using UAS see Installing Forward Facing Car Seat With UAS on page 51 Figure 95a Step 1 Loosen Top Tether by pressing Tether Adjuster release button while pulling strap as shown in Figure 97 Step 2 Remove Tether Hook from vehicle tether anchor Pull in and hold ...

Page 35: ...ressed in clothing with arms and legs that will not interfere with buckling and snugly adjusting Harness Never place blankets between Harness and child Prevent death from heat exposure never leave child unattended even when sleeping Vehicle interiors can reach very high temperatures quickly even when it is not a hot or sunny day Strangulation hazard child can strangle in loose Harness Straps Never...

Page 36: ...ess Straps must be through Shoulder Harness Slots at or above and closest to the child s shoulders as shown in Figure 104 If the child s shoulders are above the highest set of Shoulder Harness Slots in the car seat s seat back your child is too large for this car seat See Shoulder Harness Adjustment on page 19 to change position of Shoulder Harness Straps Step 4 Check Position of Headrest The bott...

Page 37: ...uckle as shown in Figure 108 Step 6 Place child s arms through Shoulder Harness Straps and position the Straps over child s shoulders and thighs Figure 106 Figure 107 Step 7 Buckle Harness Insert Buckle Tongues into Buckle one at a time as shown in Figure 109 You should hear a click Pull up on tongues to check that they are securely locked Step 8 Pull Harness Adjuster Strap to snugly adjust Harnes...

Page 38: ...o keep the Harness out of the way for easier placement or removal of your child place the Buckle Tongues between the fabric and the plastic panel on the exterior of the child seat 2 2 1 1 Figure 112 Figure 113 Figure 114 WARNING DEATH or SERIOUS INJURY can occur Never use this car seat without the Seat Cushion in place Operation and Adjustment Removing Installing Seat Cushion TO REMOVE SEAT CUSHIO...

Page 39: ...s shown in Figure 117 Figure 117 lowered recline foot Raised recline foot Step 2 Remove Seat Cushion see Removing Installing Seat Cushion on page 72 Remove UAS Push on Connectors from their storage location see UAS Belt Storage on page 76 Step 3 Insert the Anti Rebound Bar into the holes in the bottom of the seat on each side of the Recline Foot as shown in Figure 118 Step 4 Hold the Anti Rebound ...

Page 40: ...ace UAS Push on Connectors back into their storage location see UAS Belt Storage on page 76 Install the Seat Cushion see Removing Installing Seat Cushion on page 72 Figure 120 UAS Belt Storage REMOVAL OF UAS BELT FROM STORAGE Step 1 Remove the Seat Cushion see Removing Installing Seat Cushion on page 72 Step 2 Remove the UAS Adjuster 1 and Belt 2 from their storage position in the seat bottom show...

Page 41: ...ok around storage bar as shown in Figure 126 fold Top Tether belt and insert into Tether Storage Replace Instruction Manual Instruction Manual Storage After carefully reading and following these instructions keep this manual for future use and store in the compartment located in Shoulder Harness Access Panel as shown in Figure 127 Figure 125 Figure 126 Figure 127 WARNING Read and understand produc...

Page 42: ...ear facing follow the instructions for installing the seat with a lap belt in the Installing Rear Facing Car Seat With Vehicle Belt on page 41 NOTE If it is necessary to check your seat it must be packed in a Clek Weelee Travel Bag sold separately Damage may result from checking your seat without proper packaging Removing Installing Shoulder Harness Covers The Shoulder Harness Covers included with...

Page 43: ...132 TO INSTALL SEAT CUSHION COVER Step 1 Place Seat Cushion Cover on a flat surface with Seat Cushion Cover attachments facing up as shown in Figure 133 Step 2 Place Seat Cushion onto Seat Cushion Cover aligning the Seat Cushion with the Seat Cushion Cover attachments Step 3 Reattach Seat Cushion Cover attachments to Seat Cushion by wrapping the Seat Cushion Cover sides around the entire Seat Cush...

Page 44: ...r or blot with clean soft towel Step 6 Repeat steps 3 5 as necessary until spot is removed Step 7 Rinse with clear lukewarm water and blot with clean soft white cloth as final step SEAT FRAME EXTERIOR PLASTICS ONLY WASHING INSTRUCTIONS Use a soft cloth with warm water and soap Apply light pressure with cloth in small circular motions Do NOT remove the labels from this car seat They are meant to be...

Page 45: ...e 1 year from the date of original purchase the Warranty Period During the Warranty Period Clek Inc will at its option repair or replace this product if it is found by the manufacturer to be defective in material or workmanship Clek Inc reserves the right to discontinue or change parts fabrics models or products or to substitute this product with a comparable model or product To make a claim under...

Page 46: ...of the use or inability to use this product LIMITATION OF WARRANTIES AND STATE PROVINCIAL LAW RIGHTS The warranty and remedies as set forth above are exclusive and in lieu of all others oral or written express or implied To the extent permitted by applicable law any implied warranties including implied warranties of merchantability and fitness for a particular purpose are hereby disclaimed Some st...

Reviews: