ENGLISH
15
6.6
Setting up the machine
WARNING
Before starting to work wear an apron, cap, non-slip waterproof shoes, a mask to
protect the respiratory system, gloves and any other form of protection indicated
by the supplier of the detergent or necessary in the environment you are going to
work in.
Perform the following operations before beginning work:
•
Battery models: check the battery charge level (recharge if necessary);
•
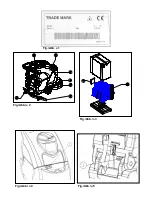
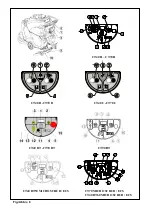
lower the head by means of the pedal (fig. 6, ref. 9);
•
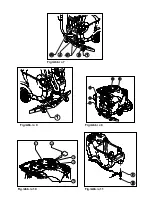
ensure that the recovery tank (fig. 2, ref. 2) is empty; if not, empty it;
•
check that the cock control lever (fig. 6, ref. 6) is in the “CLOSED” position;
•
via the front opening provided, fill the solution tank (fig. 2, ref. 7) with clean water and
non-foaming detergent in an appropriate concentration: leave at least 5 cm difference
in level between the surface of the liquid and the tank inlet;
•
fit suitable brushes or drive discs for the floor and the work to be performed (see
paragraph 6.4);
•
check that the squeegee (fig. 2, ref. 6) is well secured and connected to the suction pipe
(fig. 7, ref. 4); ensure that the rear blade is not worn.
i INFORMATION
If you use the machine for the first time, it is advisable that you train with it for a
short time on a wide surface without any obstacles, to acquire the necessary
familiarity.
Always empty the recovery tank before refilling the solution tank.
For an effective cleaning and long life of the equipment, it is necessary to follow some
simple rules:
•
prepare the work area, keeping away the possible obstacles;
•
begin to work starting from the farthest spot, in order to avoid trampling on the area
just-cleaned;
•
choose paths that are as much straight as possible;
•
on wide floors divide the paths into rectangular and parallel areas.
At the end quickly mop the area, if necessary, to clean spots that are inaccessible to the
scrubber.
6.7
Work
After setting up the machine, proceed as follows:
•
connect the machine to the power supply:
•
models with cable:
plug the machine;
•
models with battery:
connect the ANDERSON connectors with each other (fig.
5, ref. 1 and ref. 2);
•
move the cock lever (fig. 6, ref. 6) to the position of minimum flow of solution: the
detergent solution begins to reach the brush;
•
lower the squeegee by means of the proper lever (fig. 6, ref. 8);
•
Versions with mechanical drive: press “1” on the brush switch (fig. 6, ref. 3) to
enable the function “Brush”;
•
Versions with electric drive: press the brush button (fig. 6, ref. 3)
•
Versions with mechanical drive: press “1” on the suction unit switch (fig. 6, ref. 2) to
start the suction motor;
•
Versions with electric drive: press the suction button (fig. 6, ref. 2) to turn the suction
motor on;
•
press brush/drive control lever (fig. 6, ref. 7);
•
Versions with mechanical drive: when the brush switch is in position “1” and the
drive lever is pulled, the motor will come on, thus rotating the brush and moving the


