POWER GUN SUCTION BLAST TOOLS
Page 12
© 2018 CLEMCO INDUSTRIES CORP.
www.clemcoindustries.com
Manual No. 24189, Rev. C 06/18
7.3.7
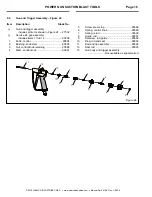
Slide the new material-hose clamp onto the
material hose and slip the material hose onto the mixing
chamber’s connection pipe. Crimp the clamp ears to
tighten the clamp.
7.3.8
Install nozzle: Make sure the mixing chamber
setscrews do not extend past the inside of the mixing
chamber. Fully insert the nozzle into the end of the
mixing chamber and tighten the setscrews to secure.
7.3.9
After the thread sealant has cured, apply Teflon
sealant tape or other common thread sealant to the male
threads on the water hose fitting and thread the fitting
into the water valve. Tighten to secure.
7.3.10
Make sure the mixing chamber setscrews do not
extend past the inside of the mixing chamber. Fully
insert the jet into the end of the mixing chamber.
7.3.11
Rotate the mixing chamber to obtain the most
comfortable position while holding the gun assembly and
material hose and then tighten the setscrews to maintain
the position.
7.3.12
The conversion is complete. Refer to the
instructions within the manual for operation.
8.0 TROUBLESHOOTING
WARNING
Failure to observe the following procedure before
performing any maintenance or service can
cause serious injury from the sudden release of
trapped compressed air.
Lockout and tagout the compressed air
supply.
Bleed the air supply line.
8.1 No
Abrasive
Flow
8.1.1
Foreign material in the mixing chamber
assembly: Remove nozzle and check for blockage in the
mixing chamber and nozzle.
8.1.2
Abrasive blockage in the material hose: If the
material hose packs with abrasive, it is a sign that the
abrasive mixture is too rich. Make sure the air-intake
holes in the lance are open. When using the lance into
bagged abrasive make sure the intake holes are not
buried in abrasive
8.1.3
Worn nozzle: Replace the nozzle when the
orifice is worn to 9/16” or sooner if production decreases
noticeably.
8.1.4
Air jet worn: Inspect end of air jet and replace
when wear reaches the orifice.
8.1.5
Air jet and/or nozzle not seated correctly: The jet
and nozzle must be fully seated into the mixing chamber,
and the setscrews must be tight.
8.1.6
Abrasive bridging at the lance’s abrasive inlet
holes: Frequent bridges or blockages are most likely
caused by damp abrasive. Refer to Section 8.3.
8.1.7
Hole worn in material hose: Inspect hose for
holes and inspect the clamps for leaks. Repair as
needed.
8.2 Plugged
Nozzle
8.2.1
Foreign material in the nozzle: Clean and re-
install.
8.2.2
Abrasive mixture too rich: Make sure the air-
intake holes in the lance are open.
8.3 Abrasive
Bridging
8.3.1
Frequent bridging or blockage at the lance can
be caused by damp abrasive. Some abrasives tend to
absorb moisture from the air, especially fine-mesh
abrasives in high-humidity areas. Empty the material
hose and hopper of abrasive, and store the abrasive in
an airtight container when not in use.
8.4
Neither Air Nor Abrasive Comes Out the
Nozzle When Trigger is Pulled
8.4.1
Inspect nozzle for blockage: Refer to Section 8.2.
8.4.2
Make sure that the air compressor is on and air
supply valves are open.
8.5
Air Leaks from Gun After Trigger is Released
8.5.1
Binding at the trigger, rod, or rod guide: Clean
abrasive from parts and inspect for cause of resistance.
8.5.2
Worn or damaged rod tip or obstruction between
the rod tip and air jet: Repair as needed.


