


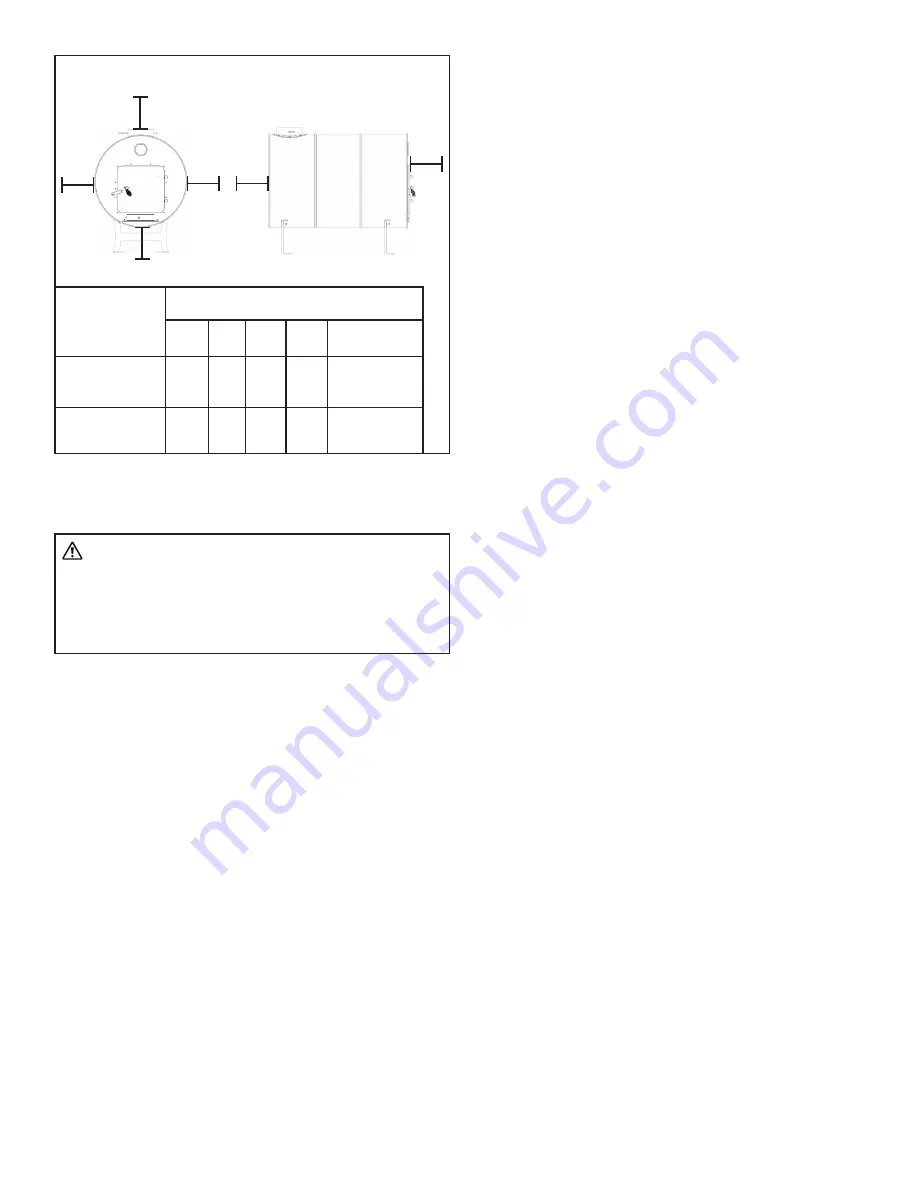
Clearances to Combustibles
Side
Materials
Clearance to Combustibles
Front Top Rear Side
Floor
wood / plaster
board
72”
72” 36” 36”
Not for use on
combustible
flooring
Concrete /
Masonry
72”
72” 36”
36”
Leg Height
(8 inches)
Floor
Top
Side
Front
Rear
ASSEMBLY INSTRUCTIONS
WARNING: Make sure barrels are
thoroughly clean before applying barrel
stove kit. NEVER USE AN ACETYLENE
TORCH due to explosive gases that may be
trapped inside your barrel.
1. Open the barrel plug and displace vapors with water
to make barrel safe for power tools. (Figure 1)
2. Ensure the barrel is empty and dry before beginning
the installation of barrel stove kit.
3. Stand barrel upright, with a barrel plug facing up. If
there are extra holes in the barrel beside this plug,
permanently seal them shut.
4. Using a scribe or marking pencil, trace the inner
perimeter of the door and of the air inlet vent.
5. Cut along these markings with either a hacksaw or
sabre saw.
6.
Apply high temperature sealant around the cut
openings
, then press the door frame against the
sealant and over the holes. Secure the door frame
to the barrel using bolts provided with the kit.
(Figure 2)
7. Position the legs underneath the barrel, near the
front and rear of the barrel and balanced around
the center of the barrel so that the barrel is level
and stable. With the door frame attached, access
the inside of the barrel to secure the legs. (Figure 3)
8. Protect and elongate the useful life of your stove by
lining the bottom with fire bricks or loose gravel.
9. Attach the flue collar at the rear and top of barrel
by the same process as the door:
• Mark the inner perimeter.
• Use either a hacksaw or a sabre saw to cut along
the marking.
• Use high temperature sealant along the cut.
• Press the flue collar into the high temperature
sealant against the opening.
• Secure the flue collar with the 6 included bolts.
(Figure 4).
For single barrel stoves, ki
t F500300
10. Attach the flue damper to the flue collar. (Figure 8)
For double barrel stoves, kit F500305
11. Position the connecting legs on top of the barrel,
near the front and rear of the barrel and balanced
around the center of the barrel so that the
second barrel may be supported securely. When
positioning the back legs be sure to not obstruct
the flue collar. With the door frame attached,
access the inside of the barrel to secure the legs.
(Figure 5)
10. Cut 6” diameter flue pipe long enough to connect
the two barrels
. Insert into flue collar.
11. With help, hoist the second barrel on top of the
first and adjust position until the barrels are aligned
and balanced.
12. Mark the perimeter of the 6” flue pipe on the
underside of the top barrel.
13. Remove the top barrel. Using either a hacksaw or a
sabre saw cut along the markings. Trace then cut a
flue collar inner perimeter on the opposite end and
side of the barrel. (Figure 6) For both openings on
this barrel, fasten flue collars to the barrel with the
same procedure as step 9.
14. With help, hoist the second barrel back on top of
the first barrel and support legs. Align the barrel
so that the flue pipe fits snug into the flue collar of
bottom and top barrel. Fasten barrel to legs. Reach
through top flue collar to insert, arrange, and
tighten nuts (Figure 7). Fasten the underside flue
collar to the stove pipe.
15. Install flue damper to top barrel. (Figure 8)


