Disassembly
Removing the Keyboard 2 - 9
2.Disassembly
Removing the Keyboard
1.
Turn
off
the computer and remove the battery (
page 2 - 5
).
2.
Use
only
the small tool
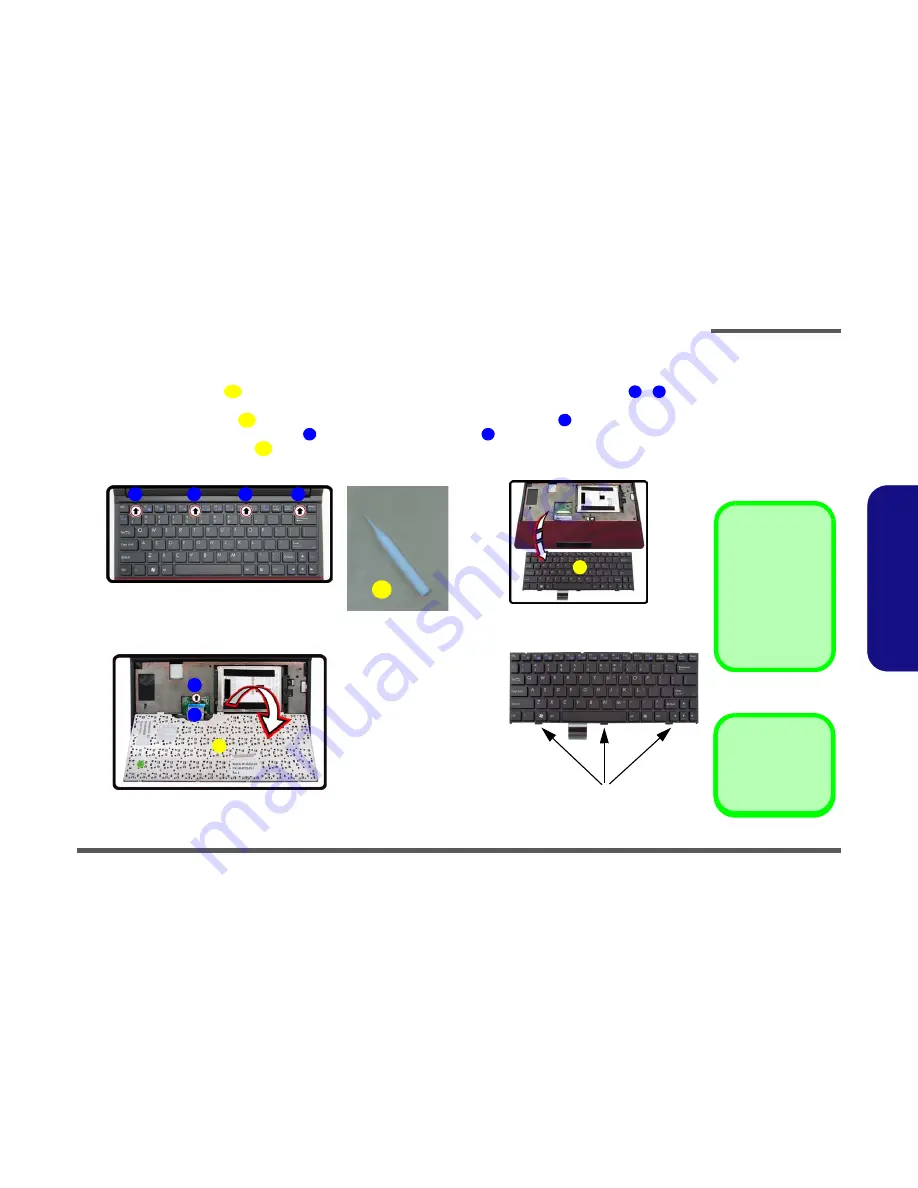
provided (see picture below) to carefully press the
four
keyboard latches
-
at the
top of the keyboard to elevate the keyboard from its normal position (
Figure 5
a
).
3.
Carefully lift the keyboard
up, being careful not to bend the keyboard ribbon cable
(
Figure 5
b
).
4.
Disconnect the keyboard ribbon cable
from the locking collar socket
(
Figure 5
b
)
5.
Carefully lift up the keyboard
(
Figure 5c
) off the computer.
A
1
4
5
6
6
7
Figure 5
Keyboard Removal
a. Press the four latches to
release the keyboard.
b. Lift the keyboard up and
disconnect the cable from
the locking collar.
c. Remove the keyboard.
5
a.
b.
2
3
4
1
7
5
5
c.
6
d.
Keyboard Tabs
A
Tool for pressing
the keyboard
latches.
1. Battery
6. Keyboard
5. Keyboard
Re-Inserting the Key-
board
When re-inserting the
keyboard, align first
the
three
keyboard
tabs
(
Figure 5
d
)
that
are located at the bot-
tom, to the slots in the
case.
Summary of Contents for M1110Q
Page 1: ......
Page 2: ......
Page 3: ...Preface I Preface Notebook Computer M1110Q M1110Q C Service Manual ...
Page 24: ...Introduction 1 12 1 Introduction ...
Page 38: ...Disassembly 2 14 2 Disassembly ...
Page 41: ...Part Lists Top A 3 A Part Lists Top Figure A 1 Top Figure A 1 Top ...
Page 42: ...Part Lists A 4 Bottom A Part Lists Bottom Figure A 2 Bottom ...
Page 43: ...Part Lists LCD A 5 A Part Lists LCD 非耐落 Figure A 3 LCD ...
Page 44: ...Part Lists A 6 A Part Lists ...
Page 72: ...Schematic Diagrams B 28 Power Button Board B Schematic Diagrams ...


