Disassembly
2 - 8 Removing the Hard Disk Drive
2.Disassembly
Removing the Hard Disk Drive
The hard disk drive can be taken out to accommodate other 2.5" serial (SATA) hard disk drives with a height of 9.5mm
or 7mm (h). Follow your operating system’s installation instructions, and install all necessary drivers and utilities (as
outlined in
Chapter 4 of the User’s Manual
) when setting up a new hard disk.
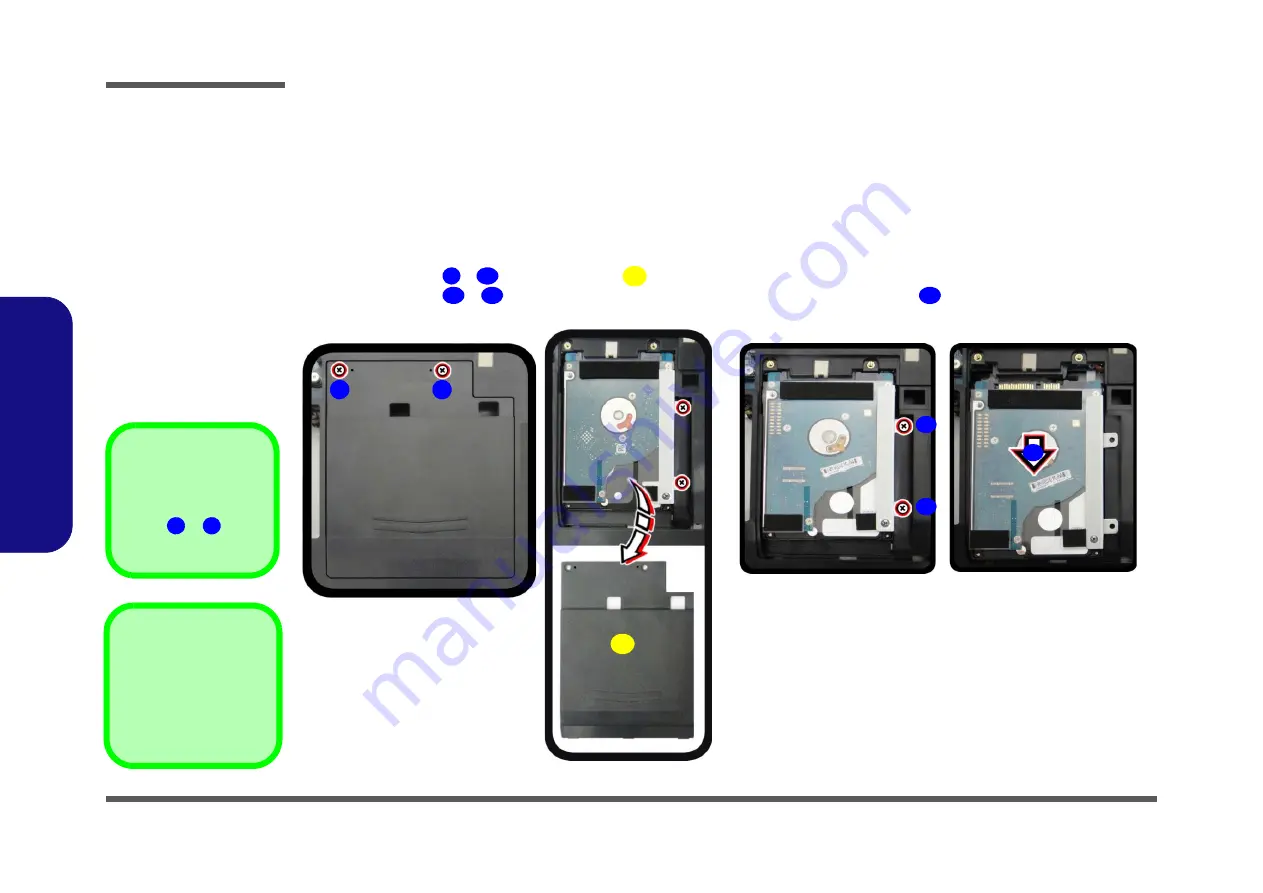
Hard Disk Disassembly Process
1.
Turn
off
the computer, remove the battery (
) and keyboard (
2.
Remove screws
-
and HDD cover
(
)
.
3.
Remove screws
-
and then slide the hard disk out in the direction of arrow
).
1
2
3
4
5
6
a.
1
4
3
2
b.
5
6
Figure 4
HDD Assembly
Removal
a. Remove the screws and
HDD cover.
b. Slide the HDD in the di-
rection of the arrow.
3. HDD Cover
•
4 Screws
Screw Size
Note that the size of
screws
&
is
M2.5 x 5L.
1
2
Summary of Contents for N170RD1
Page 1: ...N170RD1 ...
Page 2: ......
Page 3: ...Preface I Preface Notebook Computer N170RD1 Service Manual ...
Page 24: ...Introduction 1 12 1 Introduction ...
Page 43: ...Top A 3 A Part Lists Top Figure A 1 Top ...
Page 44: ...A 4 Bottom A Part Lists Bottom Figure A 2 Bottom ...
Page 45: ...Main Board A 5 A Part Lists Main Board Figure A 3 Main Board ...
Page 46: ...A 6 HDD A Part Lists HDD Figure A 4 HDD ...
Page 47: ...2nd HDD A 7 A Part Lists 2nd HDD Figure A 5 2nd HDD ...
Page 48: ...A 8 A Part Lists LCD EDP LVDS Figure A 6 LCD EDP LVDS ...
Page 49: ...LCD LG IPS A 9 A Part Lists LCD LG IPS Figure A 7 LCD LG IPS ...
Page 50: ...A 10 DVD A Part Lists DVD Figure A 8 DVD ...
Page 51: ...Dummy ODD A 11 A Part Lists Dummy ODD Figure A 9 Dummy ODD ...
Page 52: ...A 12 A Part Lists ...
Page 120: ...Schematic Diagrams B 68 B Schematic Diagrams ...


