Disassembly
Removing the Battery 2 - 5
2.Disassembly
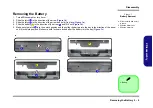
Removing the Battery
1.
Turn
off
the computer, turn it over.
2.
Slide the latch
in the direction of the arrow (
)
.
3.
Slide the latch
in the direction of the arrow, and hold it in place (
)
.
4.
Slide the battery
in the direction of the arrow
and lift it out (
)
.
5.
Make sure the latch
is in the unlock position and then slide the battery into the bay in the direction of the arrow
until it locks into position. Make sure both locks are locked after the battery is in the bay (
)
.
1
2
6
3
4
5
3. Battery
Figure 1
Battery Removal
a. Slide the latch and hold it
in place.
b. Slide the battery out.
c. Slide the battery in.
a.
c.
1
2
b.
3
4
5
3
Summary of Contents for N650DU Series
Page 1: ...N650DU ...
Page 2: ......
Page 3: ...Preface I Preface Notebook Computer N650DU Service Manual ...
Page 24: ...Introduction 1 12 1 Introduction ...
Page 48: ...Disassembly 2 24 Removing the CCD 2 Disassembly ...
Page 51: ...Top A 3 A Part Lists Top Figure A 1 Top ...
Page 52: ...A 4 Bottom A Part Lists Bottom Figure A 2 Bottom ...
Page 53: ...LCD A 5 A Part Lists LCD Figure A 3 LCD ...
Page 54: ...A 6 DVD A Part Lists DVD Figure A 4 DVD ...
Page 55: ...HDD A 7 A Part Lists HDD Figure A 5 HDD ...
Page 56: ...A 8 2nd HDD A Part Lists 2nd HDD Figure A 6 2nd HDD ...
Page 57: ...MB A 9 A Part Lists MB Figure A 7 HDD ...
Page 58: ...A 10 A Part Lists ...
Page 104: ...Schematic Diagrams B 46 B Schematic Diagrams ...


