52
G e o t h e r m a l H e a t i n g a n d C o o l i n g
Tranquility
®
30 Digital (TE) Series IOM - 60Hz HFC-410A
R e v. : 2 9 M a y, 2 0 1 5 J
WARNING!
HAZARDOUS VOLTAGE! DISCONNECT
ALL ELECTRIC POWER INCLUDING REMOTE
DISCONNECTS BEFORE SERVICING.
Failure to disconnect power before servicing can cause
severe personal injury or death.
WARNING!
Troubleshooting
Outputs
The compressor and reversing valve relays are 24VAC
and can be veri
fi
ed using a voltmeter. For units with ECM
blower motors, the DXM2 controls the motor using serial
communications, and troubleshooting should be done with
a communicating thermostat or diagnostic tool. The alarm
relay can either be 24VAC as shipped or dry contacts for use
with DDC controls by clipping the JW1 jumper. Electric heat
outputs are 24VDC “ground sinking” and require a voltmeter
set for DC to verify operation. The terminal marked “24VDC”
is the 24VDC supply to the electric heat board; terminal
“EH1” is stage 1 electric heat; terminal “EH2” is stage 2
electric heat. When electric heat is energized (thermostat
is sending a “W” input to the DXM2 controller), there will
be 24VDC between terminal “24VDC” and “EH1” (stage 1
electric heat) and/or “EH2” (stage 2 electric heat). A reading
of 0VDC between “24VDC” and “EH1” or “EH2” will indicate
that the DXM2 board is NOT sending an output signal to the
electric heat board.
Test Mode
Test mode can be entered for 20 minutes by pressing the
Test pushbutton. The DXM2 board will automatically exit test
mode after 20 minutes.
Advanced Diagnostics
To properly troubleshoot advanced control features,
and to aid in troubleshooting basic control features, a
communicating thermostat or diagnostic tool must be used.
Service Mode
The Service Mode provides the installer with several
functions for troubleshooting, including Manual Operation,
Control Diagnostics, Control Con
fi
guration, and Fault
History.
Manual Operation – The Manual Operation mode allows the
installer to bypass normal thermostat timings and operating
modes, to directly activate the thermostat inputs to the
DXM2, activate the DXM2 Test mode, and directly control the
ECM blower, internal
fl
ow center, and proportional valve.
Control Diagnostics – The Control Diagnostics menus allow
the installer to see the current status of all DXM2 control
switch inputs, values of all temperature sensor inputs,
control voltage, ECM blower, internal
fl
ow center, and
proportional valve operating status and parameters.
Dipswitch Con
fi
guration – The Dipswitch Con
fi
guration
menus allow the installer to easily see the current DXM2
control con
fi
guration.
Fault History – In addition to the fault code, the DXM2 stores
the status of all control inputs and outputs when a fault
condition is detected. The fault history covering the last
fi
ve
lockout conditions is stored and may be retrieved from the
DXM2. After a speci
fi
c fault in the fault history is selected,
the operating mode and time when the fault occurred are
displayed, with options to select speci
fi
c control status
values when the lockout occurred.
Fault Temp Conditions – This option displays the DXM2
temperature and voltage values when the lockout occurred.
Fault Flow Conditions – This option displays the DXM2 ECM
blower, pump, and valve operating parameters when the
lockout occurred.
Fault I/O Conditions – This option displays the status of
the DXM2 physical and communicated inputs and the relay
outputs when the lockout occurred.
Fault Con
fi
guration Conditions – This option displays the
status of the DXM2 option selections when the lockout
occurred.
Fault Possible Causes – This option displays a list of
potential causes of the stored fault.
Clear Fault History – The Clear Fault History option allows
the fault history stored in the non-volatile memory of the
DXM2 to be cleared.
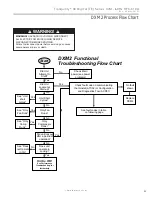
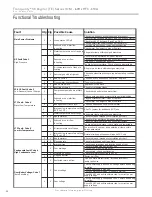
DXM2 Troubleshooting Process Flowchart/Functional
Troubleshooting Chart
The “DXM2 Functional Troubleshooting Process Flowchart”
is a quick overview of how to start diagnosing a suspected
problem, using the fault recognition features of the DXM2
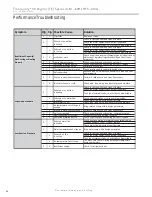
board. The “Functional Troubleshooting Chart” on the
following page is a more comprehensive method for
identifying a number of malfunctions that may occur, and is
not limited to just the DXM2 controls. Within the chart are
fi
ve columns:
• The “Fault” column describes the symptoms.
• Columns 2 and 3 identify in which mode the fault is likely
to occur, heating or cooling.
• The “Possible Cause column” identi
fi
es the most likely
sources of the problem.
• The “Solution” column describes what should be done to
correct the problem.


