Climbing Technology by Aludesign S.p.A. via Torchio 22
24034 Cisano B.sco BG ITALY
www.climbingtechnology.com
5/29
IST12-2D654CT_rev.1 04-21
ENGLISH
The instruction manual for this device consists of general and specific instructions,
both must be carefully read and understood before use.
Attention!
This leaflet
shows the specific instruction only.
SPECIFIC INSTRUCTIONS QUICK STEP-A/S.
This note contains the necessary information for a correct use of the following
product/s: rope clamps for right/left foot Quick Step-A/S.
1) FIELD OF APPLICATION.
The rope clamps for foot Quick Step-A/S are not personal protection equipment
(P.P.E.). They are only accessories to facilitate rope ascents and they must not be
used to prevent falling from a height. They keep the rope stretched under the body
of the user, thus facilitating the flow of the other blocking devices and helping to
keep the body of the user vertical.
1.1 - Quick Step-A model
(Fig. 2.2). This version comes with a lever that keeps
the device open to facilitate insertion of the rope and prevent it from coming out.
Ideal for tree climbing and work at a height.
1.2 - Quick Step-S model
(Fig. 2.1). This version does not come with an opening
lever, so the rope can be inserted with a single hand and released rapidly by a
simple leg movement.
2) NOMENCLATURE
(Fig. 2). A) Release lever. B) Bottom buckle. C) Adjusting
webbing. D) Locking cam. E) Body. F) Protection webbing. G) Opening/safety
lever.
2.1 - Main materials
. Refer to the legend in the general instructions (paragraph
2.4): 2 (locking cam); 3 (body); 7 (protection webbing); 10 (adjusting webbing).
3) MARKING
.
Numbers/letters without caption: refer to the legend in the general instructions
(paragraph 5).
3.1 - General
(Fig. 3). Indications: 4; 7; 8; 19; 30) Maximum load permitted;
31) Permitted rope diameters; 32) For left (L) or right (R) foot.
3.2 - Traceability
(Fig. 3)
.
Indications: T1; T3; T8.
4) COMPATIBILITY.
The device can be only used with ropes (core + sheath) static or semi-static (EN
1891) or dynamic (EN 892) Ø 8-13 mm.
Attention!
Do not use on metal cables
or plied ropes.
5) CHECKS.
Further to the checks listed below, comply with what indicated in the general
instructions (paragraph 3). Before each use, verify that: the cam teeth are present
and show no signs of wear. During each use: check regularly the buckles and the
adjustment devices.
6) ISTRUCTIONS FOR USE.
6.1 - Fixing on the boot.
Put on the device so that the body is on the inner side of
the boot and the protection webbing sits in the hollow under the sole. Adjust the
height of the device on the bottom buckle and regulate the adjusting webbing so
that the system is correctly tensioned and adhere to the boot.
6.2 - Insertion of the rope.
Quick Step-A model. Turn the lever to open the cam
(Fig. 4.1). Couple the lever with the body of the device. Insert the rope on the
device (Fig. 4.2), and release the lever to close the cam (Fig. 4.3). Quick Step-S
model. Push the rope against the locking cam to insert it (Fig. 5.1).
6.3 - Function testing.
Before the use, check that the device runs freely upwards
and locks in the desired position.
6.4 - Removing of the rope.
Quick Step-A model. Turn the lever to open the cam,
couple the lever with the body of the device and then remove the rope. Quick
Step-S model. Bend the leg backwards to release the rope from the cam so that it
can be removed (Fig. 5.2).
6.5 - Removing from the boot.
Pull the release lever to slacken the system and
remove it from the boot.
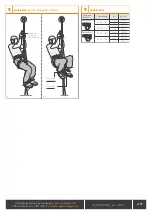
6.6 - Speleo progression technique.
A right or left Quick Step-S is used for as-
cending on a single rope, in combination with a left or right ascent handle, a
chest ascender and a foot loop. Progression can be: simultaneous, by pushing
both legs together (Fig. 6.2-6.3); alternate, by pushing one leg after the other
sequentially (Fig. 7.1-7.2).
6.7 - Tree climbing progression technique.
Two Quick Step-A devices (right and
left) are used for ascending on a double rope, in combination with a double
ascent handle (e.g. Quick’Arbor H). Progression is simultaneous and takes place
by pushing both legs together (Fig. 8.1-8.2)
.
7) REPLACEMENT PARTS.
This product is compatible only with with the spare parts listed below: spare lower
strap (Ref. No. 7K65400001); spare upper strap (Ref. No. 7K65400002).
Attention!
Before installing a replacement part, carefully read and understand the
instructions for use of the device on which it will be installed.
Attention!
Before use
make sure that the spare part is correctly installed.


