climecon.fi
© Climecon
2
Installation guide ECOT, thermostat
Commissioning
1.
Make sure that the connections are made correctly.
Turn on the 230V supply voltage coming to the supply air
unit. The display (7) will show the room temperature and
the LED (6) will light up. The factory setting of the ther-
mostat is 21ºC (central point of the setting area)
and if the room temperature is lower, the led will turn red
and the heating will be switched on, otherwise a green led
will be illuminated.
2.
When the value of the thermostat is changed (± 3ºC from
the value of the central point) with the control knob (4),
you can see the new setting value on the display (7).
3.
Changing the central point of the setting area to e.g. 24ºC.
Open the cover (2) of the thermostat and turn the tem-
perature control knob (4) up (extreme position). Remove
jumper S3 and install it back to its position. The new
central point of the setting area will now be 24ºC.
4.
The factory set accuracy of temperature adjustment
is ± 0.5ºC. If you need to change the accuracy to ± 1ºC,
remove jumper S2.
5.
Temperature drop from the setting value of 3ºC...10ºC
is adjusted from the knob (8). The value of temperature
drop is visible on the display (7).
6.
After you have made all the necessary changes, reinstall
the cover (2) and the system is ready for use.
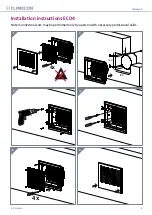
Installation of the thermostat:
1.
Bring the cable intended for the thermostat unit (KLMA)
from the supply air unit either to the instrument box
(60 mm spacing between holes) or directly to a surface-
mounted ECO thermostat.
2.
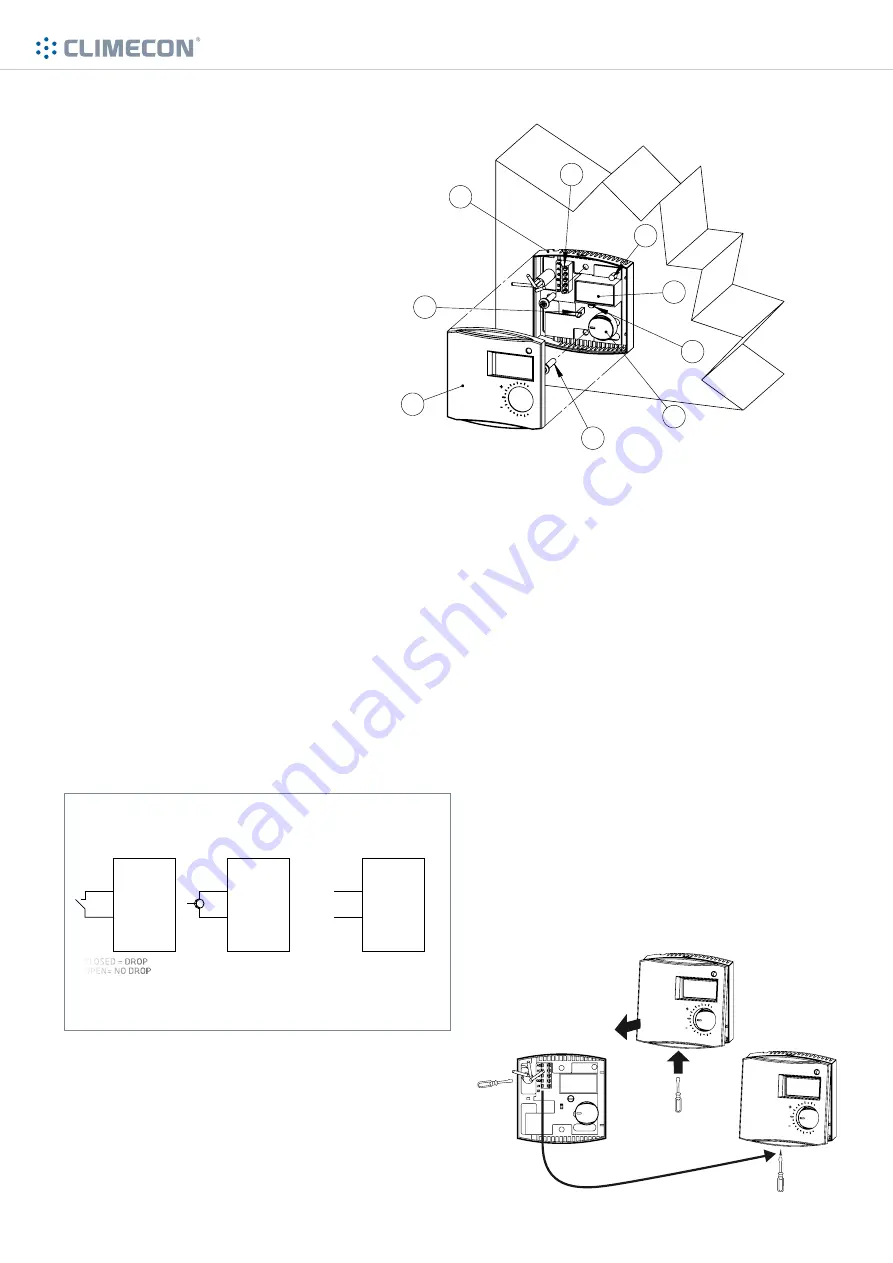
Remove the cover (2) of the thermostat from the rear part
(1), using e.g. a small screwdriver (clips at the upper and
lower edge of the thermostat).
3.
Fix the rear part of the thermostat either to the instrument
box or directly on the wall, using screws (3).
4.
Connect the cables to the terminal block (5) as shown on
Figure 2.
5.
If the temperature drop function is taken into use, connect
it as shown on Figure 5.
6.
After all the connection work, check the connections and
reinstall the cover of the thermostat.
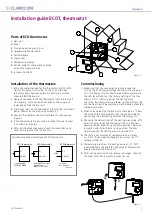
Parts of ECO thermostat
1.
Rear part
2.
Cover
3.
Fixing screw (to a wall, 2 pcs)
4.
Temperature control knob
5.
Terminal block
6.
Signal LED
7.
Temperature display
8.
Control knob for changing the setting
value of temperature drop
9.
Jumpers S2 and S3
2
1
4
3
5
6
7
8
9
Z1
GO (0V)
CLOSED = DROP
OPEN= NO DROP
NPN CONDUCTS= DROP
NPN DOES NOT
CONDUCT= NO DROP
0V = DROP
10V = NO DROP
ECO-thermostat
ECO-thermostat
ECO-thermostat
Z1
GO (0V)
Z1
GO (0V)
+
0/10V
-
Figure 4
Figure 5
Figure 6
1.
2.
Temperature drop alternatives of ECO thermostat


