background image


9

Leg Assembly: 

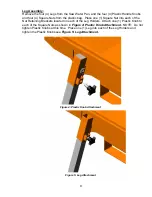
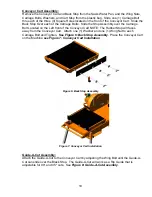
Remove the four (4) Legs from the Saw Water Pan, and the four (4) Plastic Handle Knobs 
and four (4) Square Nuts from the plastic bag.  Place one (1) Square Nut into each of the 
Nut Retaining Brackets located on each of the Leg Holders.  Attach one (1) Plastic Knob to 
each of the Square Nuts as shown in 

Figure 4: Plastic Knob Attachment.

  NOTE:  Do not 

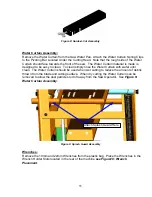
tighten Plastic Knobs at this time.  Place one (1) Leg into each of the Leg Holders and 
tighten the Plastic Knobs see 

Figure 5: Leg Attachment.


Figure 4: Plastic Knob Attachment 


Figure 5: Leg Attachment


Summary of Contents for BBC157

Page 1: ...OWNERS MANUAL COMPACT MASONRY SAW MODELS BBC157 BBC207 BBC547 FORM 7506 rev 2 2006...

Page 2: ...l or incidental damages arising out of the failure of any product to operate properly Integral units such as gasoline engines electric motors batteries tires transmissions etc are excluded from this w...

Page 3: ...Cutting With Diamond Blades 19 D Dry Cutting 20 E Wet Cutting 20 III Maintenance A V Belts 20 B Electric Motor 21 Electric Motor Warranty Service 21 C Gasoline Engine 21 Gasoline Engine Warranty Servi...

Page 4: ...gine is running or immediately after it is turned off Never operate the engine with any heat shields or guards removed Keep all guards in place when operating any piece of equipment Keep hands feet ha...

Page 5: ...ings and instructions for the safe and effective use of the material being cut California and some other authorities for instance have published lists of substances known to cause cancer reproductive...

Page 6: ...nd blades and wet cutting abrasive blades Insufficient coolant could result in severe blade breakage or diamond segment separation 7 The blade guard must be in place with the nose guard down and locke...

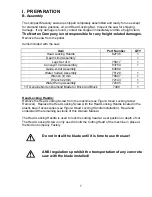
Page 7: ...nch 19 mm 70807 1 Wrench 22mm 72143 1 Water Pump Assembly 72305 1 14 Genuine Norton Diamond Blade for Brick And Block 7499 1 Head Locking Handle Remove the Head Locking Screw from the machine see Figu...

Page 8: ...plastic Bag Place the 12mm Large Washer over the 12mm Carriage Bolt Slide the 12mm Carriage thru the Head Locking handle Slot either above the Head Locking Handle to limit the depth of cut or below t...

Page 9: ...h of the Nut Retaining Brackets located on each of the Leg Holders Attach one 1 Plastic Knob to each of the Square Nuts as shown in Figure 4 Plastic Knob Attachment NOTE Do not tighten Plastic Knobs a...

Page 10: ...ront of the Conveyor Cart NOTE The Rubber Stop will faces away from the Conveyor Cart Attach one 1 Washer and one 1 Wing Nut to each Carriage Bolt and Tighten See Figure 6 Back Stop Assembly Place the...

Page 11: ...imply rinse the Water Curtain with water until clean The Water Curtain should be used when wet cutting to reduce the amount of debris thrown from the blade and cutting surface When dry cutting the Wat...

Page 12: ...12 Figure 10 Wrench Placement Water Pump Assembly The Water Pump requires no additional assembly...

Page 13: ...rpm Cooling System Forced Air Oil Capacity 0 6 liter 0 63 US qt Fuel Capacity 3 6 liter 0 95 US gal Fuel Type Unleaded Gasoline 86 pump octane Fuel Consumption 310 g kWh 0 51 lb Hp hr Low Oil Sensor Y...

Page 14: ...wiring connection is preferred but an extension cord with an electrical plug with 30 amp minimum capacity may be used A 30 amp circuit breaker is recommended Connecting wires should be as short as pos...

Page 15: ...rovided by the power company Electrical Connections 115 Volt 230 Volt For any Electric Motor service warranty or technical related questions please contact your nearest Baldor service center Baldor El...

Page 16: ...r Cleaner Never run the engine without the air cleaner Rapid engine wear will result from contaminants being drawn through the carburetor and into the engine 4 Engine Starting Refer to the engine owne...

Page 17: ...of both collars and on the mounting surface of the blade 4 Place the blade on the blade shaft Use only Norton Clipper Diamond Blades 5 Slide the outside blade shaft collar onto the blade shaft 6 Tigh...

Page 18: ...the backward stroke Complete each rapid stroke backward and forward by passing the material beyond the center of the blade before starting the reverse movement of the cart The harder the material the...

Page 19: ...twisted off 4 Do not force the material or bump into the blade When nearing completion of the cut retard and slightly hold back the conveyor cart If this is not done the material may be pulled into th...

Page 20: ...om a barrel remove water from pan and submerge it in water barrel Remove the drain plug so the used water and sludge will drain from pan 1 Prepare water supply 2 Install water curtain on cutting head...

Page 21: ...he drive for about 15 minutes to seat the belts Then impose the peak load If the belts slip tighten them until they no longer slip at peak load 3 Remember too much tension shortens belt and bearing li...

Page 22: ...conditions wash and oil the pre cleaner b Paper Element Every 100 operating hours more often under dusty or dirty conditions clean the paper element c Engine Oil After the first month or 20 operating...

Page 23: ...rease capacity for the bearings LUBRICATION OF SEALMASTER BEARINGS Shaft Sizes Maximum Grease Capacity of Bearing Chamber in Ounces 1 2 to 3 4 09 7 8 to 1 3 16 1 4 1 1 4 to 1 1 2 3 8 1 11 16 to 1 15 1...

Page 24: ...ent inspect the part you have and provide additional description as necessary 4 Specify mode of shipping desired for example parcel post truck airfreight U P S best way etc B Parts List See assembly d...

Page 25: ...25 V PARTS LIST SECTION Power Plant BBC547 Gasoline S 1 S 2...

Page 26: ...r the jackshaft 83720 7 Bearing 70599 8 Jackshaft 83721 9 Motor fixation plate 83722 10 Jackshaft fixation plate 83723 11 Cutting head 83724 12 Support plate for belt guard 83725 13 Belt guard 83726 1...

Page 27: ...2085A M3 Voltage Change Switch 231085 M4 Switch Box Rear 231087 M5 Switch On Off 231089 M6 Switch Box Cover 231088 M7 Capacitor Box Small 231091 NA Thermal Reset Button 1 1 2 HP Thermal Reset Button 2...

Page 28: ...28 Frame Common All BBC157 207 547...

Page 29: ...earing 83728 26 Water pump fixation spring 76097 27 Support post 83729 28 Water pump complete 72305 29 Drive end comp For water pump 72297 30 Sheath for flexible shaft Not Available Now part of 72307...

Page 30: ...30 Cutting Head Common All BBC157 207 547...

Page 31: ...earing set of 2 76060 40 Bearing set of 2 73418 41 Blade shaft assembly 76035 42 Loose collar 73216 43 Screw for loose collar 73217 44 Handle grip 72097 45 Leveling support 76113 46 Bushings bearing N...

Page 32: ...32 Cutting Table Common All BBC157 207 547...

Page 33: ...ls Top Backstop or Conveyor Cart Stop NA Part of 83754 59 Wheel Kit Conveyor Cart Set Of 4 w Hardware 75333 Carriage Bolt M10 x 30 DIN 603 sold each 3 required 27282 Washer 10 5 DIN 9021 sold each 3 r...

Page 34: ...34 C Baldor Service Policy...

Page 35: ...35 D Honda Service Policy...

Page 36: ...cancer birth defects or other reproductive harm Some examples of these chemicals are Lead from lead based paints Crystalline silica from bricks and cement and other masonry products and Arsenic and ch...

Reviews: