4 - WATER CONNECTIONS
Inlet water :
EUROKONUS 3/4
Outlet water :
EUROKONUS 3/4
Condensate discharge :
Ø
14 mm (internal diameter)
For the position of the pipeline and the wall fixings, refer to the
designs shown in the following sections, based on the specific
configuration.
4.1 PIPELINE DIAMETER
The choice and sizing of the hydraulic lines must be made by
an expert who must operate according to the rules of good
technique and the laws in force.
4.2 CONNECTIONS
To make the connections:
•
position the hydraulic lines
•
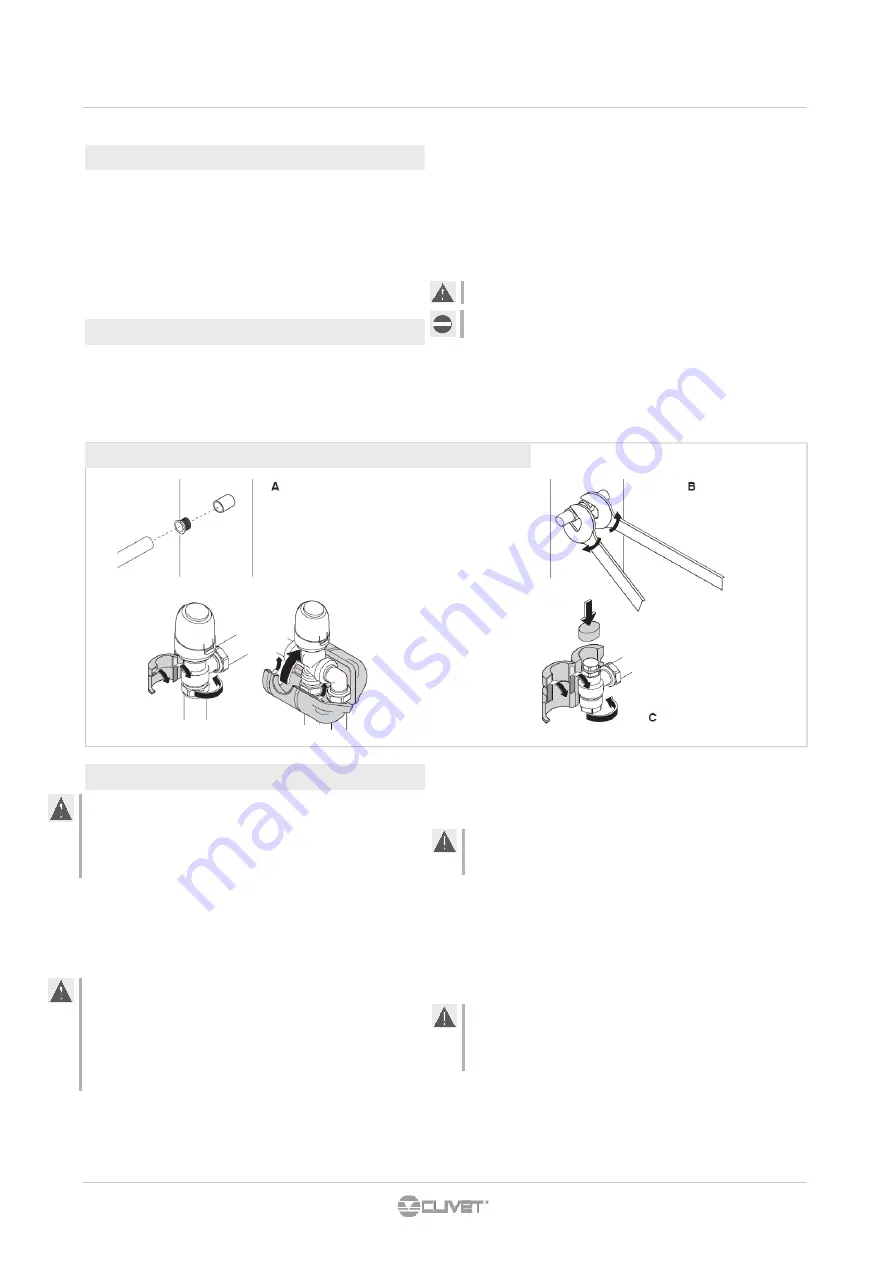
tighten the connections using the “spanner and counter
spanner” method ( ref. B)
•
check for any leaks of liquid
•
coat the connections with insulating material ( ref. C).
The hydraulic lines and joints must be thermally insulated.
Avoid partially insulating the pipes.
Do not over-tighten to avoid damaging the insulation.
Use hemp and green paste to seal the threaded connections;
the use of Teflon is advised when there is anti-freeze in the
hydraulic circuit.
4.3 CONDENSATION DISCHARGE
The condensation discharge network must be suitably sized
(minimum inside pipe diameter 16 mm) and the pipeline
positioned so that it keeps a constant inclination, never less
than 1%.
•
In the vertical installation, the discharge pipe is connected
directly to the discharge tray, positioned at the bottom of
the side shoulder underneath the hydraulic fixtures.
•
In a horizontal installation the discharge tube is connected
to the one already present on the machine.
If possible, make the condensation liquid flow directly in a
gutter or a “rainwater” discharge.
When discharging directly into the main drains, it is advisable
to make a siphon to prevent bad smells returning up the pipe
towards the room. The curve of the siphon must be lower
than the condensation collection bowl.
If the condensation needs to be discharged into a container, it
must be open to the atmosphere and the tube must not be
immerged in water to avoid problems of adhesiveness and
counter-pressure that would interfere with the normal outflow.
If there is a height difference that could interfere with the
outflow of the condensation, a pump must be mounted
(accessory kit):
•
in a vertical installation mount the pump under the lateral
drainage tray;
•
in a horizontal installation the pump position must be
decided according to the specific requirements.
In any case, consult the specific instructions in the
condensation discharge pump kit.
However, on completion of the installation it is advisable to
check the correct outflow of the condensation liquid by slowly
pouring about ½ l of water into the collection tray in about 5-
10 minutes.
Insulate the water lines / In the figure are indicated the optional components
55
Summary of Contents for ELFOROOM 11
Page 40: ...9 INFORMAZIONI TECNICHE 40 ...
Page 41: ...9 INFORMAZIONI TECNICHE 41 ...
Page 43: ...NOTE 43 ...
Page 44: ...44 ...
Page 45: ...ELFORoom2 3 5 11 15 17 Water terminal 45 ...
Page 87: ...NOTES 87 ...
Page 88: ...NOTES 88 ...
Page 89: ...ELFORoom2 3 5 11 15 17 Terminal à eau 89 ...
Page 131: ...NOTE 131 ...
Page 132: ...NOTE 132 ...
Page 133: ...ELFORoom2 3 5 11 15 17 Terminal de agua 133 ...
Page 175: ...NOTAS 175 ...
Page 177: ...ELFORoom2 3 5 11 15 17 Wassergekühltes 177 ...
Page 193: ...5 ELEKTRISCHE ANSCHLÜSSE 5 6 Eingebautem Thermostat in Gerät 4 pipes Y1 Y2 2 pipes Y1 193 ...
Page 219: ...BEMERKUNGEN 219 ...
Page 220: ...BEMERKUNGEN 220 ...
Page 221: ...ELFORoom2 3 5 11 15 17 Фанкойл для вертикальной и горизонтальной установки 221 ...
Page 263: ...ДЛЯ ЗАПИСЕЙ ...


