11
STEP 7 - Preparing Bottom Door Section
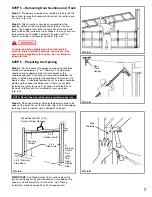
Step 7-1:
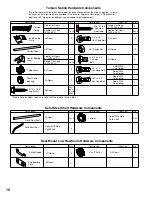
Spread the hardware on the garage floor in groups so
that you can easily find the parts.
Step 7-2:
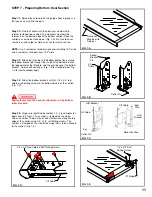
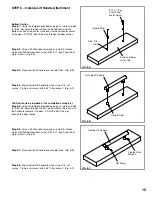
Find the section with the aluminum weatherstrip
retainer fastened to one edge. The aluminum weatherstrip
retainer is on the bottom edge of the bottom section. Place the
section on saw horses face down. (Fig. 7-A) Be sure to cover
saw horses with carpet or cloth so as not to scratch section.
NOTE:
Use 2 sawhorses for doors up to and including 10’0” wide
and 3 sawhorses for doors over 10’0” wide
Step 7-3:
Attach the lift cable to the bottom bracket by inserting
the bottom bracket pin through the inside of the bottom bracket,
the looped end of the lift cable, and the outside ear of the bottom
bracket. Secure with cotter pin. (Fig. 7-B for standard door, Fig.
7-C for low headroom door)
Step 7-4:
Attach the bottom brackets with (5) 1/4” x 3/4” red-
colored self-drilling screws to the bottom corners of the section.
(Fig. 7-D)
Red fasteners must be used for attachment of the bottom
roller brackets.
Step 7-5:
Hinges are identified by number 1, 2, 3 (and higher for
doors over 8’0” high). This number is stamped on the hinge.
Attach a number 1 hinge at each end stile location along the top
edge of the section using 1/4” x 3/4” self drilling screws. The
number is stamped on the side of the hinge that is to be attached
to the section. (Fig. 7-E)
FIG. 7-D
FIG. 7-A
FIG. 7-B
FIG. 7-C
FIG. 7-E
Aluminum
Weatherstrip
Retainer
1/4” x 3/4” Red Colored Self Drilling Screws
Lift Cable
Bottom
Bracket
Pin
Lift
Cable
Cotter Pin
Lift Cable
Key
Cotter Pin
LHR Bracket
Lift Cable
Roller Location
End
Stile
LHR
Bracket
1/4” x 3/4” Self
Drilling Screws
#1 Hinge


