background image


- 20 - 

                                          User’s Guide 

Pan/Tilt Network Camera 

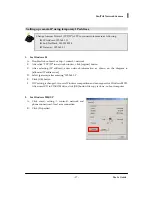
F.


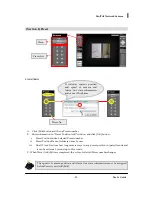
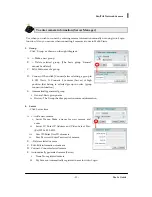
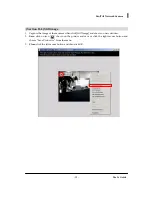
When Administrator page is open 
click [TCP/IP] of [Network] group on 
the left side menu. 

G.


After selecting Network Type (1), set 
up IP Setting (2). Refer to text page 41-
42 for detailed setting method and 
comment. 

H.


Click [Apply] button to finish setting. 


I.


Virtual IP Address is given to camera for emergency connection and it should not be 
changed to be used in following cases   

-


Do not know IP Address of camera 

-


Change to other network type (Static IP, PPPoE) after setting camera to Dynamic 
IP(DHCP) (

it is possible to connect in 1 min 10 sec after connecting power and 

Cross-Over cable

-


Change to other Network Type (Dynamic IP, PPPoE) after setting camera to 
PPPoE. (

it is possible to connect in 30 sec after connecting power and Cross-

Over cable

Summary of Contents for USB01PT

Page 1: ......

Page 2: ...Please read the User s Guide to use the product correctly...

Page 3: ...dicated on the bottom side of the product Record MAC Address in the space provided below It is necessary to keep it when using Service that is Dynamic DNS server of Technical Support Clover Electronic...

Page 4: ...t Version 2 2 9 and all information including the product specification is subject to changes without any notice System Requirement Network 10 Base T LAN Client PC Pentium III 500 MHz or more Memory R...

Page 5: ...and can radiate radio frequency energy and if not installed and used in accordance with the instruction manual may cause harmful interference to radio communications Operation of this equipment in a...

Page 6: ...force z Do not put the camera faced towards sunlight or electric light It can cause critical damage to CCD device z Do not touch or wipe lens Make sure you do not leave fingerprints on lens z Handle...

Page 7: ...nsor 28 Section 4 Video 29 Section 5 7 Display Area Admin Tools Connect Disconnect 30 Section 8 Select View Mode Section 9 Motion Control 32 Section 10 11 1 Alarm I O Position 33 Section 11 2 11 3 Sta...

Page 8: ...ion and speed of an object so that it is possible to monitor in all directions As a result PAN TILT NETWORK CAMERA can be set up and used by simply connecting the network lines to power supply without...

Page 9: ...any should be used z External Camera can usage Network Camera Connecting CCTV camera with an external camera makes an additional network camera z Flash Memory for Firmware update It is convenient to u...

Page 10: ...unit 2 Ceiling Mount Set Ceiling Plate and bolts 3 Rear Cover Camera cover 4 AC Adapter 100 240VAC 50 60Hz 5 Power Code AC Adapter connection 6 Multi Port Cable Video Out Audio In Out port 7 Cross Ov...

Page 11: ...N cables 5 Power Code Connect to AC Adapter Use acceptable voltage in different country 6 Multi Port Audio In Out Video Out 7 Video IN Connecting the external CCTV Camera can be used as External Video...

Page 12: ...late 4 Internal Camera Type Information including TV Type pixels 270 000 410 000 AC Power Frequency when consigned are indicated in detail 5 Assembly Type Explains how Internal Camera is to be assembl...

Page 13: ...not identified in dynamic IP environment Set up SMTP from administrator s page and receive by E mail refer to text in page 43 5 IP address can be set using two methods A Establish camera IP using aut...

Page 14: ...lic IP from Internet service provider Cable Private line i Network TYPE 1 Network TYPE 2 ii Make a note and confirm Static Public IP given by internet service provider and other network environment in...

Page 15: ...P router it composes into interior private IP network environment i Network TYPE 3 Network TYPE 5 ii Make up interior private IP network environment first using router manual iii Select private IP Add...

Page 16: ...t or LAN Cross Over Cable Camera Internet 10 Base T HUB Router Direct Cable Direct Cable What is Cross Over Cable Cross Over Cable Red Color Cable 2M is used when connecting camera into PC directly wi...

Page 17: ...smaller than 65535 Default 80 ii Video Server Port TCP If not 4333 it should be bigger than 1024 and smaller than 10000 Default 4333 2 Set up procedure A Download Setup IP Software when connecting ca...

Page 18: ...for Video of camera Audio data communication B Dynamic IP DHCP i Use when connecting with Cable Modem or automatic connection modem ii Set up Web Server Port and Video Server Port C PPPoE i Use when s...

Page 19: ...t to Camera A Enter camera IP address in Internet Explorer s address input space B Download Active X Control automatically C Active X Control capacity is about 1 8M so that downloading can take a some...

Page 20: ...s use D Select gateway after entering 192 168 1 1 E Click OK button F If IP setting is changed it re sets Windows composition and can request for Windows98 CD After insert CD in CD ROM drive click OK...

Page 21: ...rotocol TCP IP then click Properties D Enter network information in Use the following IP address as on the window E Click the OK button Make a tick for when linked indication of icon on task bar netwo...

Page 22: ...e Confirm whether Internet tool internet option security item of Explorer s pull down menu are set up in normal D If Active X Control download ends wait for user s acceptance as Security warning windo...

Page 23: ...1 2 Virtual IP Address is given to camera for emergency connection and it should not be changed to be used in following cases Do not know IP Address of camera Change to other network type Static IP PP...

Page 24: ...Address of other grade in case installing several cameras at the same time to one IP Router because Virtual IP Address is collided For example 192 168 0 3 Assume that network structure of above pictu...

Page 25: ...de IP Router of this network structures changes private IP address to public IP address and then connects with the outside this function is called NAT Network Address Translation Also to be used as a...

Page 26: ...ion of image Quality and Camera Source 5 Display Area Image of camera appears in 1 Channel 4 Channel 6 Admin Tools Connect on administrator page of camera When connecting Administrator s account detai...

Page 27: ...orded moving pictures Sound It transmits Sound that travels through interior microphone of camera to headphone or speaker of PC Mic It transmits sound that is traveled through microphone of PC to spea...

Page 28: ...ame by user iii Dwell Time It is time how long camera stays in any preset position in patrol mode and it can be set from 1 second up to 10 seconds C When Preset Add Edit are completed the color of sel...

Page 29: ...work Camera 2 Move A Click Move and then preset number camera moves at the specified speed and at the same time Alarm Out function runs 3 Delete A Select Preset number that wish to delete after click...

Page 30: ...Preset B Click arrow and then select Preset that is shown in list 2 Run A If click Run camera moves repeatedly according to the order of preset transfer pattern B The above preset pattern can be shown...

Page 31: ...ion refer text page 50 Sensor administrator page setup and for more explanation about Alarm I O Module Camera I O Module Magnetic Sensor Infrared Sensor Siren Lamp Alarm Out 2 Alarm Out 1 Alarm In 2 A...

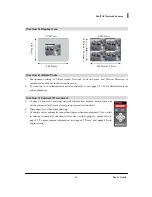
Page 32: ...0x240 SIF 176x144 QCIF 2 Quality A It determines the quality of image The file for image of high quality is large in volume because of decreased compressibility but the file for low quality of image i...

Page 33: ...n Section 7 Connect Disconnect 1 Connect Connect by entering network information camera Several cameras can be connected at the same time group connection function 2 Disconnect Use when disconnecting...

Page 34: ...belong to selected group in order group connection function E Automatically generated group i General Basic group name ii History The Group that keeps previous camera information 4 Server Click Server...

Page 35: ...all direction up down left right B Center Button It Moves camera to the original position center 2 Speed Control Slider Bar A It Regulates the speed of camera in 10 steps 3 Camera moves so that click...

Page 36: ...an absolute position window 2 Horizontal axis it is left to right pan axis in range of 0 320 3 Vertical axis it is up and down tilt axis in range of 0 105 4 Position Point It is the position of camera...

Page 37: ...It is saved automatically in a folder in the form of C Record camera name YYYY_MMDD_HHMMSS_order number swi Ex 2004_0618_090659_0 swi 3 It generates and saves automatically a record file every hour as...

Page 38: ...age 1 Capture the image of the moment when click Still Image and shows on new window 2 Save click on icon shown on the picture and save or click the right mouse button and choose Save Picture As from...

Page 39: ...inutes But the record speed can vary as the condition of network so that it is recommended to adjust the play speed to enable the picture and sound to be played in the same period Section 11 6 Sound 1...

Page 40: ...For detailed information refer to page 40 Audio Section 11 8 Stretch It enlarges or reduces the size of picture to fit in Display area 640x480 Section 11 9 Zoom It enlarges the picture by double Digi...

Page 41: ...ppears on top of screen ii Select Camera It is the same as the Camera Source of web page iii Video Format 1 It is set according to TV Type of CCD Camera 2 It is set up according to TV Type of CCD Came...

Page 42: ...otion can be seen upside down ii Mount Type 1 It is set according to product set up type A Ceiling For ceiling set up B Desktop For desktop set up 2 If it is not set properly the picture and direction...

Page 43: ...Default B MIC i Select 1 Internal Use built in microphone of camera 2 External It can be used when external microphone is installed to Audio In of camera ii Volume 1 Volume of microphone can be adjus...

Page 44: ...ly 5 Click Apply after setup ii Dynamic IP Cable Modem DHCP 1 Set up Web Server Port and Video Server Port 2 Click Apply after setup 3 Automatic rebooting function can be applied when there is a probl...

Page 45: ...s a result of exclusive communication protocol between DDNS server and camera C Synchronize with Dynamic DNS time i When camera is rebooted it synchronizes with local time of where camera is set up si...

Page 46: ...transmission type ii My server requires Authentication 1 Select when transmitting in Base64 format that requires authentication 2 Enter Account name and Password given by SMTP server provider for auth...

Page 47: ...1 237 40 108 2051 This message written on 10 14 33 12 Jul 2004 4 H 323 A Simultaneous Connections it allows both web connection HTTP and H 323 connection simultaneously through web browser it rejects...

Page 48: ...s current date and time in camera B New Camera Date Time i Synchronize with computer time Camera time is synchronized with computer time ii Set manually Set camera time manually If Synchronize with Dy...

Page 49: ...motion of camera up down left right iii Operator s account is set up with oper ID and oper Password when manufactured iv To change account s details click Edit to edit and click Save to save the chang...

Page 50: ...with a name My Camera 4 Firmware Update CLOVER ELECTRONICS U S A provides the update of Firmware to improve performance of camera Refer to pages 57 59 Reference 4 Firmware Update method for Other det...

Page 51: ...Enable Disable Set act of motion Detection 2 Region Setting A Set surveillance area B Can choose among Wide Normal and Narrow Wide Normal Narrow z When motion detection is on Video Resolution is auto...

Page 52: ...rough speaker installed to Audio Out of camera ii Alarm Out It runs On Off device that is connected to Alarm Out of camera iii Send Mail It sends the time and condition of motion detection by e mail t...

Page 53: ...or Alert Time alert sound of PC and other functions are as same as the function of Motion Detection in page 48 49 Reboot Use to restart the system when camera dose not work properly or failure of the...

Page 54: ...speed of file transmission 4 What is the zip file size for each picture When it is set with the maximum quality in SIF 320x240 the file capacity per frame is 2 25KByte and when set with minimum Qualit...

Page 55: ...y E mail and the more convenient way is to check by using Service DDNS 12 Can I use several network cameras with computer simultaneously when only one public IP address is used and the rest is a netwo...

Page 56: ...53 User s Guide Pan Tilt Network Camera Ref 1 The appearance of product...

Page 57: ...rdness 2 Make a hole as shown below where camera will be set Unit mm 3 Fix up ceiling plate as shown below with screws provided 4 Cable must be connected before fixing camera onto ceiling plate as sho...

Page 58: ...towards into camera in the direction of arrow on the right diagram Latches of rear cover are put into holes of camera and fixed up 7 When the set up is completed camera is fixed onto ceiling plate as...

Page 59: ...comes off 2 Hold camera and push in the opposite direction as shown with an arrow separating rear cover Be careful not to drop camera off 3 Pull up rear cover with both hands in the arrow direction a...

Page 60: ...e of Admin Tools page 3 Click Start Update and then firmware update window pops up as shown below Click and attach downloaded file cmp z When updating Firmware web browser under the Internet Explorer...

Page 61: ...tart Update to upload firmware file to camera 5 When file uploading finishes delete existing firmware of flash memory Delete existing firmware 6 Save new firmware in memory and notify the progress of...

Page 62: ...If the following problems occur In the middle of Firmware Update reconnect to camera and start Firmware Update again from the beginning z If it stops running after file Upload is finished z If there...

Page 63: ...e v Port forwarding and Virtual Server 1 Choose setup window connection login port forwarding 2 Service packet enter 2051 2051 in port 3 Forwarding enter 2051 in internal port 4 Forwarding enter 192 1...

Page 64: ...f Router IP setup it is same as the Gateway of camera 1 Select DHCP Server and then Disable of DHCP server 2 Click Auto Setup and carry out router set up web wizard A While proceeding web wizard chang...

Page 65: ...peating step 1 4 5 Repotec RP IP2014 A Set up procedure i Router connection 1 Enter http 192 168 1 254 in the Internet Explorer address window 2 Connection ID router Password admin ii Change of Router...

Page 66: ...vice Name enter Web 6 Specify Custom Service Ports enter 2051 and then click ADD 7 Click NEW 8 Server IP Address enter 51 9 Local Service choose custom 10 Custom Service Name enter Video 11 Specify Cu...

Page 67: ...orwarding 2 Application enter Web 3 Start and End enter 2051 2051 4 Protocol choose TCP 5 IP Address enter 51 6 Check Enabled 7 Application enter Video 8 Add Port Number 3051 by repeating step 3 6 9 C...

Page 68: ...ing and virtual server 1 Port forwarding 2 Click Add Custom Service 3 Start and End Port enter 2051 2051 4 IP Address 192 168 10 51 5 Click Apply 6 Add Port Number 3051 by repeating step 2 5 11 Speeds...

Page 69: ...Password smcadmin ii Change of Router IP setup it must be the same as Gateway of camera 1 LAN 2 Change the initial setup value 192 168 2 1 of router IP to 192 168 10 1 3 Check the changed setup by re...

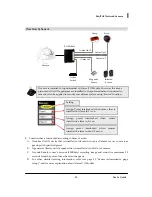
Page 70: ...t of camera ii Power LED red indicator lights when connected to camera iii Out LED 1 2 it indicates two Alarm Output conditions According to the action of Alarm Output relay ON OFF yellow indicator tu...

Page 71: ...le runs without time delay 3 Entrance Delay it is a function that signals camera after certain period of time when sensor connected to Alarm Input starts to work A ON when sensor connected to Alarm In...

Page 72: ...al situation 3 Alarm Output Connect On Off device such as siren lamp and etc to Alarm Output terminal 1 Alarm Output Status OFF 2 Alarm Output Status ON Terminal1 Terminal2 1 1 2 2 Sensor 1 Normal 2 w...

Page 73: ...aker Volume Level 2 Network Type Static Internet Address 192 168 1 2 Virtual IP Address 192 168 1 3 Subnet Mask 255 255 255 0 Default Gateway 0 0 0 0 Auto Reboot Flag Not checked Primary DNS Server 0...

Page 74: ...Date Time Time Initialize Administrator ID Password admin pass Operator ID Password oper oper Viewer ID Password view view Users Auto Login Enable Operator Enable Disable Disable Region Normal Sensiti...

Page 75: ...72 User s Guide Pan Tilt Network Camera Ref 8 Specification...

Page 76: ...73 User s Guide Pan Tilt Network Camera...

Reviews: