TRANSAXLE (TYPE G)
Transaxle
2005 Precedent IQ System Electric Golf Car Maintenance and Service Manual
Page 16-5
16
TRANSAXLE
See General Warnings, Section 1, Page 1-1.
TRANSAXLE REMOVAL
1. Disconnect the battery cables as instructed.
See WARNING “To avoid unintentionally starting...” in
General Warnings, Section 1, Page 1-2.
2. Place chocks at the front wheels and slightly loosen lug nuts on both rear wheels.
See WARNING “Lift
only one end...” in General Warnings, Section 1, Page 1-2.
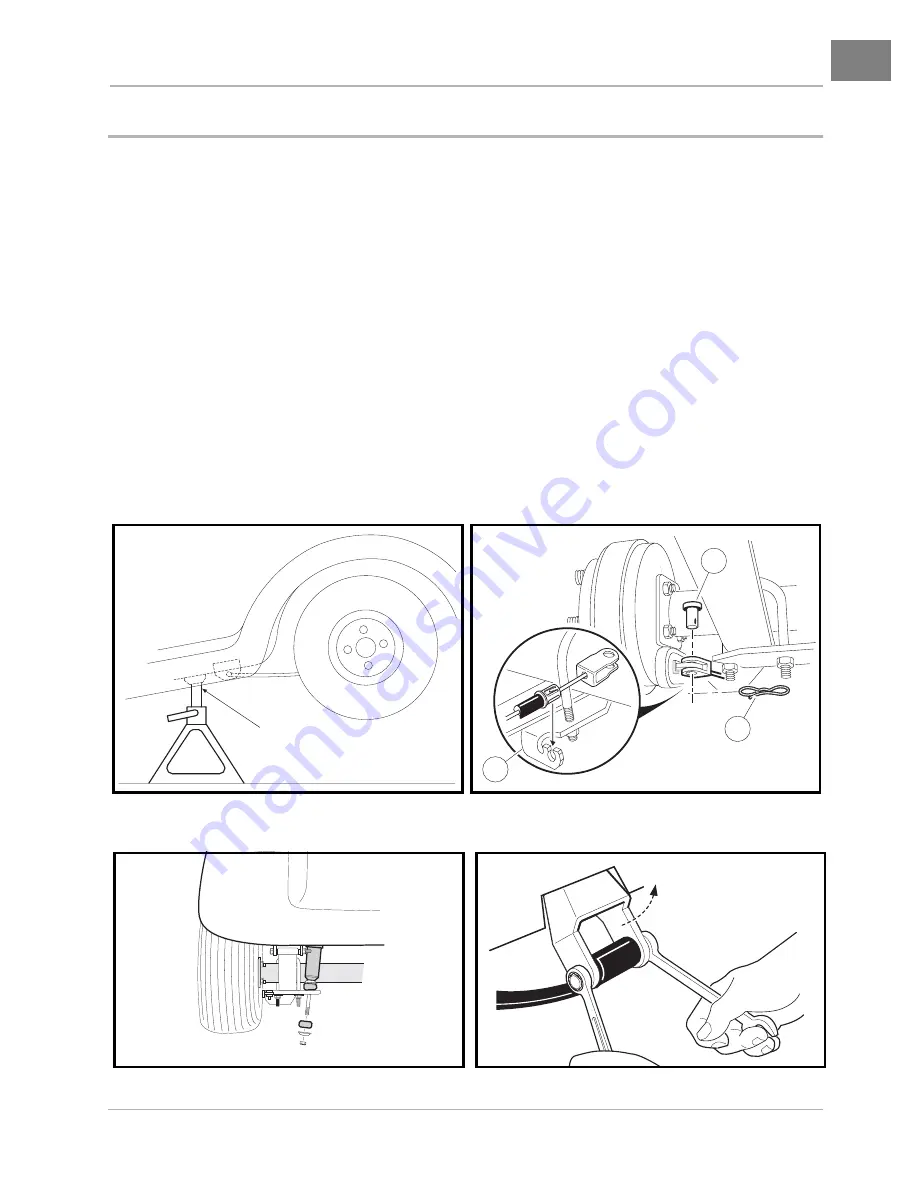
3. Place a floor jack under the transaxle and raise the rear of the vehicle. Position jack stands under the alu-
minum frame rails forward of the spring mount. Lower the vehicle to let the jack stands support the vehi-
cle
(Figure 16-6, Page 16-5)
.
See WARNING “Lift only one end of the vehicle...” in General
Warnings, Section 1, Page 1-1.
4. Remove the rear wheels, then thread one lug nut onto a stud on each rear hub. This will keep the brake
drums on the hubs.
5. Remove the bow tie pins (1) and brake cable clevis pins (3). Use tool (CCI P/N 102555501) to compress
tangs on cable end and remove cable end from bracket (4)
(Figure 16-7, Page 16-5)
.
Figure 16-6 Vehicle Supported on Jack Stands
Figure 16-7 Brake Cable
Figure 16-8 Disconnect Shocks
Figure 16-9 Shackles
JACK STAND
UNDER ALUMINUM
FRAME RAIL
AS SEEN FROM
DRIVER-SIDE OF
VEHICLE
REAR OF VEHICLE
4
1
3
Remove bolt, then
rotate shackle
up and away
from spring.


