WHEELS, TIRES AND HUBS
Rear Hubs
8
WARNING
• Strain on the brake hose or the brake hose fittings can result in damage to the line or fittings and
cause a leak in the hydraulic system, diminished brake performance, or brake failure.
• If at any point in this procedure the hydraulic system is opened, the brakes must be bled after the
correct reinstallation of the brake components. Failure to bleed the brakes could result in decreased
braking performance due to air being trapped in the hydraulic system. Use only DOT 5 brake fluid.
9.
Remove brake disc from hub.
10.
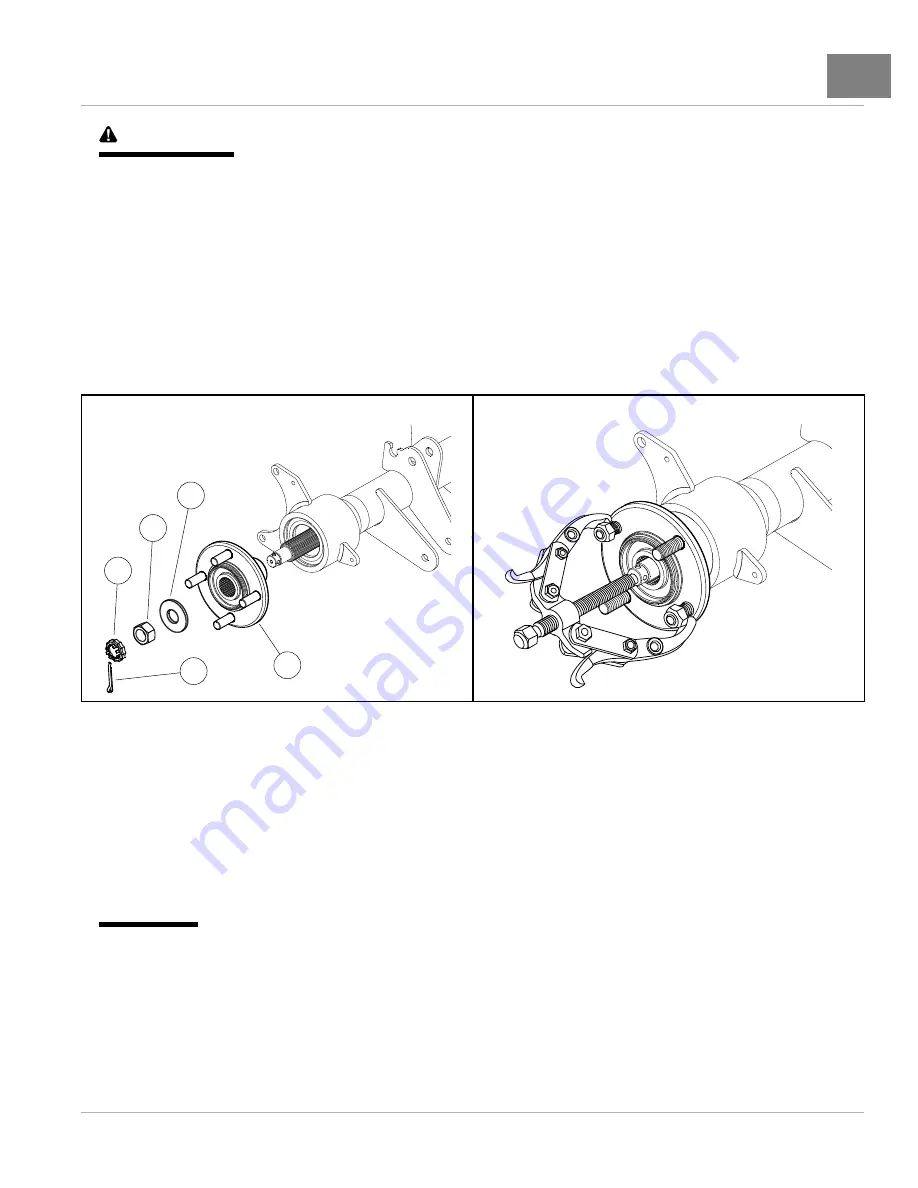
Remove axle nut (3) and large flat washer (4) and pull hub (5) off axle shaft.
See following NOTE.
NOTE:
If the hub (5) does not slide easily from the axle shaft, use a two or four-jaw wheel puller to remove the
hub
2
1
3
4
5
2560
Figure 8-7
Rear Hub Exploded View
2561
Figure 8-8
Puller Removing Rear Hub (If Necessary)
REAR HUB INSTALLATION
1.
Clean the spline and threaded portion of the axle shaft.
2.
Apply anti-seize compound to both the axle shaft splines and hub (5) splines.
See following CAUTION.
CAUTION
• Do not allow anti-seize compound to contact the brake disc or pads.
3.
Slide hub (5) onto axle shaft
See following NOTE.
NOTE:
Ensure hub is positioned to slide into the bearing and seal assembly.
4.
Install the large flat washer (4) onto the threaded portion of the axle.
5.
Install axle nut (3) and advance the nut to the large flat washer.
6.
Install brake disc onto hub.
2016 Carryall 1500/1700 and XRT 1550 Maintenance and Service Manual
Page 8-7
Summary of Contents for Carryall 1500 2016
Page 2: ......
Page 432: ...NOTES...
Page 433: ...NOTES...
Page 434: ...NOTES...
Page 435: ......
Page 436: ......


