


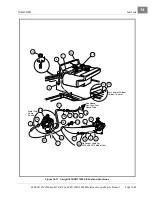


FUEL SYSTEM
Fuel Pump
2006-2010 Turf/Carryall 272/472 and XRT 1200/1200 SE Maintenance and Service Manual
Page 14-21
14
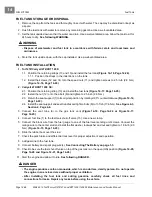
FUEL PUMP CLEANING AND INSPECTION (METAL PUMP ONLY)
1. Use a nonflammable solvent to clean the front cover, pumping chamber and back cover. Be sure the vent
on the front cover is clean both inside and out.
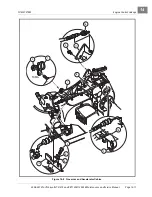
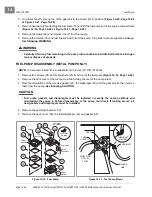
2. Inspect the valve assemblies (31, 32, and 33), gaskets and diaphragms for damage
.
3. If a valve assembly is damaged, the rubber retaining plug (33) and valve assembly must be replaced.
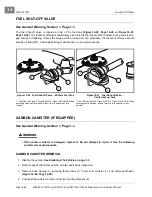
FUEL PUMP ASSEMBLY (METAL PUMP ONLY)
1. Install the fuel gasket (35) and diaphragm (34) on the back cover (36)
2. Install the valve assembly in the pumping chamber (30).
See following CAUTION.
CAUT ION
• If the valve assembly is not installed exactly as shown, the impulse fuel pump will not operate
properly.
3. Install the pumping chamber (30) on top of the fuel diaphragm (34). Be sure the fuel inlet and the fuel out-
let align with the arrows on the front of the front cover
.
4. Install the gasket (29), clear impulse diaphragm (28) and the paper impulse gasket (27) to the pumping
chamber (30).
5. Install the front cover and then the lockwashers (25) and four screws (24) on the assembly. Be sure the
arrows on the front cover point from the fuel inlet to the fuel outlet
. Tighten
the screws to 26 in-lb (3.0 N·m).
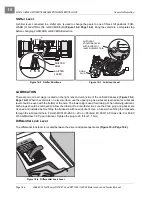
FUEL PUMP INSTALLATION
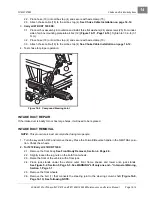
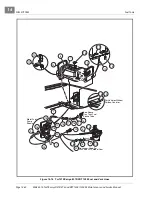
1. Connect the fuel line (2) that comes from the fuel filter (17) to the fuel pump (18). Install a new clamp (16)
or
.
See same figure for proper routing of fuel
lines
.
See following NOTE.
NOTE:
Be sure to connect the fuel line (2), that comes from the primary fuel filter (17), to the inlet nipple
on the pump. Direction of fuel flow is indicated by the arrows on the fuel pump.
2. Connect the fuel line (3) to the fuel pump (18) that goes to the secondary fuel filter (22). Install a new
clamp (16).
3. Connect the impulse line (7) to the bottom nipple on the fuel pump (18). Use a new clamp (20).
4. Install the fuel pump onto the mounting bracket with two thread-rolling screws (25) and tighten to 40 in-
lb (4.5 N·m).
5. Turn the fuel shut-off valve on top of the gas tank to the open position
6. Connect battery and spark plug wire(s).
See Connecting The Battery on page 1-3.
7. With the Forward/Reverse handle in the NEUTRAL position, start the engine and check for fuel leaks. If
the fuel pump leaks, a rebuild kit or new fuel pump must be installed to replace all gaskets and dia-
phragms, or entire pump.
See following DANGER.
ý
DANGER
• Repair any fuel leaks before using the vehicle.
Summary of Contents for CARRYALL 272
Page 2: ......
Page 14: ......
Page 18: ...1...
Page 52: ...5...
Page 90: ...6...
Page 110: ...7...
Page 112: ...8...
Page 128: ...10...
Page 170: ...11...
Page 224: ...13...
Page 284: ...16...
Page 302: ...17...
Page 308: ......
Page 309: ...Club Car R NOTES...
Page 310: ...Club Car R NOTES...
Page 311: ......