TROUBLESHOOTING AND ELECTRICAL SYSTEM:
DIESEL VEHICLES
Test Procedures
12
TEST PROCEDURE 27 – Fuel Solenoid Pull Coil Circuit
See General Warnings, Section 1, Page 1-2.
NOTE:
Keep the battery connected during this test procedure.
1.
Disable the vehicle.
See Disabling the Vehicle on page 1-3.
2.
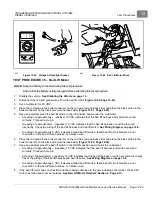
Disconnect the three-pin connector between the fuel solenoid and the wire harness
.
3.
Disconnect the light green wire from starter solenoid.
4.
Set a multimeter to 20 VDC.
5.
Place the red (+) probe on the 14-gauge blue wire (w135) of the three-pin connector at the fuel solenoid (wire
harness side).
6.
Place the black (–) probe on the frame or engine block (ground).
7.
The multimeter should indicate 0 VDC with the key in the OFF position.
8.
Monitor the multimeter and turn the key switch to the ON position. The multimeter should indicate 0 VDC.
9.
Monitor the multimeter and turn the key switch to the START position. The multimeter should indicate between
10 and 11.5 VDC.
10. If the reading obtained in the previous step is correct and the fuel solenoid does not operate correctly, replace the
fuel solenoid.
See Fuel Solenoid Removal on page 14-3.
11. If any of the above readings are incorrect, check the following items:
– Battery.
See Test Procedure 1 – Battery on page 12-12.
– Key switch.
See Test Procedure 4 – Key Switch (Starter Circuit) on page 12-17.
– Starter solenoid.
See the Kubota D722 diesel engine manual (CC P/N 103840201).
– Wire continuity of w135.
See Test Procedure 18 – Wire Continuity on page 12-31.
TEST PROCEDURE 28 – Fuel Solenoid Hold Coil Circuit
See General Warnings, Section 1, Page 1-2.
NOTE:
Keep the battery connected during this test procedure.
1.
Disable the vehicle.
See Disabling the Vehicle on page 1-3.
2.
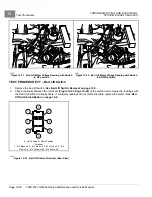
Disconnect the three-pin connector between the fuel solenoid and the wire harness
.
3.
Set a multimeter to 20 VDC.
4.
Place the red (+) probe on the 18-gauge gray wire (w122) of the three-pin connector at the fuel solenoid (wire
harness side).
5.
Place the black (–) probe on the frame or engine block (ground).
6.
The multimeter should indicate 0 VDC with the key switch in the OFF position.
7.
Monitor the multimeter and turn the key switch to the ON position. The multimeter should indicate approximately
12 VDC.
8.
If the reading obtained in the previous step is correct and the fuel solenoid does not operate correctly, replace the
fuel solenoid.
See Fuel Solenoid Removal on page 14-3.
9.
If any of the above readings are incorrect, check the following items:
– Battery.
See Test Procedure 1 – Battery on page 12-12.
– 30-amp fuse on w125.
See Test Procedure 2 – Fuse on page 12-15.
– Key switch.
See Test Procedure 5 – Key Switch (ON Position) on page 12-18.
2008-2012 All-Wheel Drive Maintenance and Service Manual
Page 12-37
Summary of Contents for Carryall 295 SE
Page 2: ......
Page 20: ......
Page 28: ......
Page 58: ......
Page 66: ......
Page 100: ......
Page 122: ......
Page 150: ......
Page 157: ......
Page 190: ......
Page 197: ......
Page 236: ......
Page 284: ......
Page 386: ......
Page 394: ......
Page 442: ......
Page 452: ......
Page 454: ......
Page 455: ......
Page 456: ......

