DRIVETRAIN COMPONENTS
Rear Driveshaft
17
REAR DRIVESHAFT
REAR DRIVESHAFT REMOVAL
See General Warnings, Section 1, Page 1-2.
1.
Push the car to a position that enables easy access to the roll pin securing the rear driveshaft to the differential
pinion shaft
. Chock the front wheels.
2.
Disconnect battery and spark plug wire(s)
(gasoline vehicles only)
.
See Disconnecting the Battery –
Gasoline/Diesel Vehicles, Section 1, Page 1-3.
3.
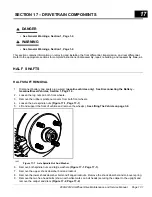
Remove the roll pin from the differential pinion shaft and driveshaft universal joint.
See following NOTE.
NOTE:
Use a 1/4-inch roll pin punch to drive out the roll pin.
4.
Slide the driveshaft forward on the transmission to release the driveshaft from the differential pinion shaft. Then
slide the driveshaft toward the rear and off the transmission shaft.
REAR DRIVESHAFT INSTALLATION
See General Warnings, Section 1, Page 1-2.
1.
Apply a light coat of anti-seize on the splined shaft of the differential.
2.
Slide the universal joint of the driveshaft (with grease fitting) onto the splined transmission shaft.
3.
Slide the differential pinion shaft into driveshaft universal joint. Align the roll pin holes in the driveshaft with the
pin holes in the differential pinion shaft.
4.
Drive a new roll pin into the differential pinion shaft and the driveshaft universal joint coupling.
See following
NOTE.
NOTE:
The roll pin should be slightly below the surface on both sides of the coupling.
Use a 1/4-inch roll pin punch to drive the roll pin into place.
5.
Gasoline vehicles:
Connect the spark plug wires.
6.
Connect battery.
See Connecting the Battery – Gasoline/Diesel Vehicles, Section 1, Page 1-4.
TRANSMISSION
TRANSMISSION REMOVAL
See General Warnings, Section 1, Page 1-2.
1.
Disconnect battery and spark plug wire(s)
(gasoline vehicles only)
.
See Disconnecting the Battery –
Gasoline/Diesel Vehicles, Section 1, Page 1-3.
2.
Remove the outer clutch cover.
See Clutch Outer Cover Removal on page 15-41 (gasoline vehicles) or
Clutch Outer Cover Removal on page 16-37 (diesel vehicles).
2008-2012 All-Wheel Drive Maintenance and Service Manual
Page 17-13
Summary of Contents for Carryall 295 SE
Page 2: ......
Page 20: ......
Page 28: ......
Page 58: ......
Page 66: ......
Page 100: ......
Page 122: ......
Page 150: ......
Page 157: ......
Page 190: ......
Page 197: ......
Page 236: ......
Page 284: ......
Page 386: ......
Page 394: ......
Page 442: ......
Page 452: ......
Page 454: ......
Page 455: ......
Page 456: ......

