18
Radiator
RADIATOR AND COOLANT SYSTEM (DIESEL)
COOLANT RESERVOIR INSTALLATION
1.
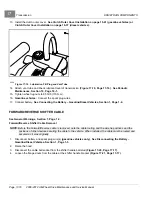
Install reservoir, aligning holes in mounting tabs with holes in chassis, and secure with bolts. Tighten the
hardware to 132 in-lb (15 N·m).
2.
Attach 5/8 inch hose to the bottom of reservoir and secure with clamp.
3.
Attach the two hoses to top of reservoir and secure with clamps.
4.
Fill the reservoir to the FULL mark with an appropriate coolant mixture and check for leaks.
See following NOTE.
NOTE:
Use a mixture of 45% water and 55% propylene glycol with anti-corrosion additives.
5.
Replace the reservoir cap.
6.
Connect battery.
See Connecting the Battery – Gasoline/Diesel Vehicles, Section 1, Page 1-4.
7.
Start and run the engine until it reaches operating temperature and check for leaks.
8.
Stop the engine and allow the engine and coolant to cool.
See following WARNING.
WARNING
• Coolant reservoir and radiator are pressurized. Remove caps slowly to relieve pressure.
• Hot! Coolant system is pressurized. Do not remove radiator cap while engine is hot.
9.
If necessary, remove reservoir cap and fill the reservoir to the FULL mark. Replace cap.
See preceding
WARNING.
10. Lower and secure the hood.
RADIATOR
See General Warnings, Section 1, Page 1-2.
RADIATOR REMOVAL
1.
Disconnect battery.
See Disconnecting the Battery – Gasoline/Diesel Vehicles, Section 1, Page 1-3.
2.
Raise the hood.
3.
Drain the radiator, reservoir and engine.
See Engine Coolant Change on page 18-1. See following WARNING.
WARNING
• Coolant reservoir and radiator are pressurized. Remove caps slowly to relieve pressure.
• Hot! Coolant system is pressurized. Do not remove radiator cap while engine is hot.
4.
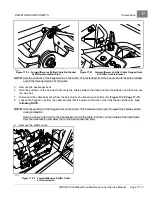
Release the clamp securing the hose to the radiator fill spout and remove hose.
5.
Release the clamps securing the upper and lower radiator hoses to the radiator and remove hoses.
6.
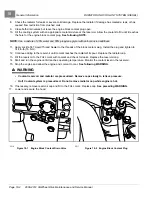
Disconnect the two-pin connector between the fan motor and the wire harness
.
7.
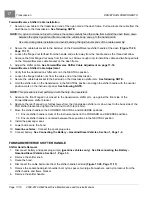
Remove the flanged locknuts and flanged bolts securing the two radiator support brackets to the chassis and
remove brackets.
Page 18-4
2008-2012 All-Wheel Drive Maintenance and Service Manual
Summary of Contents for Carryall 295 SE
Page 2: ......
Page 20: ......
Page 28: ......
Page 58: ......
Page 66: ......
Page 100: ......
Page 122: ......
Page 150: ......
Page 157: ......
Page 190: ......
Page 197: ......
Page 236: ......
Page 284: ......
Page 386: ......
Page 394: ......
Page 442: ......
Page 452: ......
Page 454: ......
Page 455: ......
Page 456: ......

