BODY AND TRIM
Front Body Components
4
5.
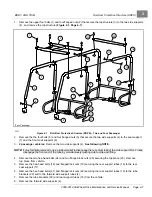
Rotate front edge upward and lift off the entire center cowl panel to disengage the Tuflok fasteners and the rear
tabs of the panel out of the slots in the instrument panel structural support.
CENTER COWL PANEL INSTALLATION
1.
Position the center cowl panel to the vehicle, making sure that the rear tabs of the panel engage the slots in the
instrument panel structural support. Make sure that the tabs on the ends of the center cowl panel engage the
slots in the tops of the side cowl panels.
2.
Position and secure the center cowl panel to the instrument panel structural support by pressing down firmly and
directly over the four metal body trim clips on the underside of the panel.
3.
Install four Tuflok plastic locking fasteners along the trailing edge of the center cowl panel to secure the panel to
the instrument panel structural support.
4.
Replace, lower and secure hood.
See Hood Installation on page 4-4.
SIDE COWL PANEL (FENDER) REMOVAL
1.
Remove Roll-over Protective Structure (ROPS).
2.
Remove hood.
3.
Remove center cowl panel.
See Center Cowl Panel Removal on page 4-4.
4.
Disengage the three tabs securing the top of the side cowl panel from the three slots in the under-hood, inner
structure of the fender flare.
5.
Reach under the side of the fender flare and use thumb pressure on the three lower side-retaining tabs while
pulling upward on the front outboard edge of the side cowl panel to disengage the three lower side-retaining
tabs from the fender flare.
6.
Lift up on the front of the side cowl panel enough to disengage the rear side tab from the slot in the front side
of the instrument panel.
7.
Twist the front outside edge of the side cowl panel up, out and away from the centerline of the vehicle. This
will disengage the fender from the ROPS cowl support and the fender-retaining notch in the instrument panel
structural support.
8.
Remove side cowl panel from vehicle.
SIDE COWL PANEL (FENDER) INSTALLATION
1.
Position the side cowl panel to the vehicle.
2.
Insert the top rear, inside corner down and into the space between the ROPS cowl support and the
fender-retaining notch in the instrument panel structural support. Ensure that the top rear, inside corner of the
side cowl panel is engaged in the fender-retaining notch in the instrument panel structural support and that the
ROPS cowl support passes through the ROPS cowl support clearance hole in the side cowl panel.
3.
Rotate the side cowl panel down and over the ROPS cowl support until it is down and in place.
4.
Grip the front leading edge of the side cowl panel and twist it towards the center of the vehicle and guide the rear
side tab of the side cowl panel into the slot in the front, side of the instrument panel.
5.
Engage and secure the three lower side-retaining tabs into the receiving slots on the top of the fender flares.
6.
Pass the rubber hood latch through the hole in the top of the side cowl panel.
7.
Engage and secure the three top retaining tabs of the side cowl panel into the three slots in the under-hood,
inner structure of the fender flare.
8.
Reinstall center cowl panel.
See Center Cowl Panel Installation on page 4-5.
2008-2012 All-Wheel Drive Maintenance and Service Manual
Page 4-5
Summary of Contents for Carryall 295 SE
Page 2: ......
Page 20: ......
Page 28: ......
Page 58: ......
Page 66: ......
Page 100: ......
Page 122: ......
Page 150: ......
Page 157: ......
Page 190: ......
Page 197: ......
Page 236: ......
Page 284: ......
Page 386: ......
Page 394: ......
Page 442: ......
Page 452: ......
Page 454: ......
Page 455: ......
Page 456: ......

