TRANSAXLE: ELECTRIC VEHICLE
Transaxle Removal
18
TRANSAXLE REMOVAL
See General Warnings on page 1-2.
1.
Disconnect the batteries and discharge the controller.
See Disconnecting the Batteries – Electric Vehicles
2.
Place chocks at the front wheels and slightly loosen lug nuts on both rear wheels.
See WARNING “Lift only one
end...” in General Warnings on page 1-2.
3.
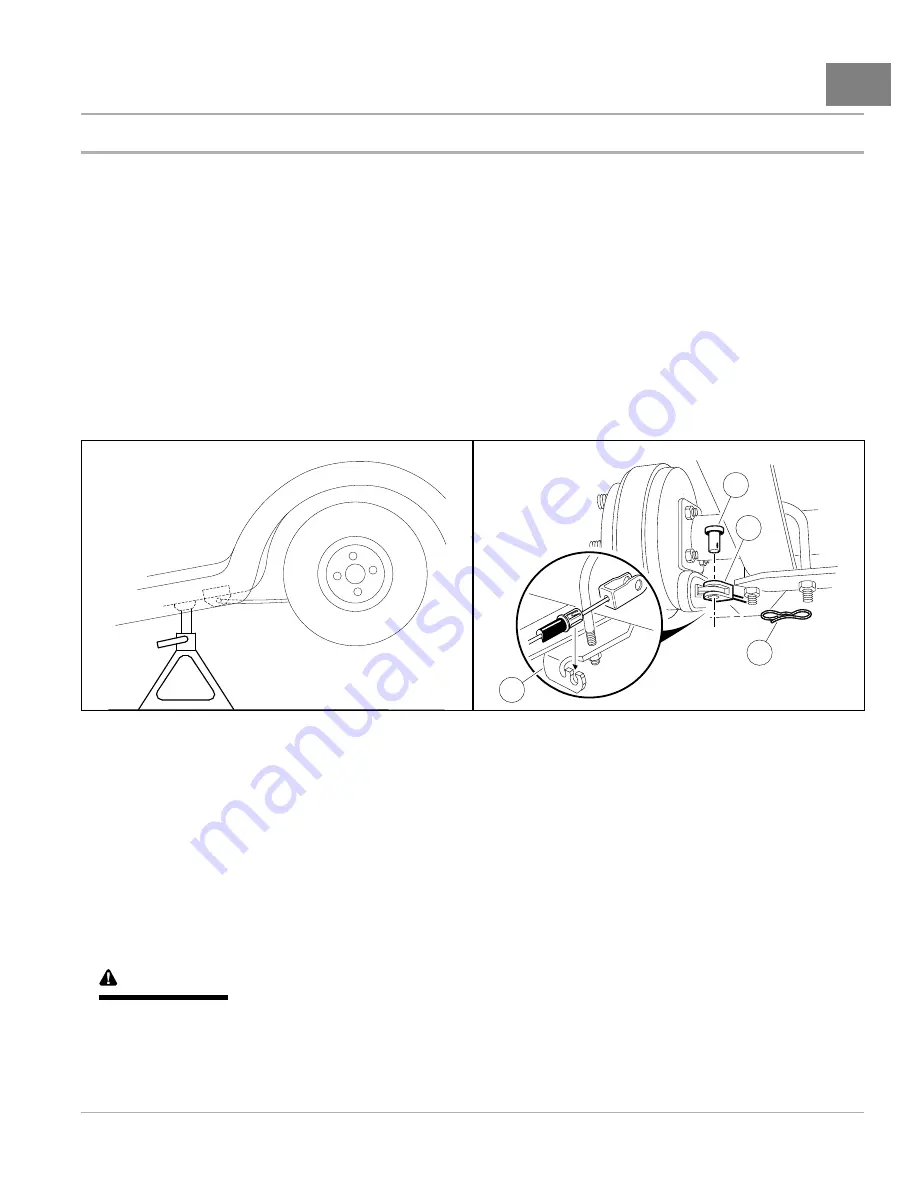
Place a floor jack under the transaxle and raise the rear of the vehicle. Position jack stands under the aluminum
frame rails forward of the spring mount. Lower the vehicle to let the jack stands support the vehicle
.
See WARNING “Lift only one end of the vehicle...” in General Warnings on page 1-2.
4.
Remove the rear wheels, then thread one lug nut onto a stud on each rear hub. This will keep the brake drums
on the hubs.
5.
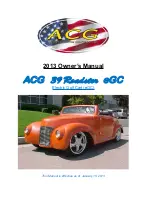
Remove the bow tie pins (1) and brake cable clevis pins (3). Use tool (P/N 102555501) to compress tangs on
cable end and remove cable end from bracket (4)
1
2
3
4
682
Figure 18-6
Vehicle Supported on Jack Stands
651
Figure 18-7
Brake Cable
6.
Disconnect the shock absorbers from their lower mounts
.
7.
Disconnect the four motor wires. Use two wrenches to prevent the post from turning.
8.
With a floor jack supporting the transaxle, remove lower spring shackle nuts and bolts. Position shackles so
they are clear of springs
.
9.
If a chain hoist was used to raise the vehicle, lift the vehicle high enough to permit easy access and clearance
for removal of the motor. If a floor jack was used to raise the vehicle, lower the transaxle enough to permit
easy access and clearance for removal of the motor.
10. Remove the three motor mounting bolts (1)
securing the motor to the transaxle.
See following CAUTION.
CAUTION
• Do not position fingers under motor when sliding motor off of the input shaft. Fingers may get
pinched when motor disengages.
11. Carefully remove the motor from the transaxle. Slide the motor away from the transaxle until the motor spline
becomes disengaged from the input shaft, then lift motor out.
See preceding WARNING.
2014 Precedent
®
Golf Car Maintenance and Service Manual
Page 18-5
Summary of Contents for Precedent 2014
Page 2: ......
Page 4: ......
Page 24: ......
Page 28: ......
Page 38: ......
Page 66: ......
Page 104: ......
Page 116: ......
Page 152: ......
Page 234: ......
Page 252: ......
Page 264: ......
Page 298: ......
Page 332: ......
Page 394: ......
Page 412: ......
Page 438: ......
Page 444: ......
Page 508: ......
Page 534: ......
Page 543: ......
Page 544: ......
Page 545: ......
Page 547: ......
Page 548: ......


