15
Onboard Charger Operation
BATTERY CHARGER
AC POWER CONNECTION
CAUTION
• Charger enclosure may be hot during charging. Use hand protection if handling the charger while
charging.
NOTE:
Make sure that the AC cord provided with your charger has the proper AC plug for your location. If it does not,
contact your Club Car representative to obtain the proper cord or plug.
Only use one charger on a single 15 amp circuit or the circuit may become overloaded.
To reduce the risk of electric shock, the battery charger must be grounded. The charger is equipped with an AC
electric cord with an equipment-grounding conductor and a grounding type plug. The AC plug must be connected to
an appropriate receptacle that is properly installed and grounded in accordance with the National Electric Code and
all local codes and ordinances.
The AC power cord must be a three-conductor, no. 12 AWG (American Wire Gauge) or no. 14 SWG (British Standard
Wire Gauge), heavy-duty cord with ground, properly wired and in good electrical condition. Keep it as short as
possible (no more than 12 feet (3.7 m)). Place all cords so they will not be stepped on, tripped over, or otherwise
subject to damage or stress.
CHARGING BATTERIES
NOTE:
Batteries should be put on charge even if they have been used for only a short time, i.e., 10 minutes. The
charger is automatic and will turn off when batteries are fully charged. If the charger does not seem to be
operating properly, or if the batteries seem weak, contact a local Club Car distributor/ dealer.
New batteries will not deliver their full range until the vehicle has been driven and recharged from 20 to 50
times.
Vehicles should be restricted to 40 to 50 amp hours of discharge between charges until the batteries have
been properly seasoned (20 to 50 charge cycles). For maximum battery life, Club Car recommends that
electric vehicles always be recharged after 40 to 50 amp hours of discharge or each night in order to avoid
deep discharging the batteries. Charging between uses will also extend battery life.
When temperatures fall below 65 °F (18.3 °C), batteries charged in unheated areas should be placed on
charge as soon as possible after use. Batteries are warmest immediately after use, while cold batteries
require more time to fully charge.
1.
Insert the onboard charger AC plug into a dedicated and properly wired AC receptacle to begin a charge cycle.
See Battery Charger Algorithms, Section 15, Page 15-2.
NOTE:
Only connect ONE charger to a single 15 amp circuit or the circuit may become overloaded.
2.
Place the charger AC cord so it will not be stepped on, tripped over, or otherwise subject to damage or stress.
3.
Do not place items in the compartment where the battery charger is installed. Provide the charger with adequate
ventilation.
After the charger is plugged in, the vehicle’s control circuit is locked out, preventing operation of the vehicle, as well as
the possibility of subsequent damage to the charger and vehicle.
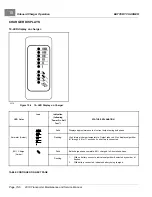
Once the lockout is actuated, the charger turns on and performs a Power-On Self Test in which the LED lights on the
charger flash ON in sequence, the Charger Indicator Light on the dash will flash three times and the reverse buzzer will
simultaneously sound three times. If test is successful, charging will start and the ammeter will come on.
Page 15-8
2019 Transporter Maintenance and Service Manual
Summary of Contents for TransPorter 4
Page 2: ......
Page 271: ...ELECTRIC MAIN HARNESS Wiring Diagrams Electric Main Harness 18 ...
Page 272: ... Page intentionally left blank ...
Page 273: ...ELECTRIC INSTRUMENT PANEL HARNESS Wiring Diagrams Electric Instrument Panel Harness 18 ...
Page 274: ... Page intentionally left blank ...
Page 275: ...ELECTRIC ACCESSORIES HARNESS Wiring Diagrams Electric Accessories Harness 18 ...
Page 276: ... Page intentionally left blank ...
Page 282: ...NOTES ...
Page 283: ...NOTES ...
Page 284: ...NOTES ...
Page 285: ......
Page 286: ......

