background image


35

Network Camera_ User manual


3.4.


PTZ  Control  Menu 

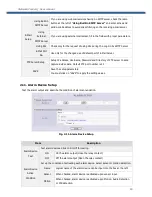
You can control the PTZ of PTZ-enabled product by using PTZ menu control buttons on the Web Viewer.


Item 

Description 


Camera Position Control 


Pan/Tilt control 


Zoom In   


Zoom Out 


Focus Far 


Focus Near 


Enter into OSD menu for camera setting.   

In the OSD menu, use Up/Down buttons to navigate through the menu item on 

the screen.   

Depending upon the situations Left/Right buttons will perform one of the 

followings. 

1. Change parameter value in each submenu.   

2. Decrement/increment the numbered value. 

3. Go into lower level menu trees. 

4. If clicked when the cursor is on “EXIT”, upper menu will be activated or OSD 

menu mode will be finished. 


For more detailed information, refer to the product manual. 

If the product can’t support the OSD menu, “Menu” button is disabled.


After activating this mode, the camera will move so that the clicked point on the 

video is located at the center of the video. display. 


Left : Deactivated. 


Right : Activated. 


Iris Control 


Set Pattern 


Set Tour 


Set Preset 


GOTO Preset 


Run Pattern 


Run Tour 


Run Scan 

Summary of Contents for MPC1050IR

Page 1: ...Rev 1 1 Network Camera M Series User Manual...

Page 2: ...ion of the Document Feb 20th 2014 1 1 Modified 2 7 Video Setup ISP Module Adjust Indications Warning Death or Serious Injury will occur without following Warning Caution Operational Problem Faulty Mal...

Page 3: ...6 2 8 User Admin Time Setup 18 2 9 Sensor Capture Setup 20 2 10 E Mail FTP Setup 22 2 11 Alarm Device Setup 23 2 12 Motion Detection Setup 24 2 13 Audio Detection 26 2 14 PTZ Setup 27 2 15 Upgrade Res...

Page 4: ...efer to the manual of each specific product for available option 2 Install IP installer Ver 3 0 1 or above and NVR Pro Ver 5 17 or above on your PC Each Program is included in the CD coming with produ...

Page 5: ...WIFI network interface module displayed to highlight the selection and click on OK to start the program b Find the product for the configuration Click on Refresh button to find the list of the product...

Page 6: ...deo server can be decoded or stored in a PC running NVR PRO program or other CMS program Minimum requirement of the PC is recommended as in the following table Item Minimum Requirements Misc CPU Intel...

Page 7: ...rnet Explorer as followings http IP address of the product admin htm Example http 172 16 64 133 admin htm If you changed the HTTP port of the product from default value 80 you can access to Admin mode...

Page 8: ...e changed username and password For the sake of enhanced security we strongly recommend you to change ID and Password during the installation and keep the ID and Password carefully for not opening to...

Page 9: ...in Mode menus while the right side shows the settings of selected admin menu Click each of the menu items at the left to go into specific admin mode Fig 2 2 Layout of Admin Mode Select the language of...

Page 10: ...rough NVR Pro Screen Capture in Web Viewer Designate the folder to save captured image in Web viewer by clicking capture button Default path is Desktop Audio Input Selection Select the type of input a...

Page 11: ...JPEG can be limited only for certain software please check it before selecting MJPEG If MJPEG is selected Video Rate is automatically adjusted for configured resolution and frame rate Resolution Assig...

Page 12: ...llocation Static IP Setup When the network environment is fixed IP select LAN in the network type and input the IP address Subnet Mask Gateway DNS1 and DNS2 Ask your network administrator or ISP for t...

Page 13: ...ess is 224 0 0 0 239 255 255 255 Address The address is used for multi casting real time audio video data from the product Default is 224 1 1 1 Port The port is used for multi casting real time audio...

Page 14: ...g 2 5 802 1x Setup Item Description Activation Check at the box to enable 802 1x authentication If checked this product behaves as a client requiring authentication Certificate CA Certificate Certific...

Page 15: ...hed You must click the Save once you finish the all settings 2 6 Onvif Setup Onvif protocol is open standard for communication between network video devices It supports camera set configuration real t...

Page 16: ...the power Power frequency can be different by each country Correct one must be choose for frequency It can be selectable 50Hz or 60Hz Default is 60Hz OSD Time Display Enable disable OSD time display...

Page 17: ...eduction value 3DNR Set 3 dimensional noise reduction ON or OFF Exposure compensation at night Set function Exposure compensation at night in accordance with the installation environment For the produ...

Page 18: ...the setting values Fig 2 8 User Admin Time Setup Item Description User Administration Administrator Username Admin ID Default ID is root Administrator password Admin password The default password is a...

Page 19: ...to save the default attribute Time Setup Current Time It shows you the current time kept in the product Synchronize with an Internet Time Server Synchronize the time kept in the product with the time...

Page 20: ...are two types of sensors which are Normal Open and Normal Close Name Input logical name of the sensor Video Capture Condition Set events initiating video capture for FTP E mail or storing in the loca...

Page 21: ...tically adjusted in accordance with the pre recording time Built In Storage Pre and Post recording time is independently configurable when recording into built in SD card The Pre Recording can be sele...

Page 22: ...address will be sent via E mail whenever the IP address changes It is sent to the E mail address set in Recv E Mail Address Recv E Mail Address Enter destination E mail address to send information fr...

Page 23: ...Directory of FTP server to send captured video data Default FTP port number is 21 SAVE Save the setup parameters You must click on SAVE to apply the setting values 2 11 Alarm Device Setup Test the al...

Page 24: ...egion Setup Item Description Channel Sensitivity Set the sensitivity of motion detection for each channel Default is 6 The Higher the value the higher the sensitivity Note that false motion alarm can...

Page 25: ...p you to find out by several testing about how many percent is needed to detect motion in your view sight Percentage Set how many percent of change in the video will be recognized as motion in the con...

Page 26: ...audio detection for each channel Default is 50 The Lower the value the higher the sensitivity Note that false audio alarm can be generated at unnecessary high sensitivity so you need to set the value...

Page 27: ...an ID Input ID in this field Click on SAVE to save the ID If PTZ ID does not match it won t operate normally PTZ Baud Rate Configure the RS 485 Baud Rate for PTZ control If the PTZ Baud Rate does not...

Page 28: ...Item Description Manual Upgrade Upgrade the system manually System S W Upgrade Upgrade the system software installed on the product via the network ActiveX Firmware Upgrade Upgrade the system softwar...

Page 29: ...o apply upgraded contents you should perform System Restart All previous connections will be disconnected upon reset Device does not resume the connections and the user must re connect to the product...

Page 30: ...sion is ief for the case of system firmware 4 When you ve found the file click Open This will select the file and close the Choose file dialogue window 5 Click the INSTALL button An alert message box...

Page 31: ...System Status Information With this System Status Information you can check whether the system upgrade has been done correctly or not as well as the versions and event status of the whole system and...

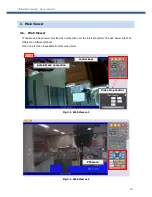
Page 32: ...deo server provide video connection over the internet explorer The web viewer might be different on different product Video crop function is available from the web viewer Fig 3 1 Web Viewer 1 Fig 3 1...

Page 33: ...the video by 180o Start Crop Video Crop video is always transmitted through channel 3 Set the coordinate of the top left corner of the crop video Set the size and frame rate frames sec of the crop vid...

Page 34: ...he web viewer The blue area in the figure below shows the crop window from a 1920x1080 image sensor Set the position as 250 250 and the size as the desired After the setting click on to start video tr...

Page 35: ...perform one of the followings 1 Change parameter value in each submenu 2 Decrement increment the numbered value 3 Go into lower level menu trees 4 If clicked when the cursor is on EXIT upper menu will...

Page 36: ...OUR button to start tour setting The OSD menu will appear on the screen c Choose preset number and Click GOTO PRST d Repeat procedure c to assign a series of preset positions to the tour e Click SET T...

Page 37: ...ction Reverse the Left Right of Video Reverse the Up Down of Video When passing over the 90 degree as the limited point of Tilt operation it will rotate the camera by 180 degree for continuous movemen...

Page 38: ...can be changed only through OSD Menu Delete the settings for Preset Tour Pattern Privacy or Sector configured in the camera selectively or altogether Enable disable display of Camera ID Preset ID Sect...

Page 39: ...any server Example http www google com Or open the MS DOS Prompt and type the following ping www google com Then press Enter If you see the Reply from message it means that the network is working pro...

Page 40: ...s slow In Basic Setup of Admin Mode lower the Quality High quality means more data You can also set the Max upload rate to higher value But this value must be lower than the maximum upload speed of yo...

Reviews: