•
With Sunshield
•
Without Sunshield
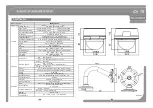
Installation with a Wall Mount Bracket
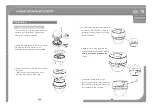
① Attach the rubber gasket and Sunshield*
or Surface Mount bracket on the
Wall Mount bracket using the
screws provided.
☞ Applicable only when using
the Sunshield.
④ Put the camera into the bracket
where the mark lines up with
‘unlocked’ (I) mark on the bracket.
Lock the camera in by slightly turning
it clockwise.
⑤ Make sure to turn the camera to the
15
14
② Mount the wall mount assembly on
a wall using the bolts provided.
③ Attach the service wire. Power & video
connect the cables.
☞ Attach the service wire properly to
avoid dropping the product to the
ground.
⑤ Make sure to turn the camera to the
position where the mark on the camera
lines up with ‘locked’ (II) mark on the
bracket.
⑥ Tighten the locking screw on the
opposite side using the L wrench.
Remove the protection cover from
the dome cover. The installation is
now complete.
Summary of Contents for SxB2xZ12F N
Page 1: ...Compact PTZ Dome Camera SxB2xZ12F N P User s Manual Ver 1 2 3810 0287A2 www cnbtec com...
Page 2: ...Compact PTZ Dome Camera SxB2xZ12F N P User s Manual Ver 1 2 www cnbtec com...
Page 24: ...45 44 Unit mm...
Page 25: ...www cnbtec com Compact PTZ Dome Camera SxB2xZ12F N P Ver 1 2...
Page 26: ......
Page 31: ...4 PTZ 59 58...
Page 32: ...61 60...
Page 47: ...91 90 mm...


