background image

Network Weatherproof Camera Installation Manual 


15

 / 20 

4. Using Web Viewer 

You can connect to the network camera using a web browser or “XNET-CMS” software. For instructions on 

how to use 

XNET-CMS software, 

please refer to 

XNET-CMS Manual, provided in the installation CD. 


4.1. Logging In 

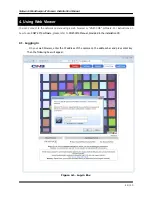
On your web browser, enter the IP address of the camera on the address bar and press enter key. 

Then the following box will appear:


Figure 4-1. Log-in Box 

Summary of Contents for XNET IBP5030CR

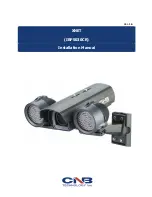
Page 1: ...Ver 1 0 XNET IBP5030CR Installation Manual ...

Page 2: ...u think there is any problem with the product Contact the store or the manufacturer before disassembling the product for alteration or repair XNET is a trademark of CNB Technology Inc This product complies for CE Europe and FCC USA regulations for industrial home use electrical device INFORMATION This equipment has been tested and found to comply with the limits for a Class A digital device pursua...

Page 3: ...2 3 2 Camera Module Rear 7 2 3 3 Cable Connection 8 2 3 4 Network Cable 9 2 3 5 Adjusting Zoom and Focus 10 2 3 6 Connection to Alarm Devices 10 2 3 7 Mounting the Camera 11 3 Software Installation 12 3 1 Connecting XNET to network 12 3 2 Installing IP Installer Software and Configuring IP address 13 3 2 1 About IP Installer 13 3 2 2 IP Address Configuration 13 4 Using Web Viewer 15 4 1 Logging In...

Page 4: ...ents Smart Event feature In addition to motion detection and sensor alarm feature pre and post alarm feature allows fully automated surveillance without an operator Install Operation Wizard Install Operation Wizard makes it easy to install and run the system and it also offers a unified setup configuration for large and multiple installation projects Up to 3 motion detection areas Motion Detection...

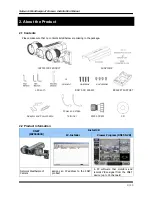
Page 5: ...R PRODUCT SUNVISOR L Wrench BOLT AND SCREW BRACKET SUPPORT Adaptor and Power Cable Power and Video Terminal RJ45 SCREW CD 2 2 Product Information XNET IBP5030CR Install CD IP Installer Viewer Program XNET NVR Network Weatherproof Camera assigns an IP address to the XNET product A PC software that monitors and records Video signal from the XNET device up to 16 channels ...

Page 6: ...minates depending on the light intensity Sunvisor Protects the camera against rain snow and direct sunlight Screws front 4EA rear 4EA Sets the front and back cap FRONT Cap MAIN BODY REAR Cap Pan adjusting Screw fixes the pan angle of the camera Tilt adjusting Screw fixes the tilt angle of the camera Mounting Bracket Screw Screw for Wall Mount Bracket Base Adapter Bracket Support IR Illuminator Sup...

Page 7: ...CABLE IN 1 Alarm Sensor Power IN Video out Class 1 Only Alarm Input Output DC12V Input and Analog Video Output CABLE IN 2 RS485 Power IN Video out Class 2 Only This connects to control P T Pan Tilt device by RS485 interface Network Input Cable Ethernet Input Connects to a 10Mbps or 100Mbps LAN via waterproof RJ45 Connector Ⓐ Power LED Lights up Red when 12V DC power is connected Ⓑ Link LED Lights ...

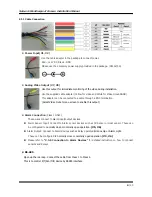
Page 8: ...ct Video Out at menu screen to enable this output z Alarm Connection Class 1 ONLY These wires connect to Alarm input output devices Alarm Sensor Input Connect to Alarm sensor devices such as IR Sensor or Heat sensor These can be configured to normally close or normally open operation 5 6 Alarm Output Connect to Alarm devices such as Relay operated Siren Lamp or Alarm Light These can be configured ...

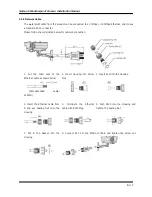
Page 9: ... network connection 1 Cut the outer Jack of the Ethernet cable as shown below Recommended cable 24AWG 2 Insert Housing into Screw Nut 3 Insert Seal into the Housing 4 Insert the Ethernet cable from A and put Sealing Nut onto the Housing 5 Terminate the Ethernet cable with RJ45 Plug 6 Push RJ45 into the Housing and tighten the Sealing Nut 7 Put in the Gasket into the Housing 8 Connect RJ 45 to the ...

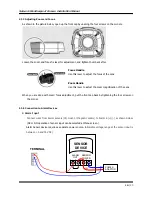
Page 10: ...r to adjust the zoom magnification of the Lens When you are done with zoom focus adjustment put the front cap back by tightening the four screws on the corner 2 3 6 Connection to Alarm Devices z Alarm Input Connect wires from Alarm sensors IR Heat or Magnetic sensor to Alarm in as shown below NC or NO operation of sensor input can be selected at Menu screen Alarm Sensor device requires a separate ...

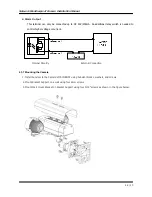
Page 11: ... is needed to control higher voltage or current Internal Circuitry External Connection 2 3 7 Mounting the Camera 1 Install Sunvisor to the Camera s MAIN BODY using Sunvisor blocks washers and screws 2 Mount Bracket Support on a wall using four 6mm screws 3 Mount Wall mount Bracket on Bracket Support using four 5 16 screws as shown in the figure below ...

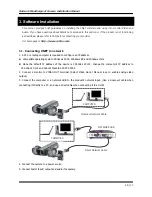
Page 12: ...IP address z Compatible operating system Windows 2000 Windows XP and Windows Vista z Since the default IP address of the device is 192 168 123 100 change the computer s IP address to 192 168 123 101 and Subnet Mask to 255 255 255 0 2 Connect a monitor to VIDEO OUT terminal Select Video Out at Menu screen to enable analog video output 3 Connect the computer or a network HUB to the product s network...

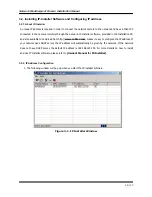
Page 13: ...e Installation CD and also available to download from http www cnbtec com makes it easy to configure the IP address If your network uses DHCP server the IP address will automatically be given by the network If the network does not have DHCP server the default IP address is 192 168 123 100 For more details on how to install and use IP Installer software please refer to Owner s Manual for IP Install...

Page 14: ...ck Set IP Address button to open the box shown in Figure 3 2 Figure 3 2 Set IP Address box 3 When you enter the IP address and click Set button the box shown in Figure 3 3 will appear Figure 3 3 Select Network Adapter Box 4 Select the adapter and click select button to change the IP address of the camera ...

Page 15: ...ng a web browser or XNET CMS software For instructions on how to use XNET CMS software please refer to XNET CMS Manual provided in the installation CD 4 1 Logging In On your web browser enter the IP address of the camera on the address bar and press enter key Then the following box will appear Figure 4 1 Log in Box ...

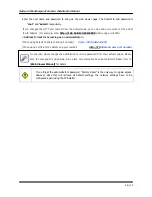
Page 16: ...ministrator When using default IP address and port number http 192 168 123 100 When using a different IP address and port number http IP address new port number If you forget the administrator s password Factory Reset is the only way to regain access However since this will retrieve all default settings the network settings have to be configured again using the IP installer For security please cha...

Page 17: ...Network Weatherproof Camera Installation Manual 17 20 4 2 Web Viewer Page Web viewer page consists of Video area and menu area Figure 4 2 Web Viewer page ...

Page 18: ...ol the actual PTZ movement Please refer to XNET Owner s Manual for detail Motion In this page you can add delete or set up the areas for motion detection Please refer to XNET Owner s Manual for detail Multi View In this page you can view videos from other network cameras that are linked in Multi Video Player setup page Please refer to XNET Owner s Manual for detail Live View Main Stream Check this...

Page 19: ...GA XGA MJPEG VGA MJEPG MPEG4 H 264 Frame rate SXGA XGA VGA CIF 24 fps Resolution SXGA 1280 x 960 XGA 1024 x 768 VGA 640 x 480 CIF 320 x 240 Video streaming SXGA XGA MJPEG Single mode VGA Dual Capable Constant and variable bit rate in MPEG4 or H264 Controllable frame rate and bandwidth Image settings Compression level setting Configurable Brightness Sharpness White Balance Network Protocol Ipv4 HTT...

Page 20: ...de over HTTP Digital Input Output Control 1 Sensor 1 Alarm selectble with RS 485 by Cable PTZ control RS 485 PTZ Protocol Service User define update selectable with Digital I O by Cable Mechanical Operating Temperature 10 50 20 50 with Fan Heater Power DC 12V Max 30 W IR ON Dimensions Weight Net 332 8 W x 230 9 H x 361 9 D mm Approx 4kg Dimensions mm The casing parts and specifications of this pro...

Reviews: