background image


Ver. 1.1 

XNET Network Dome Camera 

(IDP4000VR/IDP4000VD/IVP4000VR)


Installation Manual 


Summary of Contents for XNET IDP4000VD

Page 1: ...Ver 1 1 XNET Network Dome Camera IDP4000VR IDP4000VD IVP4000VR Installation Manual...

Page 2: ...lem with the product Contact the store or the manufacturer before disassembling the product for alteration or repair This product complies for CE Europe and FCC USA regulations for industrial home use...

Page 3: ...2 2 Product Information 5 2 3 Hardware Designation 6 2 3 1 Switch and Controls 6 2 3 2 Connecting Cables 7 2 3 3 Connecting to Alarm Devices 8 3 Software Installation 9 3 1 Installing XNET 9 3 1 1 Ins...

Page 4: ...EG or MPEG 4 or H 264 and sent to meet various applications of network or user 2 way Audio Communication Bi directional voice communication between Client s PC and XNET Smart Event feature On the top...

Page 5: ...cription Additional info XNET XNET Network Dome Camera AC Power Cable 2Jack Cable Terminal Terminal for Alarm and Audio CD Software and User s manual 2 2 2 2 P Pr ro od du uc ct t I In nf fo or rm ma...

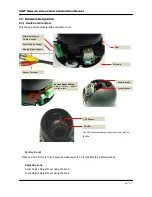
Page 6: ...e inside the dome cover Factory Reset Press and hold for more than 3 seconds while power is on to recall factory default settings Adjusting Lens Zoom Adjust Adjust Zoom using the knob Focus Adjust Adj...

Page 7: ...listen to the audio signal sent from a remote PC for Bi directional Audio communication ALARM Input Output Connect to Alarm Input and Output Sensor Input Wires from various sensor type IR heat and mag...

Page 8: ...ink if the system receives data 2 2 3 3 3 3 C Co on nn ne ec ct ti in ng g t to o A Al la ar rm m D De ev vi ic ce es s Alarm Input Wires from various sensor type IR heat and magnetic can be connected...

Page 9: ...or XNET s Video and Audio signals easily If you have questions about details not explained in this section or if the product is not functioning as described please refer to FAQ before contacting the s...

Page 10: ...ta z Since the default IP address of the device is 192 168 123 100 set up the IP address of the computer like the following IP Address 192 168 123 101 Subnet Mask 255 255 255 0 2 Connect LAN cable to...

Page 11: ...figured in order to connect IP camera and monitoring PC to a network IP Installer software provided in the Installation CD included in the package will configure IP address easily If your network have...

Page 12: ...ich you wish to change the IP address and click Set IP Address button to bring up the following box in Figure 3 3 Figure 3 3 IP Address box 3 When you enter the IP address and click Set button the box...

Page 13: ...default id and password is root admin respectively If you want to use a different HTTP port number from the default value simply put a colon and port number at the end of the IP address For example e...

Page 14: ...om me e C Ca am me er ra a I In ns st ta al ll la at ti io on n M Ma an nu ua al l 14 17 4 4 2 2 W We eb b V Vi ie ew we er r P Pa ag ge e Web viewer page consists of Video monitor screen and menu op...

Page 15: ...Manual for detail Motion Opens up Motion Detection page You can add or delete areas for detecting motion in this page Please refer to XNET Owner s Manual for detail Multi View Opens up Multi View pag...

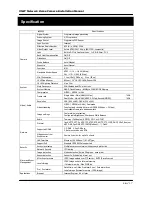
Page 16: ...A Resolution VGA 640 x 480 QVGA 320 x 240 Video streaming MJPEG MPEG4 or H 264 Dual mode Constant and variable bit rate in MPEG4 128kbps 3M bps Controllable frame rate and bandwidth Image settings Com...

Page 17: ...g Application Web Viewer Window Web Browser Base Live view for up to 10 user clients Video Snapshot to file JPEG NVR CMS and Utility IP Installer etc Maintenance System Upgrade Firmware upgrade over H...

Reviews: