background image

Tempest NG User Manual v1.2013 


9


Components

Components

The Sideline Unit

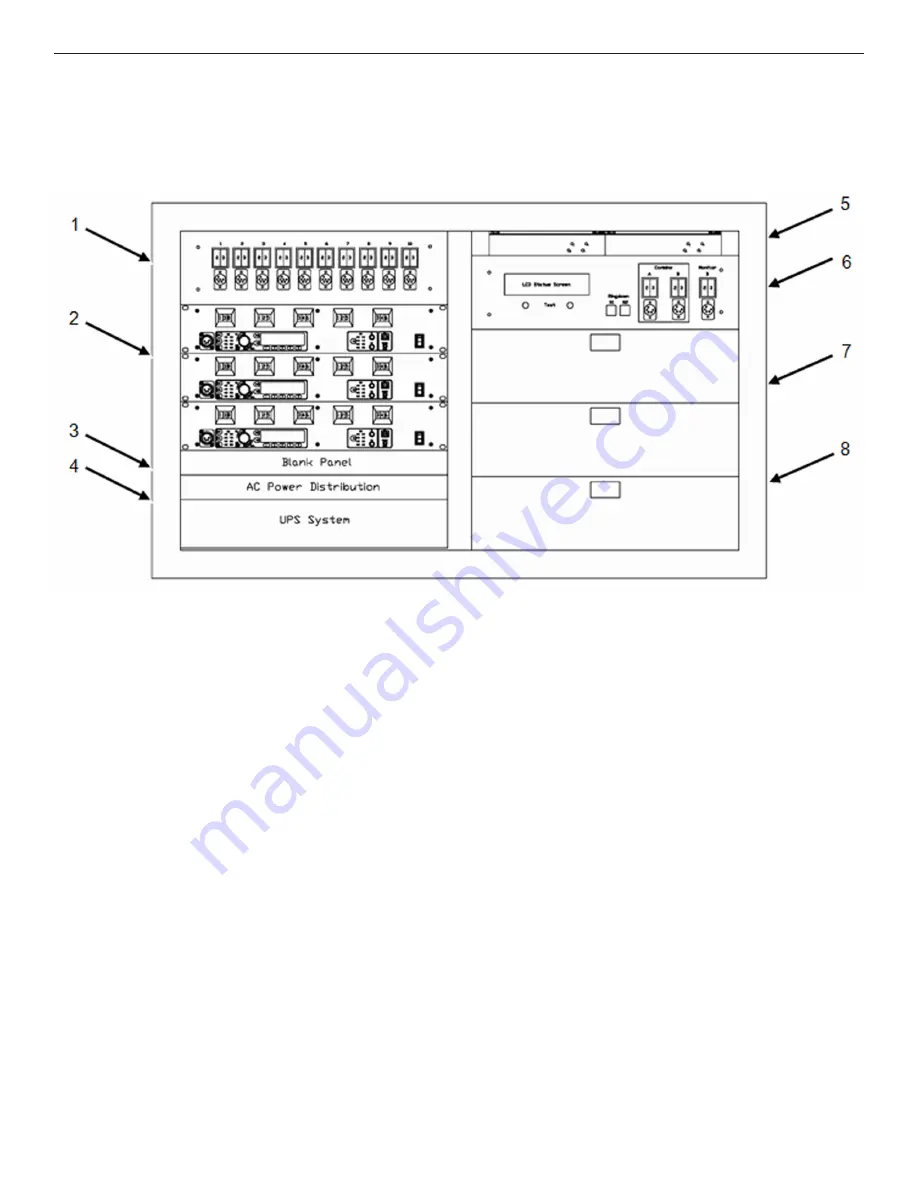
Sub Components:

1.  WAM 10 Wired Assignment Module

2.  Tempest BaseStations (1, 2 or 3 units)

3.  AC Power Distribution Center

4.  Uninterruptible Power Supply (UPS)

5.  PS 4001 AudioCom® Power Supply(s)

6.  WIM 8(RD) Wired Interface Module

7.  Battery Chargers (inside drawers)

8.  Storage Drawers

The Sidelines Unit is a trunk that is placed on the sidelines at or near mid field. It is this Unit that will tie into the stadium “dry 

pair” and distribute the correct signal to each sideline coach.

The Sidelines Unit houses a WAM 10 wired assignment module, a WIM 8 wired interface module, up to three (3) Tempest NG 
wireless base stations, a UPS, intercom power supply(s), battery chargers and storage drawers. Additionally, on the inside rear 
of the unit, connections are made for the dry pair via spring jacks or RJ-14s.

The AC Power Distribution Center is the hub of all of the A/C current in the trunk.  The main system power is located on the 
front of this unit.  This will connect to the stadium power via the supplied cord and supplies power to the battery chargers and 
the Uninterruptible Power Supply (UPS).  All other equipment (PS-4001(s), Tempest Wireless BaseStations, and Ringdowns) are 
plugged into the UPS.  Note:  When the user turns on the system via the main power switch, the UPS must then be turned on 
also.  When turning power off to the system, the user must also manually turn off the UPS to avoid a complete discharge. 

Summary of Contents for Tempest NG Sideline

Page 1: ...v1 2013 Sideline Communications System User Manual ...

Page 2: ...ver to fully benefit from the available features please read this manual carefully We wantTempest NG to make your job easier and your gameday experience to be positive To successfully familiarize yourself with the many diverse and powerful features Tempest NG offers it is crucial that you acquaint yourself with the manual Your time spent will help you get the most from yourTempest NG System by mak...

Page 3: ...l Rev1 2013 COACHCOMM LLC Tempest NG 205Technology Parkway Auburn AL 36830 Phone 334 321 2300 Fax 888 329 2658 www coachcomm com Tempest is a registered trademark of CoachComm LLC Telex is a registered trademark ofTelex Communications Inc Audiocom is a registered trademark of Bosch Security Systems Inc ...

Page 4: ...e Module FCM 14 Ringdown Circuits 14 WAM 10 Wired Assignment Module 15 The BP 1002 BP 2002 Beltpacks AudioCom by Telex 16 Headsets 17 Power Supply 17 Wireless BaseStation 19 Wireless Remote Transceiver 21 BaseStation Menu System 23 Wireless BeltPack 37 BeltPack Battery System 38 BeltPack Menu System 39 Antenna System 46 Game Day Setup 47 On The Sideline 47 In The Pressbox 48 Wireless Component Set...

Page 5: ... This page intentionally left blank ...

Page 6: ...w sideline communications system that was completely outside of the Part 74 FCC rules and that has enhanced user features and ease of use The new system is calledTempest NG While the wireless portion of theTempest NG system is new technology the central infrastructure of theTempest NG system is identical to the previous NG system Therefore the nomenclature of NG was retained The wired portion of t...

Page 7: ...nt in a residential area is likely to cause harmful interference in which case the users will be required to correct the interference at their own expense Commensurate with EIRP limits specified in FCC Rules 15 247b this device may not be used with antennas that exceed 9dB of gain in multi point applications For use in RF exposure mobile or fixed conditions the antenna s used for this transmitter ...

Page 8: ...and Over the past few years the FCC has been relocatingTV stations from the old analog domain to the new digital era As a part of this process many of the frequencies used by the NG and UC systems have either become over crowded or are no longer a legal option CoachComm designed the newTempest wireless product to operate in the 2 4 GHz frequency band This band is open for general use and does not ...

Page 9: ...4 This page intentionally left blank ...

Page 10: ...Tempest NG User Manual v1 2013 5 Block Diagrams Block Diagrams TNG System Block Diagram ...

Page 11: ...6 Block Diagrams Sideline Unit Block Diagram ...

Page 12: ...Tempest NG User Manual v1 2013 7 Block Diagrams Pressbox Unit Block Diagram ...

Page 13: ...8 This page intentionally left blank ...

Page 14: ...dule up to three 3 Tempest NG wireless base stations a UPS intercom power supply s battery chargers and storage drawers Additionally on the inside rear of the unit connections are made for the dry pair via spring jacks or RJ 14s The AC Power Distribution Center is the hub of all of the A C current in the trunk The main system power is located on the front of this unit This will connect to the stad...

Page 15: ... complete failure of AC on the sidelines both from the stadium and depletion of the UPS AC the wireless portion of the system and the ring downs will not function The wired portion of the system will function properly with AC power on either or both ends See A C power warning on page 2 The Pressbox Unit Sub Components 1 PS 4001 AudioCom Power Supply s 2 WIM 8 RD Wired Interface Module 3 WAM 10 Wir...

Page 16: ...d for the ringdown circuits Typically each NG system will have one WIM 8 pressbox and one WIM 8 RD sideline The WIM 8 RD provides the interface between the stadium wiring and the system That interface is available via spring jacks or RJ 14s 4 wire RJ The spring jacks are used for those instances when a user needs to attach to bare stadium wire The RJ 14s are the preferred method since they provide...

Page 17: ...d on both ends of the system for test mode The WIM 8 will operate with limited functionality without local AC but the DPT will not function The user can start test mode from either WIM 8 in the system To enter test mode the user presses the two user soft buttons under the LCD at the same time and holds them for approximately 5 seconds The LCD screen will tell the user the results of the tests and ...

Page 18: ...nto test mode If that switch is in the Disable position the display will alert the user and revert back to the Default Operating Screen If test is successfully initiated the user will see a status screen for approximately 1 minute then the fault screen will display Dry Pair Testing Fault Screen This screen displays the faults found during the dry pair testing If no faults are detected the screen w...

Page 19: ...s on both FCMs This condition will create undesirable audio in the system NOTE When any FCM is not in use it should be set to 0 0 to maximize system performance Also the FCMs should be set to the desired settings prior to wireless set up covered later in this manual Ringdown Circuits The Ringdown Circuits are two conventional telephone circuits completely separate from the intercom system A custom...

Page 20: ... setting It should be noted however that the wireless system and the wired back up can be used at the same time Therefore a user may have up to fifteen 15 wireless users and more users on wired BeltPacks plugged in at the same time The front of the WAM 10 has ten coach positions 1 through 10 Each position has a two digit thumbwheel and a 6 pin XLR connector For each coach the thumbwheel is used to...

Page 21: ...not tied directly to the wireless system The wireless system and wired beltpack can be used at the same time independent of one another The Wired Beltpacks AudioCom by Telex The BP 1002 and BP 2002 BeltPacks are the workhorse of the wired portion of the system Each wired user on the system must have either a BP 1002 single line or BP 2002 dual line BeltPack The BeltPack serves as a pre amp and amp...

Page 22: ...e cables ME 100HD and ME 25HD are used in conjunction with the BP 1002 single line BeltPack for those users who are to have direct access to only one line See exception in Isolate combine section The dual line cables ME 100 2HD and ME 25 2HD are used in conjunction with the BP 2002 dual line BeltPack for those users who are to have direct access to two lines Power Supply Both the Pressbox Unit and...

Page 23: ...18 This page intentionally left blank ...

Page 24: ...se to access the menu functions of the BaseStation 8 Enter Button Use to accept a selected option or value The Enter button is used in conjunction with the scroll knob and menu button to navigate the menu system of the BaseStation to change the set up and operating parameters of the BaseStation 9 Buttons 1 5 Use to take a shortcut to either a specific BeltPack s menu screen or to quick select an o...

Page 25: ...cond loops to the third 4 Player Announce Output Male XLR connector provides audio output when the BaseStation is configured to do so Typically triggered by a button on one or multiple BeltPacks 5 Aux In and Out Aux In is not available in theTempest NG system Aux Out can be enabled within the Wired Intercom Settings menu This enables selected audio to be routed out of theTempest NG system and into...

Page 26: ...and a connection for a CAT 5 cable for connecting to the BaseStation The transceiver will be powered by the CAT 5 cable with current from that transceiver s BaseStation There are four 4 indicator lights on the bottom to indicate receive RX transmit TX Sync and Config In normal operation the RX and TX lights will flash very rapidly at all times indicating proper operation The Sync light will remain...

Page 27: ...22 Components This page intentionally left blank ...

Page 28: ...Menu displayed when the Menu button is pressed once from the Main Status Screen The main menu displays the sub menu areas that organize the various settings and functions of the unit BaseStation Settings displays the six 6 basic areas of adjustments for the BaseStation user interface including the local headset sidetone local headset Mic Gain LCD adjustments BaseStation name front panel lock out a...

Page 29: ...principal types of headset microphones are Electret and Dynamic The NG system includes Dynamic headsets Tempest wireless products automatically detect which type of headset is connected The Mic Gain setting for each type is stored in memory Always connect a headset before setting the Mic Gain LCD Adjustments adjusts the contrast of the LCD screen Name BaseStation enables the user to designate a na...

Page 30: ...t with a CoachComm technician before making changes to any of the Tech Menu settings Radio Configuration provides access to certain radio settings such as the Network Number Lockout Key and Transmit Power these settings are set at the factory and should only be changed with the guidance of a CoachComm technician Security Settings each wireless BaseStation and corresponding BeltPacks should have ma...

Page 31: ...com EachTempest NG system is either four 4 or eight 8 channels but all BaseStations support eight Therefore the user may have a 4 channel system in which case the adjustments on this screen for channels 5 8 are not applicable Use the menu or press the SEL button to advance to the Intercom Levels screen and press ENTER to select channel 1 Use the SEL button to select each channel in turn and use th...

Page 32: ...x units perform the dry pair test from page 12 to assure good connections Use the menu to advance to Auto Null and press ENTER You should see the channel indicator LEDs automatically advance from channel 1 through channel 8 Press MENU to go back one level and test for echo Echo cancellation software is inactive while in the nulling screen and must be re activated to test system operation To test u...

Page 33: ...e in this case a BaseStation with a 2 wire intercom system This procedure MUST NOT be performed while the system is in use in a game environment All users will hear nulling tones during the adjustment and sounds from users can interfere with the process Aux Out Settings This feature enables the routing of selected audio channels out of theTempest NG system to an external device ...

Page 34: ...ime The Player Announce output connector is an XLR 3M It is balanced and transformer isolated and outputs nominal line level audio from 4 to 8 dBu The Player Announce connector output level can be adjusted at the Player Announce screen In addition the Player button may be configured to also control an additional relay unique to the users BeltPack See the GPO Relay section for more details Mic Kill...

Page 35: ...ents BeltPack Settings 1 17 The BeltPack Settings menu allows you to access and adjust settings for any BeltPack from the BaseStation You will be prompted to select a BeltPack prior to the menu options appearing ...

Page 36: ... Disable Latch means that once pressed and released the C button will stay active Momentary means that when released the C button always turns off Disable means that the user on that BeltPack cannot access the C channel at all Note when in the Latch mode it operates in an intelligent manner If the user presses and releases the C button will change states i e if on it will turn off if off it will t...

Page 37: ... that the create feedback into the system Great care should be exercised in this setting since an incorrect setting could result in a user not being able to hear at all or not being able to adjust their volume local at the BeltPack Player Announce The BaseStation can support external audio feeds and relay triggers for features such as player communications or alerts On this screen the user can set...

Page 38: ...nected headset Vibrate will cause the BeltPack to vibrate when a call is received or Both can be selected Call Button The user may enable or disable the button that initiates a call from this BeltPack to other users on that intercom channel If disabled the user of that BeltPack cannot initiate a call to anyone but may be able to receive call signals depending on the settings in Call Function above...

Page 39: ...menu includeVolume andTalk To unlock all keys the user must press and hold the Menu and Enter buttons at the same time for two 2 seconds Battery Alert When the battery on a BeltPack goes below 10 capacity an alert is possible That audible alert can be Enabled or Disabled If this feature is Enabled the user will hear a tone in the headset of that BeltPack If the feature is Disabled no tone will be ...

Page 40: ...seStation connected to that BeltPack Base Slot Assignement Assign BeltPack to designated Base Slot Assignment Volume Press Enable or Disable the Volume Press feature Volume Press if enabled requires the user to press the volume knob while turning it to increase or decrease the volume level Talk Tones This feature will enable or disable a tone each time theTALK button is pressed ...

Page 41: ...umber of shared BeltPacks operating in full time listen and momentary talk mode on one BaseStation When in Shared Mode the shared BeltPacks operate on a single channel in the fifth slot of the BaseStation while up to four BeltPacks can operate in Normal mode with full time listen and talk back capabilities To designate the shared channel use the left dial of the fifth far right thumbwheel on the B...

Page 42: ... listening level for the headset connected to the bottom of the BeltPack 2 CC Button Used for Player Announce and QB communications 3 A B Knob Selects between the users A and B intercom channels 4 Menu Button Accesses the Menu for the BeltPack for adjusting various parameters and settings 5 Enter Button Used in conjunction with the Menu button to navigate the menus within the BeltPack 6 Call Butto...

Page 43: ...using the 5 bay charger If completely drained the batteries will require approximately 2 5 hours to completely charge to full capacity If charger s overheat it will need to be moved to a cooler area to charge batteries properly It is important to note that the chargers do NOT run from the UPS uninterruptible power supply inside the sideline trunk For the batteries to charge in the 5 bay charger th...

Page 44: ...h BaseStation name and BeltPack name Main Menu displayed when the Menu button is pressed once from the Main Status Screen The main menu displays the various sub menu areas that organize the various settings and functions of the unit Select Base Each BeltPack can remember the last 8 BaseStations to which it was connected The user can move from one BaseStation to another by selecting it in this menu...

Page 45: ...ume andTalk To unlock all keys the user must press and hold the Menu and Enter buttons at the same time for two 2 seconds Battery Alert When the battery on a BeltPack goes below 10 capacity an alert is possible That audible alert can be Enabled or Disabled If this feature is Enabled the user will hear a tone in the headset of that BeltPack If the feature is Disabled no tone will be heard LCD LED S...

Page 46: ...if on it will turn off if off it will turn on However if the user presses and holds the button the unit assumes that the user wishes the button to turn off when released This is useful for users that talk infrequently since any used microphone adds additional background noise for all of the other users C Button The C button on top of the BeltPack may be set to either Latch Momentary or Disable Lat...

Page 47: ...ne is defined as a user s own voice folded back into the user s headset Volume Limit The user can set minimum and maximum volume levels for this BeltPack This is useful to keep a BeltPack user from accidentally turning down their volume so low that they cannot hear or so high that the create feedback into the system Great care should be exercised in this setting since an incorrect setting could re...

Page 48: ...e the BeltPack to vibrate when a call is received Both will create a tone and vibrate or Disabled can be selected to turn this feature off Call Button The user may enable or disable the button that initiates a call from this BeltPack to other users on that intercom channel If disabled the user of that BeltPack cannot initiate a call to anyone but may be able to receive call signals depending on th...

Page 49: ...alk Button is activated or deactivated Belt Settings There are two areas within the Belt Setting section One is Name BeltPack This name is displayed on the front of the BeltPack and on the corresponding slot on the BaseStation connected to that BeltPack The other is theTech Menu TheTech Menu consists of settings and information vital to the system s operational status Changes to these settings can...

Page 50: ...eset diffferent types of system defaults and settings strictly related to the BeltPack Base Slot each BeltPack must have its own slot assignment for the BaseStation to which it is paired Slots 01 05 Mode Setting There are two operating modes that a BeltPack can operate Normal and Shared Mode In Normal Mode a BeltPack has full time listen and talk capabilities When a BeltPack is in Shared Mode it h...

Page 51: ... towards the 50 yardline and the other antenna pointed in the opposite direction In the case of the 900 MHz model each transceiver has only one antenna and it should be positioned at 45 degrees facing the 50 yardline Use only approved antennas to avoid possible FCC violations Each transceiver is then connected to a corresponding BaseStation via the provided standard CAT 5 ethernet cable Take care ...

Page 52: ... such that they are as high as possible on the mast yet such that they are not touching other transceivers or interfering with the antennas on another transceiver In the case of the 900 MHz model each transceiver has only one antenna and it should be positioned at 45 degrees facing the 50 yardline Connect AC Power to Unit Unwind the power cord from its storage place Plug the cord into the AC curre...

Page 53: ...deline unit and the Pressbox unit you should test the first line by plugging in a BP 2002 BeltPack into Monitor set thumbwheel to 1 2 and talk to the person on the sidelines If you are using the RJ 14s test the second line as well Then test for crosstalk by having the other person stay on line 2 while you talk on line 1 If you have crosstalk there are three possibilities the dry pair is crossed in...

Page 54: ...all wired users sound too loud or too quiet to the other use the Intercom Levels menu option to adjust the volume as described on page 26 under Intercom Levels Turn Off the Talk On All BaseStations and BeltPacks Now that setup of this particular wireless is complete turn off the Talk button on the BeltPack This will keep background noise to a minimum The user should NOT turn off the power to the B...

Page 55: ...will correct this conflict See the Tempest NG900 Multi Base Start up Procedure in this manual for assistance with this process What if the LQ on a single BeltPack is below 99 at start up This depends on where the BeltPack is located at start up but if the other BeltPacks on the same BaseStation are at 99 this is a good indication that isolated radio issue exists within that BeltPack If the LQ valu...

Page 56: ...eset the radio on Base B within the Tech Menu a On the front of Base B Press MENU b Press 1 BaseStation Settings c Scroll to 6 Tech Menu and press ENT d Press ENT thru Warning Message e Scroll to 3 Diagnostics f Scroll to 2 Reset Radio and the Reset Radio screen will display the LQ values for each of the BeltPacks on Base B 7 Press ENT to reset the radio for Base B After a few seconds the LQ value...

Page 57: ...LCD BeltPack paired to wrong BaseStation Pair BeltPack to proper BaseStation Wrong BaseStation selected at BeltPack Go into BeltPack menu and select correct BaseStation Bad internal radio Send in BeltPack for service BeltPack internal Antenna dislodged Send in BeltPack for service Crosstalk Dry pair stadium wiring Try a new unused pair Bad wired accessory such as a Wired BeltPack cable or headset ...

Page 58: ...Tempest NG User Manual v1 2013 53 Game Day Setup This page intentionally left blank ...

Page 59: ...sidetone is turned up too far the user may cause feedback or squealing on his intercom line RJ 14 A telephone jack used to make connections with dry pair By definition the RJ 14 has two pair i e four wires It is often confused with an RJ 11 two wires Some phone technicians will call these RJ 11 4 wire jacks Please note the unique wiring of the RJ 14 for the NG application Balanced Audio A form of ...

Page 60: ...e front of the Beltpack and plug in the USB cable to the side USB A connector on the Beltpack The Beltpack will power ON automatically Do not release the CALL button until the Beltpack display message appears Connecting Your BaseStation for Updating Be sure the BaseStation is powered OFF Plug in your USB programming cable to your computer and into the front USB B on the BaseStation Push and hold t...

Page 61: ...e Compatibility Telex AudioCom compatible Aux Input N A Aux Output N A Player Announce Output XLR 3M nominal 4 dB bal variable transformer isolated Front Panel Headset 4 pin male connector 4 channel access Microphone Type Dynamic or Electret auto selected Front Panel LCD Display 240 x 64 resolution 32 level grayscale Dimensions 2 RU unit 3 5 x 19 0 x 12 inches Weight 12 85 lbs AC Power Input 85 26...

Page 62: ... 500 ft Connection to BaseStation CAT 5 standard wiring BaseStations Supported Per Transceiver 1 Antenna Connector Type RP TNC Supplied Antenna Whip Omni directional antenna Dimensions with Antennas inches 12 h x 3 7 w x 1 7 d Weight with antennas 13 6 oz Specifications subject to change without notice ...

Page 63: ...ransmission Range 1000 under ideal conditions 500 ft 900 ft typical Audio Dynamic Range 94 dB Audio Frequency Response 300 Hz 3 8 kHz with proprietary audio voice shaping System Latency Less than 60ms direct BaseStation See Tempest NG BaseStation Specifications Appendix B BeltPack See Tempest NG BeltPack Specifications Appendix B Remote AntennaTransceiver See Tempest NG Remote Transceiver Specific...

Page 64: ...Tempest NG User Manual v1 2013 59 Notes ...

Reviews: