background image

58

CARAVAN EQUIPMENT

ALDE CENTRAL HEATING AND
HOT WATER SYSTEM - VIP &
LASER.

Full instructions on the use of this system
are included in the information pack you
received with your caravan and we would
strongly recommend you read them
thoroughly before using the boiler.

Quick Start Guide – 3020 113 Colour
Touch

This quick start guide allows end users to
confidently use the core features of their
Alde control panel. See the operating and
installation instructions for the Alde control
panel for more details.

Important!

Please read the operating instructions for
the Alde 3020 Compact HE boiler before
using the system.

STARTING THE SYSTEM

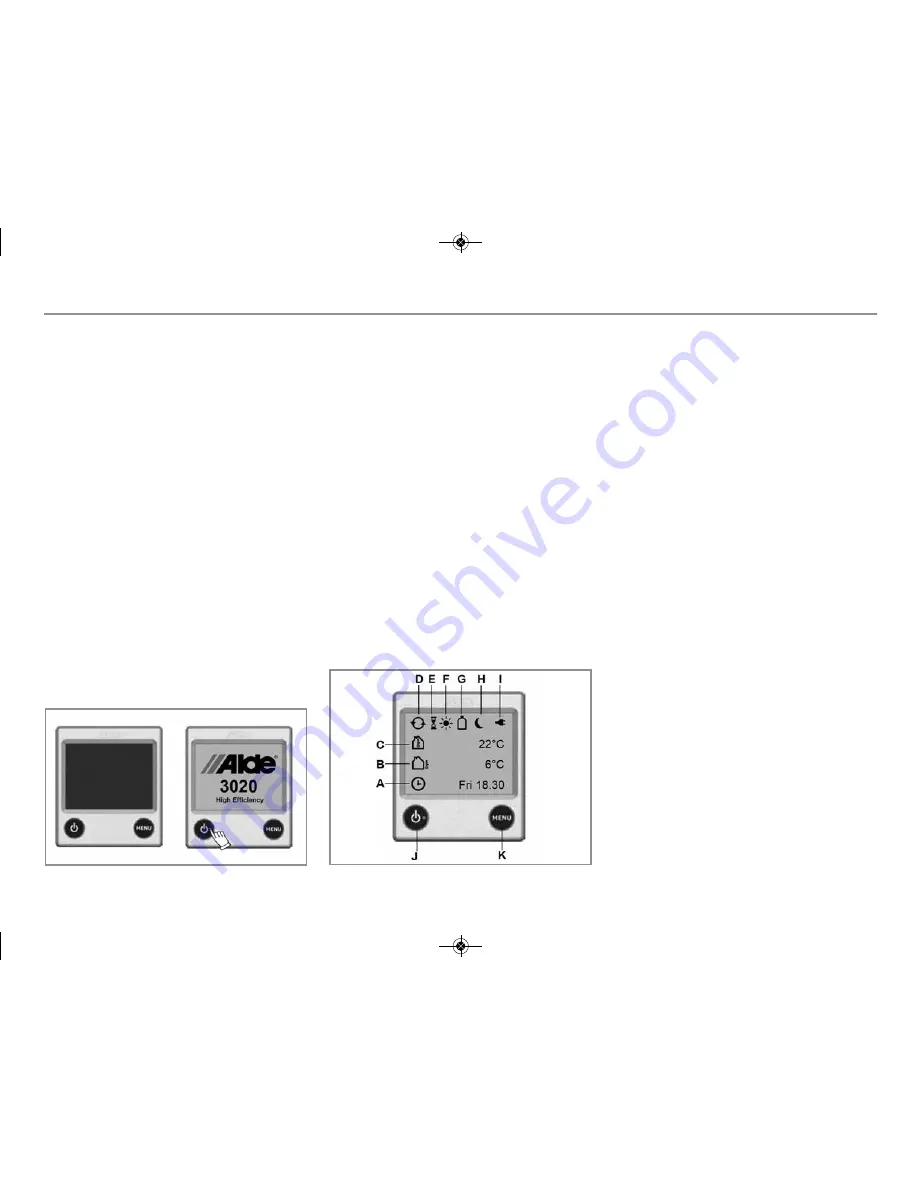
1. Both the control panel and boiler are off.

2. To start the system, press the Power

button on the control panel. The Splash
Screen is displayed and green LED is lit.
The boiler will now start with the
previously saved settings (factory settings
by default).

The system will now be drawing variable
0.2–1 A of current from the 12 V supply.

STANDBY SCREEN

The Standby Screen is displayed after the
Splash Screen. This screen contains useful
information about the status of your heating
system.

NB: If Standby Screen is set to “Dark” in
Backlight settings, the Standby Screen
will not be displayed, the screen will be
dark unless touched.

A.Clock is enabled. Day of the week and

time shown.

B.Outdoor Temperature. [Optional outdoor

temperature sensor required.]

C.Room Temperature. Measured at the

control panel. [Optional discrete room
temperature sensors available.]

D.Central heating circulation pump is active.

E. Delayed Start/Cycle is enabled.

F. Day Mode active.

G.Gas Cylinder Status. Full/empty and

active EisEx shown. [Additional
accessories required.]

H.Night Mode active.

I. 230 V supply. If not displayed, the boiler is

not receiving 230 V supply.

J. Power button. Press to switch system on-

off. Lit green LED indicates system is on.

K.MENU button. Press to access Main Menu

from Standby Screen or Settings Menu.

MAIN MENU

Press MENU button to access the Main
Menu from the Standby Screen or Settings
Menu. The screen will revert to the Standby
Screen after 30 secs if untouched.

A5 Owners Handbook 2015_2_Layout 1  26/08/2014  16:20  Page 58

Summary of Contents for Caravan 2015

Page 1: ...2015 Owners Handbook Coachman 5 Year Warranty Upgrade to a Coachman ...

Page 2: ...nd inspection of critical areas of the product from fire safety weights and dimensions to gas electrics and ventilation Every Coachman Caravan carries the NCC Approved Caravan badge The NCC also conducts unannounced inspections at the Coachman factory to ensure continued compliance NCC approval gives you peace of mind that your caravan is legal and safe Not all equipment described is fitted to eve...

Page 3: ...y twelve months and that the service record in the back of your Warranty and Service Manual is maintained in accordance with instructions Your Coachman Caravan has been designed as a luxury recreational vehicle and is intended for recreational use only It is not intended for living in using for business purposes or hiring and the Company accepts no liability if the caravan is used for any purposes...

Page 4: ... above all other problems which remains the main worry and concern of potential and actual retail customers Therefore on every new Coachman caravan sold we make a comprehensive 6 year Worry Free Water Ingress and Delamination Offer Water Ingress between new and 5 years All labour and parts covered by the Coachman Warranty provided there is a full service history Water Ingress between 5 and 6 years...

Page 5: ...line with the timings detailed above Your services in years 7 8 and 9 are carried out within 90 days either side of the anniversary of the purchase date Your 10th service is carried out before the expiry of the 120 month period from the original date of purchase The warranty will be invalidated if the caravan has been neglected misused or modified in any way without the prior agreement of Coachman...

Page 6: ...tion Document It will be sent by post to your home address Your Touring Caravan Registration Document will include a 17 character VIN Vehicle Identification Number shown in the top right hand corner This 17 character VIN will be die stamped into the caravan drawbar and chemically etched on up to a maximum of 10 eye level windows To protect yourself and your touring caravan never leave the Registra...

Page 7: ...ucted from high quality hot dip galvanised steel The axles and suspension are comprised of 3 rubber elements within a hexagonal tube Additional Al KO Octagon Shock Absorbers are fitted as standard for increased damping and improved road holding BRAKING SYSTEM The braking system comprises a rod operated overrunning device with expander mechanism and adjuster box An automatic reversing system with a...

Page 8: ...e heating EXTERIOR DOORS The Vision and Pastiche are fitted with the Holzhauer one piece door and VIP and Laser models are fitted with Seitz exterior doors Firstly and most importantly the door must not be slammed When closing the door from the outside the handle should be pulled and the door pushed to with one hand With the other hand pressure should be applied to the front of the handle surround...

Page 9: ...tions by the manufacturer for tow car matching MRO Mass in Running Order Mass of the caravan equipped to the manufacturer s standard specification plus the following a LPG The mass of the recommended gas storage tank s when filled to 90 of the permissible maximum capacity b Fluids The mass of the liquids normally remaining in the systems 1 Central heating system full 2 Freshwater the mass of any f...

Page 10: ...y into the caravan after this adjustment has been made The caravan is intended to be towed slightly nose heavy The nose weight can be adjusted by distribution of the load within the caravan You must not exceed the maximum nose weight rating of the hitch head which is 100kg or that of the towing vehicle as stated in the manufacturers handbook The caravan s nose weight should be as high as practical...

Page 11: ...th automatic transmission may need an oil cooler fitting or the SAE rating of the gearbox oil increasing when towing The advice of the vehicle manufacturer should be sought MEASUREMENT OF NOSE WEIGHT Nose weight may be measured using a proprietary brand of nose weight indicator Such equipment is obtainable at your caravan Dealer Another simple method is to use bathroom scales under the coupling he...

Page 12: ...no circumstances should the MTPLM of this caravan be exceeded When the towing vehicle and caravan are fully laden and ready to go the towing vehicle should be level fore and aft If the nose of the caravan is high at the start of your journey you may experience snaking and on rough and uneven ground the rear of the caravan could catch the road Caravans should be loaded so that the nose weight of th...

Page 13: ...afety at the UK maximum speed limit of 60 mph but the tyres are rated to 130 km hr The tyres on your caravan must be operated at the pressures indicated on the caravan s specification sheet Remember that the towing vehicle tyres should be inflated to the heavy loaded pressure given in the vehicle manufacturers service handbook Note Pressures should only be checked when the tyres are cold not after...

Page 14: ... since instability will reappear at a higher speed Coachman Caravans are also equipped for the fitment of the Al KO Trailer Control System ATC and some models have it fitted as standard The Al KO ATC is the emergency braking system for caravans and works in a similar way to Electronic Stability Programme systems for cars The sophisticated but simple electronic system monitors the lateral movement ...

Page 15: ...ng LED light and disconnecting and re connecting the power does not alleviate the problem check the push rod position as detailed below Locate ATC on the axle and check to position of the push rod See photograph right If no red line is visible ATC is not active and can be driven However we recommend that you contact Al KO at the earliest convenience If the red line is visible on the push rod as sh...

Page 16: ...r constant live refer to system requirements as detailed on page 3 of Al ko handbook Green LED not working Ready for journey If power ok check push rod position Red line visible possible to continue journey but consult Al ko See back page of Al ko handbook for details Red flashing ATC has detected a fault Do not continue with ATC connected Remove 13 pin plug and wait 5 seconds Reconnect the plug G...

Page 17: ...g vehicle ball Remove ball cover It is an advantage to have a person standing by the caravan to direct the driver of the towing vehicle to place the vehicle in the correct position Reverse the towing vehicle so that the towing ball is just under the caravan hitch 16 PREPARING FOR THE ROAD A5 Owners Handbook 2015_2_Layout 1 26 08 2014 16 20 Page 16 ...

Page 18: ...osition put the AKS on to the towball Push the black handle down and check the green indicator button is showing Fig 1 Press the red stabilising lever down The AKS is now ready for the road Fig 2 Safety Indicators If the green indicator is visible then you know you have correctly coupled your AKS to your towing vehicle Fig 3 Wear Indicator For coupling mechanism and front rear friction pads Fig 4 ...

Page 19: ... weight of 3000kg and a maximum nose weight of 100kg UNCOUPLING Lower the jockey wheel to the ground Disconnect the breakaway cable and plugs Release stabilising lever and lift the coupling handle whilst winding Lift the coupling head clear of the towball 18 PREPARING FOR THE ROAD Fig 5 Friction Pads are in good order Fig 6 Friction Pads worn out need replacing Fig 8 Fig 7 Fig 9 A5 Owners Handbook...

Page 20: ...aptors but have it rewired and a 13 pin Jaegar socket fitted Ensuring the car socket is wired in accordance with the drawing below 19 PREPARING FOR THE ROAD PIN NO COLOUR DESCRIPTION 1 Yellow Left Flasher 2 Blue Fog Hazard Light 3 White Return for 1 2 4 5 6 7 8 4 Green Right Flasher 5 Brown Right Tail Light 6 Red Stop Lights 7 Black Left Tail Light 8 Orange Reverse Lights 9 Brown Blue Car 10 Brown...

Page 21: ...brakes Note The break away cable should never become taut during normal use Correct procedure for use Regularly check the cable and clip for damage If in doubt contact your dealer or service agent Make sure the cable runs as straight as possible and goes through a cable guide underneath the trailer coupling Determine whether or not the towbar has a designated attachment point i e a part specifical...

Page 22: ...an area that is 4 metres wide from the side of your caravan at a distance 20 metres behind the driver A caravan is significantly wider than a car even a large 4 x 4 and you simply can t comply with the law unless you fit towing mirrors The driver of the towing vehicle must have an adequate view of the rear If there is no rear view through the caravan it is essential that additional exterior towing...

Page 23: ...nce for driving solo Allow longer to get up speed to pass Allow for the vehicle being twice its normal length Do not suddenly swing out Carry out all manoeuvres as smoothly as possible Use nearside wing mirror to check caravan has cleared when overtaking REVERSING It is advisable to have a second person available when reversing the caravan Start practising by choosing a left hand bend for ease Rev...

Page 24: ...the centre of the spare wheel and remove the clamping sleeve and the retaining wheel nut Remove spare wheel from carrier 8 Use your wheel brace to slacken off the wheel bolts on the wheel to be changed 9 If your caravan has a jack receiver fitted then jack up the caravan in line with the instructions If not position a suitable jack under the axle at the appropriate jacking point rear axle on twin ...

Page 25: ...l ventilation is located at various points High level ventilation is through the roof lights Under no circumstances must these vents be blocked or obstructed It is advised that fixed ventilation points are checked and cleaned if necessary on a regular basis SECURITY VIN VEHICLE IDENTIFICATION NUMBER Record your caravan V I N which can be found stamped on the underside of the drawbar or on one of t...

Page 26: ...ocking bolt into the rim specific insert Fig 3 Insert the locking bolt socket key Fig 4 Line up the locking bolts and assembly with the receiver Fig 5 Tighten the locking bolt socket using the wheel spanner provided or torque wrench as shown to wheel torque Ideally 86 Nm Fig 6 Remove the locking bolt socket key Fig 7 Insert barrel lock Fig 8 Hold the lock fast and lock Fig 9 The AL KO Secure is no...

Page 27: ...il the rear wheel is clear of the ground Fit the second lock by aligning the wheel as described previously FREE CRIME PREVENTION Advice on securing your caravan protecting your valuables property marking either at home or whilst on site can be obtained from the Crime Prevention Officer through your local Police Station 26 SAFETY AND SECURITY Fig 7 Fig 8 Fig 9 Fig 10 A5 Owners Handbook 2015_2_Layou...

Page 28: ...L LEVELLING On uneven ground lateral levelling may be accomplished by the use of a leveller jack and a spirit level placed across the caravan floor Place the leveller jack folded flat in front of the wheel needed to be raised to level the axle Tow the caravan onto the leveller jack Wind up until the spirit level shows that the caravan is laterally level Apply the caravan handbrake and chock the ca...

Page 29: ...s combined with a Whale Underfloor Tank System To determine which model you have please refer to the Coachman brochure Under no circumstances should mains water be connected to the caravan without a pressure reducer If using the system after a storage period carry out checks as outlined in Setting up the Water System Fill fresh water container and place in suitable position Place waste water recep...

Page 30: ... absorption and by mechanical filtration reduces algae and bacteria The silver content avoids bacteriological growth in the filter The Truma Ultraflow operates in the caravan water supply as a pressurised system using the Ultraflow Smart Switch Also available on some models is a special outdoor shower which connects directly beside the pump The water pump and outdoor shower are detachable from the...

Page 31: ...taps should be opened the water filter and the caravan system drained using all the drain taps cold hot waterheater situated within the caravan Additionally shower heads should be removed and the hose left hanging downwards During the winter when the caravan is not in use it is advisable to remove the filter to avoid any retained water within the filter freezing If you use the Truma external showe...

Page 32: ...er is absolutely necessary If the safety instructions are not respected it results in forfeiture of our product liability TECHNICAL DATA Power supply 12 V DC Maximum power consumption water pump 3 A 36W Fuse 6 3 AT slow Max Opening 2 bar Connection diameter 12mm Medium Drinking water 5 C to 30 C The right to effect technical modifications is reserved CONFORMITY DECLARATION En 55014 en60730 electri...

Page 33: ...f the pump and locks out in order to protect the pump knowing that the water supply has run out After the water container has been refilled the power should be removed from the system for a period of approximately 3 seconds then re connected The unit will then operate normally All pressures quoted above are for example only and in practice may vary slightly ON LASER MODELS THE WATER CAN BE SUPPLIE...

Page 34: ...n external water container 4 Fill the underfloor tank from a mains water supply By use of an Ultraflow Waterline 5 Supply the caravan from the underfloor tank OPERATION OF THE UNDERFLOOR WATER TANK SYSTEM As submersible pump system see Control Panel Instructions NOTE The external pump will automatically switch off when the tank is full TANK DRAIN OPERATION The water tank should be drained when the...

Page 35: ...2933 WINTERISING Freezing in winter may cause damage to the Whale under floor tank and module To avoid this damage ensure the system is completely drained 1 Drain the fresh water tank using the drain stem 2 Turn pump on and open all taps including drain valve and allow the pump to purge the water from the system not suitable for submersible systems 3 Open the taps until water flow stops suitable f...

Page 36: ...ropane regulator is not suitable for use on caravans manufactured to EN1949 They are not set on 30 mbar and have a greater outlet pressure tolerance Likewise the current standard automatic changeover regulator will not be suitable WARNING Do not use appliances which have a different working pressure The gas system should only be modified by competent and qualified persons The gas system and applia...

Page 37: ...culation in the awning space when such appliances are in use VENTILATION Fresh air circulation should be allowed below the caravan when appliances are in use At least three sides of the underfloor space should always be kept open and unobstructed especially by snow Do not make any additional openings in the floor Fixed ventilation gas drop holes are sited under gas appliances in various locations ...

Page 38: ...Release retaining strap iii Remove hose connection from cylinder iv Remove cylinder from gas locker and stand on ground Full cylinders i Remove plastic protector from cylinder ii Place cylinder in gas locker iii Connect hose to cylinder If you are changing the type of cylinder you will have to change this hose or use an adapter See your Dealer Avoid tension on the rubber gas hose iv Connect retain...

Page 39: ...int and connect the plug at the other end of the supply flexible cable to this Switch on the main switch at the site supply point Note If you wish to use any 12v appliances you must turn on at the control panel On Leaving Caravan Site 5 Reverse the procedure described in Paragraph 3 and 4 above 38 CONNECTING SERVICES ELECTRICITY WARNING Never allow modification of electrical or LPG systems and app...

Page 40: ... to maintain full electrical protection CHECK all caravan equipment is set up to accept the site supply before actually switching on Note It is possible that all of the 230V mains electrical equipment may not be able to be operated simultaneously A typical UK caravan site mains hook up point provides a maximum output of 16 amps and on some continental sites the available output may be as low as 5 ...

Page 41: ... done by moving the switch upwards against the spring pressure and so restoring the supply The MCB s are designed to protect both for the overload of each circuit and also the short circuit In both events the MCB will automatically switch to the OFF position and when the fault is removed they can be switched upwards against the spring to the ON position Both the RCD and MCB s will only latch back ...

Page 42: ... Solar Panel Part Number STP80CM Coachman ELEQE062 The solar panel will continuously deliver power to charge the leisure battery in the caravan Therefore the leisure battery must be connected at all times If the battery is removed you must also remove the inline fuse for the solar panel This is located in the fuse holder situated between the regulator and the battery In order to protect the batter...

Page 43: ...alue The build quality of the panel is also guaranteed against defects and water ingress for 10 years The charge controller is covered by a 2 year warranty For any warranty claims or technical questions please contact Solar Technology International help line on 01684 774000 RELAY HOUSING Provides the 12 volt distribution throughout the caravan All the fuses are located at the front of the PDU behi...

Page 44: ... its original configuration on return to the UK If it can be achieved it is preferable to connect live to live and neutral to neutral to maintain full electrical protection BATTERY BOX Located in the battery box below the mains inlet your caravan will be fitted with an aerial and satellite connection if an external source is available 43 CONNECTING SERVICES ELECTRICITY ALWAYS USE BATTERY TRAY PROV...

Page 45: ... before disconnecting the battery Generators When using a generator ensure that the actual output voltage does not exceed the rated generator output voltage and the rated input voltage of the consumer unit otherwise internal damage to the unit could occur Before starting the generator ensure that the RCD lever is in the off position N B Refer to the manufacturer s instruction book before use N B I...

Page 46: ...nu Awning Switch Pressing the Awning switch will switch power to the awning light The awning light works independently from the master switch Menu Details The available menus are controlled by the 3 control buttons The left and right buttons cycle through the available menus Pressing the enter button accesses any extra options that the current menu holds Only menus relevant to your caravan will be...

Page 47: ...he time on the clock menu if certain undesirable situations occur Here is a summary of what they mean Dimmer Switches Your caravan may be fitted with dimmer lights that are controlled via switches mounted on the walls of your living space Quickly pressing these switches will turn the lights on and off When the light is on you can hold the button down to slowly dim the brightness When a desired bri...

Page 48: ...trical operation depending on the fuse protection at the camping site power of 900 W 3 9 A or 1800 7 8 A can be manually selected Note If more output is required e g heating up or low outside temperatures gas or mixed operation should be selected so that enough heating power is always available With mixed energy operation selected the 230 V electric supply is prioritised over the gas operation if ...

Page 49: ... of gas extinguish all open flames open windows and door close all quick acting valves and gas cylinders do not smoke do not activate any electric switches ask an expert to inspect the entire system Repairs may only be carried out by an expert Guarantee claims warranty claims and acceptance of liability will be ruled out in the event of the following modifications to the unit including accessories...

Page 50: ... tight fit of the exhaust gas double duct must be checked regularly particularly at the end of long trips Also check the mounting of the appliance and the cowl Following a blow back misfire always have the exhaust gas system checked by an expert Always keep the cowl for the exhaust duct and combustion air intake free of contamination slush ice leaves etc The hot air outlets and the recirculated ai...

Page 51: ...ne 3 Menu line above 4 Menu line below 5 Display of mains voltage 230 v shore power 6 Display timer 7 Settings values 8 Control knob push button 9 Back button The control knob push button 8 is used to select menus in the lines 3 4 and configure the settings These are shown via a display 1 with a lighted background Pressing the Back button 9 takes the user back out of the menu again Control knob pu...

Page 52: ...line 3 Click to change to the setting level Depending on the connected device use the control knob push button to select between the heater or air conditioning unit Use the control knob push button to select the required temperature Click the control knob push button to confirm the value Heater Settable temperature arranger 5 30 C 1 C steps a heater Hearer is switched on Change the warm water leve...

Page 53: ...alfunction Switch the heater off and on again on the control panel In case of a longer interruption switch to the Diesel power type Malfunction in the combustion process e g lack of fuel Combi Gas The heater automatically switches to the electro mode If the heater should operate in the mixed mode again the cause of the malfunction needs to be rectified Switch the heater off and on again on the con...

Page 54: ...ion HEATER COMBI Off Fan is switched off a Vent Circulating air if no device is in operation 9 speed levels can be selected b Eco Low fan level c Mid High fan level Only Combi Gas d High Fast heating of the room Available if the difference between the selected and current room temperature is 10 C AIR CONDITIONING UNIT Off Fan is switched off a Vent Circulating air if no device is in operation b Ec...

Page 55: ...lect the power type Click the control knob push button to confirm the value Select fan level Click to change to the setting level Use the control knob push button to select the required fan level Click the control knob push button to confirm the value Activate the timer ON Click to change to the setting level Use the control knob push button to activate the timer ON Click the control knob push but...

Page 56: ... the minutes Click the control knob push button to confirm the value SERVICE MENU Query the index status of a connected device Change the background lighting of the control panel There are 5 background lighting levels to choose from Change language Select the required language from those available e g English German French Italian Display mains voltage 230 V The symbol indicates that 230 V mains v...

Page 57: ...trol panel will jump again to the menu level malfunction Cause not remedied return to setting level Press the Back button In this case the malfunction is not acknowledged in the control panel and the warning symbol remains on The device remains in the malfunction status Other devices connected to the control panel can be operated TECHNICAL DATA Display LCD monochrome Dimensions L x W x H 92 x 103 ...

Page 58: ...act the Truma Service 42 Window above the cowl is open window switch Close the window 43 Over voltage 16 4 V Check the battery voltage and voltage sources e g the charger 44 Under voltage battery voltage too low 10 0 V Charge battery Replace any old batteries 45 No 230 V operating voltage Reconnect the operating voltage 230 V Faulty 230 V Fuse Replace the 230 V fuse Overheating protection has trig...

Page 59: ...ANDBY SCREEN The Standby Screen is displayed after the Splash Screen This screen contains useful information about the status of your heating system NB If Standby Screen is set to Dark in Backlight settings the Standby Screen will not be displayed the screen will be dark unless touched A Clock is enabled Day of the week and time shown B Outdoor Temperature Optional outdoor temperature sensor requi...

Page 60: ...own 2 Hot Water Normal Volume bar half full Hot water is heated to greater than 50 C NB If Circulation Pump is set to Continuous this option will not be available 3 Hot Water Boost Volume bar full Central heating circulation is disabled for 30 mins Hot water is heated to greater than 65 C After 30 mins the system reverts to Hot Water Normal 4 Adjust by pressing Plus or Minus button Electric Heatin...

Page 61: ...on to proceed Setup Standby Screen for bedtime The backlight on the Standby Screen can be disturbing if the control panel is visible from your bed It can be inverted for white text on black background 1 Press Tool button to access the Settings Menu bottom right in Main Menu 2 Press down arrow until Backlight button is displayed 3 Press Backlight button select Inverted to proceed MAINTENANCE The Al...

Page 62: ...and boiler Unplug cable at the control panel and boiler then carefully plug back in Check there is slack on the cable at the control panel but not excessive weight from free hanging unmanaged cable Window open Optional window sensor has triggered gas heating is suspended Automatically clears and gas heating resumes when window is closed Connection fail ext Break in comms between Alde control panel...

Page 63: ...000 Series Refrigerator see caravan model specification for details which have been specially developed by Thetford for caravans and motorhomes Main Parts 1 Refrigerator door 2 Freezer door 3 Door lock 4 Security lock dependent on model 5 Control panel with LCD touchscreen 5a On off switch 5b Touchscreen 5c Symbols sources 5d Cooling level indicators 5e Symbol anti condensation only for model B 5f...

Page 64: ...children to play with or hide in the appliance Children can become trapped and possibly suffocate Do not allow children to clean or perform maintenance on the appliance without supervision MAINTENANCE Make sure that installation electrical connection maintenance and periodical inspection of the gas system will be done by a qualified technical person according to Thetford s instructions www thetfor...

Page 65: ...ator push the confirmation button and hold it for 2 seconds The symbols for the sources light up and start to blink Choose the desired source by pushing the arrow buttons Confirm your choice with the confirmation button Sources On VIP and Laser the refrigerator automatically selects the best source available N3112A N3175A A Auto in order mains battery gas 220v The refrigerator is powered by 240v t...

Page 66: ...ure between 15 C and 25 C A higher temperature needs a higher cooling level a lower temperature a lower level To improve the cooling performance of your refrigerator in high temperatures Thetford advises to install the Ventilator Kit It helps to detract the warm air quicker to the vents The Ventilator Kit is suitable for all Thetford refrigerators CONTROL OF OPTIONAL EXTRAS Anti condensation prese...

Page 67: ...e only pre cooled food in the refrigerator To prevent the food from drying out or your refrigerator from odours store food separately in closed boxes USE OF FREEZER COMPARTMENT You can use the freezer compartment to keep food frozen or to make ice cubes with the special delivered tray Never keep carbonated liquids in the freezer compartment If the refrigerator has to perform for a longer period in...

Page 68: ...refrigerator Therefore install winter covers before washing your vehicle SWITCH OFF REFRIGERATOR Before defrosting the refrigerator or storing your vehicle switch off the refrigerator Push the on off switch as illustrated and hold it for 2 seconds to switch off the refrigerator All lights will go out DEFROSTING A layer of ice on the cooling fins will decrease the cooling capacity and durability of...

Page 69: ...ork on gas Check if the gas bottle is not empty check if the valve of the gas bottle and all shut off valves are open switch the refrigerator off and on again try to run the refrigerator on another power source 6 The refrigerator does not work on 12 V Make sure the engine is running try to run the refrigerator on another power source 7 The refrigerator does not work on 12 V Make sure the engine is...

Page 70: ...uct the product has been repaired by an unauthorised Thetford Service Centre the product code or serial ID has been changed the product has been damaged by circumstances outside the normal use of the product 6 The guarantee is only valid for Thetford refrigerators that are built in a caravan Thetford is not liable for any loss and or damage caused directly or indirectly by use of the refrigerator ...

Page 71: ...ners Using the Electric Hotplate Ensure the electricity is switched on The hotplate control is numbered from 1 to 6 To turn it on rotate the knob either clockwise or anti clockwise to the required position Position 1 is the coolest setting To turn off rotate the knob until the line or pointer on the knob lines up with the zero on the control panel The hotplate is a sealed construction and transfer...

Page 72: ...w minutes preheat is recommended 7 Flame Failure Device FFD the grill burner is fitted with a flame sensing prove which will automatically cut off the gas supply in the event of the flame going out In the event of the burner flames being accidentally extinguished turn off the burner control and do not attempt to re ignite the burner for at least one minute 8 It is normal for the flames on this bur...

Page 73: ...es indicated refer to the centre of the oven and at any particular setting the oven will be hotter at the top and cooler towards the base The variation between top and centre and centre to bottom is approximately equivalent to one gas mark Good use can be made of the temperature variation in several dishes requiring different temperatures may be cooked at the same time In this way maximum Before f...

Page 74: ...me DO allow the oven to heat before using for the first time in order to expel any smells before the introduction of food Gas Mark Temperature Dish Temp ºC Shelf Cooking Time Centre Shelf Pos 2 Position 265 275ºC 130 135ºC Very Cool Meringues Very rich Fruit cake 150 2 Approx 60 mins per 500g 1 285 140 Cool Stewed fruit Baked custard 165 3 50 60 mins 2 300 150 Cool Rich fruit cake Victoria sandwic...

Page 75: ...e removed for cleaning They are interchangeable without affecting the sense of operation SERVICING All servicing must be carried out by an approved competent person Before any service work is started the appliance should have been left to cool and be disconnected from both the gas and electrical supplies After each service the appliance must be checked for gas soundness For service please contact ...

Page 76: ...at random Microwaves will pass through certain materials such as glass and plastic to heat the food Water sugar and fat in food absorb microwaves which cause them to vibrate This creates heat by friction in the same way your hands get warm when you rub them together Once cooking is complete the oven automatically stops producing microwaves Standing time is necessary after cooking as it enables the...

Page 77: ...to mount portable ideal for travelling Independently tested to confirm to the European Carbon Monoxide Alarm Standard BS EN 50291 2001 7 year warranty Carbon Monoxide and how it can affect you and your family Carbon monoxide is a dangerous poisonous gas that kills hundreds of people each year and injures many more It is often referred to as the silent killer because it has no odour or taste and ca...

Page 78: ...rette smoke Gas appliances Any fossil fuel burning appliance WARNING This FireAngel carbon monoxide detector is not a combustible gas detector nor a smoke detector WARNING Do not use this carbon monoxide detector on an intermittent basis or as a portable detector for trying to trace one source of the spillage of combustion products from fuel burning appliances or from chimneys DO NOT IGNORE ANY WA...

Page 79: ...ting properly The sounder will sound as soon as the button is pressed and the Alarm LED will illuminate red indicating that the sounder is working and the power pack is providing power to the unit This test for the sounder power pack and circuitry should be performed on a weekly basis This should be continued for the lifetime of the product WARNING Prolonged exposure to the sounder in close proxim...

Page 80: ...will cause the life of the power pack to be shortened NOTE CO test kits may be used in order to avoid having to burn cigarettes incense sticks etc However we recommend that incense sticks are used as they are cheap and readily available Read all steps thoroughly before attempting the sensor test Step 1 If the detector is wall or ceiling mounted unhook the detector from the screws Step 2 Cover the ...

Page 81: ...detected carbon monoxide If the product is still within warranty then contact technical support If the product is no longer in warranty replace immediately IMPORTANT The selected power pack was chosen to provide power beyond the lifetime of the product in particular the sensor under normal operating conditions The sensor life is seven years For this reason the detector should be replaced after sev...

Page 82: ... ALARM Please carefully review the owner s manual to ensure that you know what actions to take in the event of an alarm What to do during an alarm Keep calm and open the doors and windows to ventilate the caravan Turn off appliances where possible and stop using the appliances Evacuate the caravan leaving the doors and windows open Ring your gas or appliance supplier on their emergency number keep...

Page 83: ... water tank Before using your toilet it is vital that you add toilet additives to these tanks Check the correct dosage on the additive package The add 3L of water to the waste holding tank Fill the flush water tank of a C262 model to the top Thetford offers a pleasantly scented toilet flush for the flush water tank Aqua rinse and a variety of waste holding products Aqua Kem Blue Aqua Kem Green Aqu...

Page 84: ... To empty the tank without splashing press and hold the vent button with your thumb while the pour out spout is pointing downwards If you want to continue using your toilet after emptying prepare the waste holding tank gain Aqua Kem Green Aqua Kem Natural and Aqua Rinse Test ISO 11734 are absolutely safe to empty into a septic tank or small biological systems on camping sites Please avoid to trave...

Page 85: ...e your toilet for a long period you have to thoroughly empty clean and dry the whole toilet Also empty the flush water tank of a C262 model This is also a good moment to maintain you toilet During storage we advise leaving the blade open to prevent damage to the blade and to loosen the cap of the pour out spout to ventilate the waste holding tank Questions If you require further information or hav...

Page 86: ...ave been made to the product The product has been repaired by an unauthorised Thetford Service Centre The product code or serial ID has been changed The product has been damaged by circumstances outside the normal use of the product 5 Not using Thetford products to care for your Thetford toilet could create some damage which would not be covered by this warranty Thetford is not liable for any loss...

Page 87: ...e airflow can be adjusted in 6 steps See Table 2 MIN 3 7 m3 min 2W 0 17 A MAX 24 m3 min 86 W 7 20 A In order to save the battery the speed drops from position 6 to the lowest position after one hour of use Table 2 A5 Owners Handbook 2015_2_Layout 1 26 08 2014 16 20 Page 86 ...

Page 88: ...sition a Press the button in the toggle catches on either side of the dome and turn through approx 90º b Grasp the metal bar in the middle snap it out of its holder swivel down and push the dome upwards Dome is held by the two gas springs after approx 150mm c Swivel the metal bar towards the dome and snap into its holder d To close the dome proceed with steps a c in reverse order 2 To open in the ...

Page 89: ...ve your caravan when HEKI 2 is open Please consult your supplying dealer if you have any problems or defects Remove any snow ice or dirt before opening the roof Opening closing the dome press the push button 1 and simultaneously open the dome with the bar 2 Position A push the bar 2 to the marked rest position Fix the bar in the rest position by pushing the sliders 3 left and right downwards Posit...

Page 90: ...h the rooflight open danger of burglary 7 Do not open in strong wind or rain 8 Before opening remove snow ice dirt etc from the dome 9 Malfunctions are to be repaired by an approved dealer at once 10 Do not use caustic detergents danger of tension cracks in the dome 11 Before setting off close the dome check the locking mechanism and open the blinds Care instructions Clean the dome with the Seitz ...

Page 91: ...n case of defects and malfunctions Before starting off check the roof light for damage in the dome tension cracks and the opening mechanism which could arise owing to for example branches and other natural causes Do not step on the dome Do not leave the vehicle with the rooflight open danger of burglary and water penetration Do not open in strong wind rain or snowfall Before opening remove snow ic...

Page 92: ...ition throughout the winter as the memory of the mechanism may be lost GAS BARBECUE POINT Your caravan is fitted with a gas barbecue point The gas barbecue point is situated on the nearside towards the front This point is for use with a gas barbecue only Simply lift up the flap unplug the red plastic end cap and connect the appliance in accordance with the gas barbecue manufacturer s instructions ...

Page 93: ...nge of wired and wireless accessories To ensure your STINGER 310 system is operated correctly please read all sections of these instructions before attempting to use the alarm If you are unsure of any content please contact your supplier in the first instance or the manufacturer direct OPERATION USING THE KEY FOB Each STINGER 310 is supplied with two key fob style radio controllers which are used ...

Page 94: ...n be adjusted as described in the key fob programming section OPERATION AWNING LIGHT When the STINGER 310 alarm system is armed or disarmed the Awning light will be activated for a period one minute to provide illumination whilst entering or exiting the caravan The Awning light can be turned off during this period by pressing the Awning light button on the key fob if required note awning light con...

Page 95: ...blinds Arrange the seat appropriately All high level beds will take a maximum weight of 10 stone 63 5kg When in use the high level beds must have the bunk safety boards in place as shown in diagram 4 Note these are not suitable for children under 6 years old without supervision Prior to tilting the single beds to access storage please ensure the backrest is laid flat on the base cushion WARNING Pl...

Page 96: ...by using a special polishing cloth and acrylic polishing paste Light scratches and matt areas can be removed from acrylic by using the acrylic polishing paste and polishing cloth Distribute the polishing paste on the pre cleaned surface with the polishing cloth and polish gently in a circular motion for 3 5 minutes Rinse with warm water Do not use in strong sunshine Correct antistatic treatment of...

Page 97: ...interior walls are finished with a vinyl coating and will only require a wipe over with a damp cloth using a mild detergent to keep them in a good condition Furniture Treat your caravan furniture as you would the furniture in your home Polish wood surfaces sparingly with a good quality wax polish Use a damp cloth to clean laminated surfaces Your furniture is made from wood or wooden based material...

Page 98: ...ehold use These marks are usually only superficial and can be removed with a proprietary stainless steel cleaner polish A useful alternative is a car paint restorer such as T Cut Rust Marks Under normal usage it is unlikely that these marks will be caused by rusting of the stainless steel itself but are more likely to be the result of small particles of ordinary steel which have become attached to...

Page 99: ...nd water and clear rinsing in cold water For stubborn stains Thetford Bathroom Cleaner is recommended The use of any other cleaners may harm the product cause premature failure and will invalidate the warranty Abrasive products should never be used and the same applies to solutions such as nail varnish remover Acetone linseed oil based products such as putty thinners pine oil etc Thetford Bathroom...

Page 100: ...ended Remove all linens blankets cushions clothes mattresses etc which could be affected by damp conditions Clean the caravan inside and out as detailed in the previous section Drain off the water system See previous section Drain and sterilise the toilet See previous section Ensure all windows roof lights and doors are correctly fastened and locked Check fixed ventilation apertures are not obstru...

Page 101: ...grey colour During winter periods or storage where there is insufficient air circulation or heavy moisture a soft porous light grey oxidisation layer may form This is known as White Rust and should NOT be confused with rust THE AXLE Fig 1 The AL KO rubber suspension axle has been designed for new standards of spring comfort and is maintenance free Three rubber elements are contained within a hexag...

Page 102: ...forward movement of the chassis will allow the coiled spring to reassert itself enabling the reverse lever to recover to its normal position Normal braking is then immediately available PARKING The AL KO parking brake system incorporates a patented device for added safety when parking on a reverse sloping site or steep hill The AL KO parking brake system comprises a handbrake lever mechanism actua...

Page 103: ...outines A good all purpose oil is recommended for general use AL KO EURO AXLE DESCRIPTION Retaining the well proven AL KO Hexagonal rubber independent suspension the specific features of the AL KO Euro Axle are Bolted on wheel brakes Adjustable toe in and camber factory only Strengthened stub axle Sealed for life bearing unit Octagon Shock Absorbers In addition the backplate has a gold coloured zi...

Page 104: ...d refit the wheel bolts WARNING Ensure the wheel is of the same construction and size with the one that has been removed Tighten all bolts equally in the order shown in the diagram Torque settings are Steel Wheels 88Nm 65lbsft Alloy Wheels 130Nm 96lbsft Please note with alloy wheels you should first tighten all the bolts to 85Nm 63lbsft then go round again in the sequence shown and increase the to...

Page 105: ...Dealers will carry out your annual servicing using the latest techniques and equipment a list of the items to be inspected tested and adjusted appears in your Warranty and Service Handbook and at the rear of this guide and will complete the service document as proof of regular maintenance As with motor vehicle service documents not only will the proof of regular servicing enhance your caravan s re...

Page 106: ...ase your selected repairer must contact the AFTER SALES DEPARTMENT with all enquiries Coachman genuine parts and recommended procedures must be used at all times SERVICE DOCUMENTS TOURING CARAVANS ANNUAL SERVICE RECORD Your caravan needs servicing at least once a year Whether you use your caravan for short journeys or for touring at home or abroad regular servicing will help ensure that you can en...

Page 107: ...orward the signed and completed Registration Form contained in the Warranty and Service Handbook within one week of purchase It is a condition of this warranty that a service and safety check is carried out by your caravan dealer at least once every year 12 months from the date of purchase within the period 90 days before to 90 days after the anniversary of the purchase date for interim years but ...

Page 108: ...t the prior agreement of Coachman Caravans The warranty also excludes Caravans used for hire or reward Caravans used for other than recreational purposes i e for living in or business purposes The cost of transporting the caravan by whatever means to the place of repair Any consequential cost or loss arising Damage by mould Damage by forces of nature Damage by vermin For full details of the warran...

Page 109: ...se that while over recent years we together with our sealant suppliers have made tremendous developments in sealants and sealing techniques and are extremely confident in our product resisting water ingress it is water ingress above all other problems which remains the main worry and concern of potential and actual retail customers Therefore on every new Coachman caravan sold we make a comprehensi...

Page 110: ... preserve your Coachman warranty you must ensure Your annual service is carried out within 90 days either side of the anniversary of the purchase date The 5th service is carried out before the expiry of the 60 month period from the original date of purchase To preserve your 6 year worry free water ingress and delamination offer you must ensure The 6th annual service is carried out before the expir...

Page 111: ...WARRANTY AFTER SALES REFERENCE CHART 110 A5 Owners Handbook 2015_2_Layout 1 26 08 2014 16 21 Page 110 ...

Page 112: ... Barbecue Point 37 H Heater 47 M Maintenance Wheel Changing 23 Wheels Tyres 101 Microwave 74 O Oven Hob Grill 69 P Preparing for the Road 11 Pre Tow Checklist Hitch up 13 Pressurised Water System 29 R Refrigerator 62 Rooflights 85 The Heki 2 Rooflights 87 The Omnivent 12V Rooflight 85 The Mini Heki Rooflight 89 The Midi Heki Rooflight 89 S Safety Security 24 Security Tag 5 Servicing 104 Speed Limi...

Page 113: ...NOTES 112 A5 Owners Handbook 2015_2_Layout 1 26 08 2014 16 21 Page 112 ...

Page 114: ...www coachman co uk Coachman Caravan Company Ltd Aftercare Operations Amsterdam Road Sutton Fields Industrial Estate Hull HU7 0XF Tel 01482 877405 Upgrade to a Coachman ...

Reviews: