4
c. Remove either the ashpan with the operating tool. See
Fig. 5
Allow to cool before placing contents in a plastic bin or liner.
NOTE: EMPTY THE ASHPANS AT REGULAR
INTERVALS AND DO NOT ALLOW ASH TO
ACCUMULATE IN THE ASHPAN UNTIL IT TOUCHES
THE UNDERSIDE OF THE BOTTOMGRATE OTHERWISE
IT WILL VERY SOON DESTROY THE BOTTOMGRATE.
The continued presence of shale, stone or clinker in the
firebed will reduce burning rates.
To remove shale or stone from the firebed, open the
firedoor and rake the fire upwards with a poker to bring the
shale or stone to the top and remove with tongs.
The type of fuel and the thermostat setting govern the
frequency of fuelling.
WARNING: PROPERLY INSTALLED AND OPERATED
THIS APPLIANCE WILL NOT EMIT FUMES.
OCCASIONAL FUMES FROM DE-ASHING AND RE-
FUELLING MAY OCCUR.
PERSISTENT FUME EMISSION MUST NOT BE
TOLERATED.
IF FUME EMISSION DOES PERSIST, THEN THE
FOLLOWING IMMEDIATE ACTIONS SHOULD BE
TAKEN.
a. Open doors and windows to ventilate room.
b. Let the fire out or eject and safely dispose of fuel from
appliance.
c. Check for flue or chimney blockage, and clean if
required.
d. Do not attempt to relight the fire until the cause of fume
has been identified, if necessary seek professional
advice.
SWEEP MONTHLY - SEE FIGS. 6, 7, 8 AND 9.
The top of the throat plate and flue pipe outlet should be
swept on a monthly basis to prevent flyash deposits
restricting the flueway and prevent fume emission and
reduced burning rates.
a. Open the firedoor, remove the front firebars and
bottomgrate bars.
a. (i)
Top Flue Outlet
Draw throat plate forward about 25mm and gently
swing it downwards to a still position to expose top flue
outlet. Figs 6 and 7.
Insert flexible brush into the top flue outlet and brush
deposits downwards into firebox. Fig.8.
b (ii)
Back Flue Outlet
Draw throat plate forward about 25mm and gently
swing it downwards to a still position to expose the rear
flue outlet. Figs 6 and 7.
Insert flexible flue brush into the rear flue outlet and
brush deposits towards firebox. Fig. 9.
c. Return throat plate to original position then replace front
firebars and close firedoor.
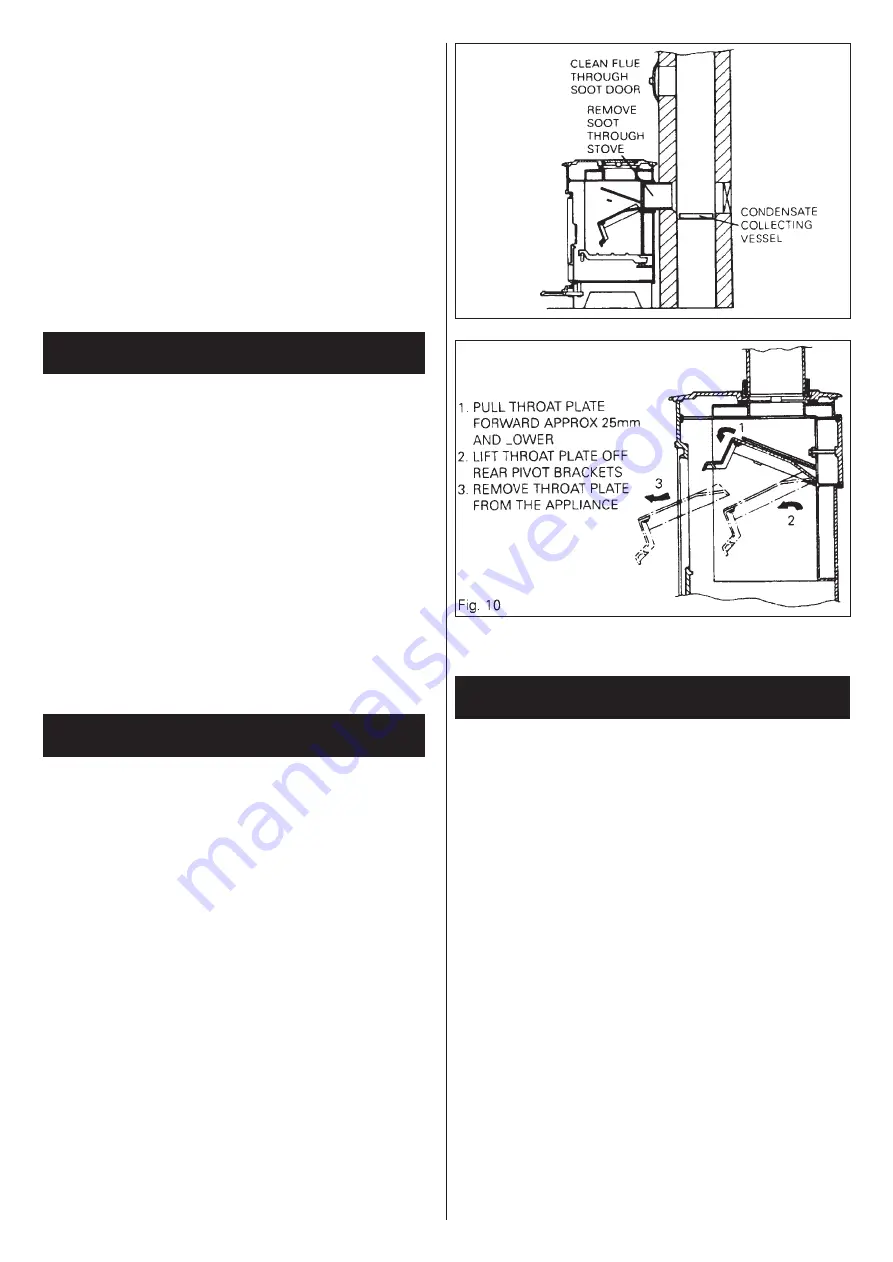
SWEEP ANNUALLY SEE FIGS. 8, 9 AND 10
WARNING: NEGLECT OF CHIMNEY SWEEPING CAN
LEAD TO DANGEROUS FUME EMISSION
Top Flue Only
The chimney can only be swept through the
appliance front.
Back Flue Only Against Chimney
The chimney must be
swept through the soot door above the appliance and the
soot removed through the appliance.
Back Flue Only in Recess
The chimney is swept through
the flue elbow cleaning door and the soot can be removed
through the appliance.
a. Open the firedoors and remove the front firebar and
bottomgrate bars.
b. Draw throat plate forward about 25mm allowing it to
partially swing downward. Support the weight of the
throat plate front, lift hinged end about 13mm and draw
plate through appliance door aperture. Fig. 8.
c. Insert the chimney sweeping brush into the main flue
via soot cleaning door entry or through the flue pipe
where possible. Ensure the deposits are separately
collected or fall into the firebox for removal. Replace the
removed components using the reverse procedure of
removal.
APPLIANCE CLEANING
(Flyash Removal)
FUME EMISSION
FLUEWAY CLEANING
Fig. 9


