background image

Chapter 2: To get started

98-126882-F

To connect a computer

18

To connect a computer

Before you connect to the LAN interface

For the LAN interface to work without any further setup, the connected computer must be set 
up to obtain an IP address and a DNS server address automatically.

To check this on your computer (Windows XP), do as follows:

1. Go to 

Start > Settings > Control Panel > Network Connections

.

2. Right-click on the LAN connection you want to use.

3. Select 

Properties

.

4. Highlight 

Internet Protocol (TCP/IP)

.

5. Click 

Properties

6. Make sure that the following is selected:

• Obtain an IP address automatically
• Obtain DNS server address automatically

To connect a computer to the LAN interface

To connect a computer to the LAN interface, do as follows:

1. Power up your computer.

2. Connect your LAN cable between the network connector on your computer and one of the 

LAN connectors on the terminal.
When the computer and the terminal are ready and the terminal is registered on the BGAN 
network, the terminal automatically starts a Standard data connection. For further 
information, see 

To connect to the Internet

 on page 39.

For information on how to configure the LAN interface on the terminal, see 

To configure the 

LAN interface

 on page 67.

To enter the SIM PIN for the terminal

Do you need a SIM PIN?

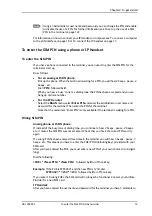
Depending on your SIM card, you may have to enter a SIM PIN to use the system. Your SIM 
PIN is supplied with your SIM card. You can enter the PIN using a standard phone or ISDN 
phone, the IP Handset or the web interface.

Note

This section only describes a Standard Internet connection with default settings on 
the terminal. For information on other scenarios, see 

To connect to the Internet

 on 

page 39.

Summary of Contents for explorer 727

Page 1: ...EXPLORER 727 User manual...

Page 2: ...t or accuracy of any translations or reproductions in whole or in part of this manual from any other source In the event of any discrepancies the English version shall be the governing text Thrane Thr...

Page 3: ...imale est de 1 m des parois ainsi que du haut de l antenne lorsque l EXPLORER 727 est allum La distance de s curit minimale ne s applique pas au dessous de l antenne car la radiation ne forme une sph...

Page 4: ...uire it from your distributor Manual overview Note that this manual does not cover installation nor does it cover how to use the IP Handset that comes with the system For information on installation r...

Page 5: ...agraph title in cross references Example For further information see Connecting Cables on page Title and description Document number EXPLORER 727 Including 19 Rack Version Installation Manual Explains...

Page 6: ...nect a computer 18 To enter the SIM PIN for the terminal 18 To register with the BGAN network 21 To make the first call 23 Chapter 3 To operate the system General 25 To use a phone or fax machine 28 T...

Page 7: ...31 Event logging and self test 132 Site map 133 Chapter 5 Maintenance and troubleshooting To get support 134 To upload software using the web interface 135 Part numbers 136 Troubleshooting guide 137 S...

Page 8: ...peed data and voice communication via satellite through the BGAN Broadband Global Area Network Applications include Internet browsing E mail Phone and fax services Large file transfers Video conferenc...

Page 9: ...ted Services Digital Network service 64 kbps Voice Standard Voice 4 kbps or 3 1 kHz Audio 4 LAN Local Area Network ports with PoE Power over Ethernet for computers e hubs IP handsets etc 2 Standard Ph...

Page 10: ...a intended for roof mounting on a vehicle The antenna contains all functions for satellite tracking including a GNSS Global Navigation Satellite System A single coaxial cable carries all RF communicat...

Page 11: ...information on how to use the handset see the user manual for the IP Handset The built in web interface in the terminal is used for easy configuration and daily use The web interface is accessed from...

Page 12: ...andset and the terminal However on the BGAN network side of the terminal calls may be transmitted as either circuit switched or VoIP calls When connected to the terminal the IP Handset provides a dedi...

Page 13: ...ransfer files and make telephone calls Coverage The Inmarsat BGAN services are based on geostationary satellites situated above the equator Each satellite covers a certain area footprint The coverage...

Page 14: ...the gateway to the worldwide networks Internet telephone network cellular network etc The BGAN services supported by EXPLORER 727 Supported services The services currently supported by the EXPLORER 7...

Page 15: ...A low tariff connection for voice only The voice signal is compressed to 4 0 kbps which reduces the bandwidth use and consequently the tariff 3 1 kHz Audio A high quality connection which can be used...

Page 16: ...reaming Data Up to 256 kbps Note 256 kbps is only supported from 45 degrees elevation and inwards a a For an overview of the elevation angles see the coverage map in the next section With the BGAN X S...

Page 17: ...on Your SIM card may not allow for all the services described in this manual For example if you want to use the BGAN X Stream service it must be subscribed to and enabled on your SIM card Also some se...

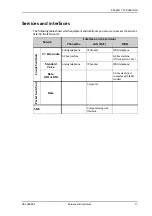
Page 18: ...d in the left column Service Interface on the terminal Phone Fax LAN PoE ISDN Circuit Switched 3 1 kHz Audio Analog telephone IP handset ISDN telephone G3 Fax machine G4 Fax machine If it supports G3...

Page 19: ...efer to the installation manual for the EXPLORER 727 System Before you start Operation at high temperatures If the terminal is installed in a location where the ambient temperature may exceed 50 C we...

Page 20: ...manual for the EXPLORER 727 system To start up the terminal SIM card Note that the EXPLORER 727 Terminal requires a SIM card dedicated to the land vehicular BGAN service The terminal can only access t...

Page 21: ...al Using the front power switch If you have the 19 Rack variant of the EXPLORER terminal flip the switch in the front panel to 1 to switch on the terminal Note If you have the 19 Rack variant of the E...

Page 22: ...rnal switch is connected to the remote on off pins in the DC connector you may leave the power switch in the connector panel in the on position and use the remote switch to turn the terminal on and of...

Page 23: ...make calls or running data sessions until the system is registered on the BGAN network You may have to enter a SIM PIN before the system can register For further information see To enter the SIM PIN...

Page 24: ...e different for another type of IP handset To start up the IP Handset do as follows 1 Connect the Ethernet cable from the IP Handset cradle to one of the LAN PoE connectors on the terminal as describe...

Page 25: ...s 1 Power up your computer 2 Connect your LAN cable between the network connector on your computer and one of the LAN connectors on the terminal When the computer and the terminal are ready and the te...

Page 26: ...l is waiting for a PIN Wrong SIM PIN Analog phone or ISDN phone If instead of the busy tone or dialing tone you continue to hear 2 beeps pause 2 beeps etc it means the SIM PIN was not accepted Check t...

Page 27: ...To enter the SIM PIN using the web interface To enter the SIM PIN Do as follows 1 On a computer connected to the terminal open your browser and enter http ut bgan or the IP address of the terminal in...

Page 28: ...the terminal Note that the registration procedure may take several minutes The table in the next section shows the normal sequence when registering LED indications during the registration procedure T...

Page 29: ...egistration To open the web interface do as follows 1 On a computer connected to the terminal open your browser and enter the IP address of the terminal in the address bar default IP address http 192...

Page 30: ...g from Denmark and the mobile number for Standard Voice is 870772420567 on your terminal and you want to make a Standard call to the terminal dial 00 870 772420567 If the mobile numbers are listed in...

Page 31: ...System It has the following sections General To use a phone or fax machine To use a computer To use the IP Handset This chapter does not describe advanced configuration of interfaces For this type of...

Page 32: ...w the status of the terminal The menu system in the IP Handset includes the following items for the terminal BGAN menu Select start and stop your data connections View C No signal strength for the sys...

Page 33: ...the call log outgoing received and missed calls and data SETTINGS page set up the interfaces of the terminal set up tracking set up terminal usage mode Standard on the move or X Stream on the pause se...

Page 34: ...the left column Service Interface on the terminal Phone Fax LAN PoE ISDN Circuit Switched 3 1 kHz Audio Analog telephone IP handset ISDN telephone G3 Fax machine G4 Fax machine If it supports G3 Fax...

Page 35: ...r fax machines IP handset The terminal has four LAN connectors with Power over Ethernet for connecting IP handsets or other IP equipment For details on the features and functions of the IP Handset ref...

Page 36: ...interface you must use UDI To select the default outgoing call type To select the default call type for outgoing calls do as follows ISDN Select the call type in the web interface under SETTINGS ISDN...

Page 37: ...tion on how to make a call to the terminal see To make a call to the terminal on page 32 To select the incoming call type To select which call types are accepted for an incoming call use a computer an...

Page 38: ...ss the off hook key from the main screen to display the latest calls in the call log Then scroll to the wanted number and press the off hook key again Note that this is the call log of the IP Handset...

Page 39: ...Number called from Date and time the voice mail message has been received Number to call to listen to the voice mail message To see that a new SMS has arrived you open the web interface For further d...

Page 40: ...he terminal are described in the following sections Note Remember the 0 at the start when you dial a local phone number If you accidently dial a 3 digit number you may get a service provider s short d...

Page 41: ...alog 2 wire phones with R key Note Different types of phone have different methods keys for the functions listed below If you have another type of phone than the ones listed below refer to the documen...

Page 42: ...hang up the call is handed over to the initial caller To send or receive a fax message To handle delays When you send or receive fax messages over satellite both fax units must be able to handle longe...

Page 43: ...mobile number is always 870 which is the country code for the BGAN system Use the 3 1 kHz mobile number if you are calling a G3 fax and the UDI number if you are calling an ISDN G4 fax connected to th...

Page 44: ...are Standard IP and Streaming IP Using a Standard IP connection several users can share the data connection simultaneously This type of connection is ideal for TCP IP traffic such as e mail file tran...

Page 45: ...the usage mode and click Apply For details see Setting the terminal usage mode for the EXPLORER 727 on page 92 Important The dual functionality of the EXPLORER 727 allows users to operate in two modes...

Page 46: ...ion on network user groups see To manage LAN network users on page 93 Unintended use of bandwidth The system default setting is automatic activation of a standard data connection With this setup you c...

Page 47: ...Standard IP on the LAN interface By default Standard IP is always activated on the terminal If you only want Standard data to be activated when you need it you can disable automatic activation under...

Page 48: ...176 and 256 kbps Stream ing and BGAN X Stream from a minimum of 384 kbps up to approximately 450 kbps Note The Streaming link is only available if your network user group includes a Streaming profile...

Page 49: ...al is shown in the Dashboard under ONGOING DATA SESSIONS in parenthesis This is the IP address you must use afterwards to access the terminal To activate a data connection with an SMS To be able to ac...

Page 50: ...1 30 180 12 and the incoming port number defined in the Remote management page in the web interface is 8080 enter http 161 30 180 12 8080 You should now be connected to the built in web interface of t...

Page 51: ...hernet on page 71 After you have enabled PPPoE in the terminal you must configure your equipment How to do this depends on the type of equipment Refer to the user documentation of the equipment As a m...

Page 52: ...rvals or after moving a specified distance To use the tracking feature you must either set up a tracking server or get a tracking solution from your service provider The EXPLORER system must be set up...

Page 53: ...set has a dedicated menu for the EXPLORER 727 System You find a list of the menu items available in The IP Handset on page 25 For information on how to start up the IP Handset see To connect the IP ha...

Page 54: ...gnostic report Event logging and self test Site map Introduction The web interface What is the web interface The web interface is built into the terminal and is used to operate set up and configure th...

Page 55: ...ons Connections LAN Settings 2 Clear the box labeled Use a proxy server for your LAN 3 Click OK When the proxy server settings are disabled close and restart your browser You may need to change this s...

Page 56: ...the language When you have access to the web interface if you want to display a different language than English select SETTINGS LANGUAGE from the left menu select a language from the list and click Ap...

Page 57: ...menu to open a submenu in the navigation pane or a new page in the contents section The signal strength of the satellite signal is shown graphically The icon bar shows icons for new SMS messages and f...

Page 58: ...ntents section To see the site map click SITE MAP in the navigation pane The site map lists all topics and submenus Click on items in the site map to go directly to the relevant location Icon Explanat...

Page 59: ...PIN see To enter the SIM PIN using the web interface on page 20 When the correct PIN has been entered the web interface opens the Dashboard and is ready for use Note You may not have to enter a SIM PI...

Page 60: ...t to the Internet on page 39 Properties The PROPERTIES section of the DASHBOARD shows the following information Airtime provider The name of your Airtime Provider Position The position of your EXPLORE...

Page 61: ...en able to register with the BGAN network Satellite selection The satellite selected for logon For further information see To select the preferred BGAN satellite on page 107 Current satellite The sate...

Page 62: ...xternal IP address that is assigned to each profile SESSIONS TOTAL lists the totals for each connection The list shows the time connected hh mm ss for voice and Streaming IP and MB transferred for Sta...

Page 63: ...numbers for easy dialing from a handset Modify or delete existing names and phone numbers or add new names and phone numbers To access the phone book To access the phone book select PHONE BOOK from th...

Page 64: ...one book from an analog phone take the phone off hook and dial 003 To edit phone book entries To add a new entry To add a new entry do as follows 1 In the phone book locate the empty entry number wher...

Page 65: ...ile numbers To view the mobile numbers of the terminal select PHONE BOOK Mobile numbers from the left navigation pane To enter or edit the mobile numbers To enter or edit the mobile numbers click Edit...

Page 66: ...s The listed information includes time connected using Standard Voice and time connected using 3 1 kHz Audio Note If power to the system is interrupted the information on the currently ongoing calls c...

Page 67: ...one number duration and type Standard or 3 1 kHz Audio of each incoming call Missed calls shows the start time calling phone number and type Standard or 3 1 kHz Audio of each incoming call that was no...

Page 68: ...1 for USA 5 Select whether or not you want Delivery notification for this SMS message If you click Yes the Status column in the Sent folder will show the status of your message when it has been sent...

Page 69: ...ptions Click Resend next to a message you want to send again When the Write message page opens click Send The terminal now attempts to send the message again To make sure the message has been sent loo...

Page 70: ...h message Click Archive to move it to your Inbox containing read messages Click Reply to reply to a message Then type in your reply and click Send For information on how to include the original messag...

Page 71: ...essage options You can set up general options for your outgoing messages These settings apply by default to all your outgoing messages Note however that you can change the Delivery notification settin...

Page 72: ...hange the number and click Save Then click Apply to apply all changes in the page The SMS service centre number is provided from your Airtime Provider To view the Voice mail number You get an SMS noti...

Page 73: ...hows properties of the connected antenna and contains a field for enabling or disabling the L Band interface on the terminal To access the SETTINGS page select SETTINGS from the left navigation pane L...

Page 74: ...used to dynamically assign IP addresses to devices connected to the terminal The drawing below shows examples of the IP addressing in Router mode default setup and Bridge mode This following section...

Page 75: ...n the connected device 3 If you want to change the Local IP address and the Netmask of the terminal type in the new address and netmask The Local IP address is the IP address of the terminal It is use...

Page 76: ...static IP address refer to step 6 on page 97 in the section To edit a network user group For information on how to set the terminal in Router mode see step 5 on page 97 in the section To edit a networ...

Page 77: ...port forwarding to additional servers 7 In the Active column select which ports should have port forwarding activated 8 Click Apply You can now access the mail server from the Internet using the publi...

Page 78: ...r Ethernet on page 44 and to the documentation for your connected equipment On the EXPLORER 727 Terminal you must enable PPPoE before you can establish a PPPoE connection Refer to the next section To...

Page 79: ...way by using Static routing To set up a new device for static routing do as follows 1 Select SETTINGS LAN Static route 2 Click Add 3 Enter the values for your device Destination The IP address you wan...

Page 80: ...he Phone Fax interface will only react on calls made to the Standard phone number For Outgoing calls you can select either Standard or 3 1 kHz Audio The selected type will be used by default if possib...

Page 81: ...only if the connected device supports the call type used Note For information on how to set up call services supplementary services see To set up call services on page 78 These settings apply to both...

Page 82: ...call 4 Set the call type for outgoing calls If you select Automatic the call type will be determined by the calling device If you select Standard all outgoing calls except UDI RDI will use the call ty...

Page 83: ...They may also be defined on the SIM card How to use the common APN When you configure the APN for your individual network user group select Common to use the setting from this page If you are using th...

Page 84: ...uirements Network assigned The APN is assigned from the network User defined Type in the APN APNs are provided from the Airtime Provider 3 At Buffering on Streaming profiles select Enabled or Disabled...

Page 85: ...wing supplementary services Call forwarding Call barring Call waiting Line identification Closed user group Note that depending on the network some of these call service settings may prevent others fr...

Page 86: ...ward from the left navigation pane 2 Click OK next to Read current settings to display the phone numbers for call forwarding for the subscription These numbers are operator controlled and come with yo...

Page 87: ...GS Common Call barring from the left navigation pane 2 Click OK next to Read current settings to make sure the page is updated 3 For each call type select which calls should be barred 4 In the Barring...

Page 88: ...tion pane 2 Click OK next to Read current settings to make sure the page is updated 3 For each call type select Call waiting enabled if you want to get notification of waiting calls while you are maki...

Page 89: ...under Group no Your airtime subscription lists your user group number s 3 Select which group should be active If you select Subscribed the group s included in your subscription will be active 4 To al...

Page 90: ...signed a local number and password you can clear the setting Settings Start up options Auto BGAN SIP in the IP Handset menu To connect and configure IP handsets If you want to view or change the setti...

Page 91: ...Configure link appears next to the handset in the list 7 Select Configure next to an IP Handset to access the built in web interface of the IP Handset The web interface of the IP Handset opens It is v...

Page 92: ...IP handsets Call settings 2 For each handset select the call types you want to enable for incoming and outgoing calls The call types are described in more detail in To select the call type on page 29...

Page 93: ...lect MENU Status Software version in the IP Handset To change the IP Handset compatibility do as follows 1 Select Settings IP handsets Server settings 2 Select the IP Handset compatibility as follows...

Page 94: ...error condition s You can configure pin 2 to be Normally closed or Normally open Normally Closed default The internal switch at pin 2 is normally closed pin 2 is connected to ground When an alarm occu...

Page 95: ...n function uses pin 5 together with pin 8 DC in Connect the appropriate pin to the ignition switch as follows Active high default Connect pin 5 permanently to Ground Connect pin 8 to positive DC volta...

Page 96: ...age 87 4 If you use the Ignition function and you want the terminal to stay on for a few minutes after the Ignition is switched off enter the number of minutes under DELAYED SHUTDOWN For further infor...

Page 97: ...king do as follows 1 Select SETTINGS Tracking continued on next page 2 Type in the Server IP address Server port Client port and Encryption key for your server connection IP address The IP address of...

Page 98: ...n the APN APNs are provided from the Airtime Provider 5 Under Position reports select the report type you want to use Compressed Only latitude and longitude are reported Extended Apart from latitude a...

Page 99: ...ollows 1 Select SETTINGS Terminal usage mode 2 Select the usage mode Standard on the move Normal EXPLORER 727 function X Stream on the pause Extended function for use when the vehicle is stationary In...

Page 100: ...xed IP address on the connected device or changing the startup mode of a connection you must set up network groups with specific primary and or secondary profiles How to do this is described in the fo...

Page 101: ...on table determines which devices should belong to which network user group When a network device is connected the terminal runs through the network classification table to check if the new connection...

Page 102: ...ault network user group cannot be disabled and does not allow you to select a Bridge mode connection To edit a network user group For further explanation of the terms used below see Definitions for ne...

Page 103: ...Chapter 4 To use the web interface 98 126882 F To manage LAN network users 96...

Page 104: ...s Leave the setting in step 6 at Dynamic do not select Static IP Select SIM default in step 9 Type in the APN user name and password from your provider in step 10 Your terminal will then use the stati...

Page 105: ...119 13 Select the Secondary profile To select more than one secondary profile press and hold Ctrl or Shift while you select additional profiles The Context Identifiers CIDs for the selected primary a...

Page 106: ...evice with dynamic IP address is connected to the terminal it is automatically listed in the Network devices list To view the list of network devices To view the list of network devices select SETTING...

Page 107: ...which network user groups Each entry in the table shows MAC address IP address LAN port and network user group When a network device is connected the terminal runs through the network classification...

Page 108: ...to associate with the device Network user groups are created and defined in the Network user group page See To set up the network user groups on page 95 5 Click Apply To remove an entry in the network...

Page 109: ...evaluated in the order they are listed The first entry and only the first entry that matches the properties of the connected device is applied meaning that the connection will be using the settings of...

Page 110: ...Header Compression disabled Recommended in noisy environments If Header Compression is disabled the system will be less sensitive to noise Profiles A profile is a collection of Quality of Service QoS...

Page 111: ...e is admin and the default password is 1234 2 Click on the session you want to start or stop Under ONGOING DATA SESSIONS at the top you can see which data sessions are currently active To upload softw...

Page 112: ...required select SETTINGS Upload from the left navigation pane If a PIN is required and the PIN has not been entered select ADMINISTRATION enter the Administration PIN and password and click Logon The...

Page 113: ...w software version When the new software version is found the web interface shows the new software version and a link where you can download the software 4 Click the link to download the new software...

Page 114: ...GS Satellite selection from the left navigation pane 2 Select the satellite you prefer to use If you select Auto the default setting the EXPLORER 727 System automatically uses the most appropriate sat...

Page 115: ...select the language The default language of the web interface is English You can change the language to French German Russian Spanish Mandarin Chinese or Japanese To change the language do as follows...

Page 116: ...n user name and password The default user name is admin and the default password is 1234 If you have forgotten the administrator password you can click the link at the bottom of the page to reset the...

Page 117: ...mber of the terminal You can find the serial number and IMEI number in the Dashboard 2 Click the link Forgot administrator password at the bottom of the ADMINISTRATOR LOGON page see the previous secti...

Page 118: ...strator password do as follows 1 After you have entered the administrator user name and password in the ADMINISTRATION page locate the section Change administrator logon 2 Type in the existing user na...

Page 119: ...k OK The configuration is now saved to a file This file is used to load the configuration into another terminal See the next section To load a configuration from a file To load a configuration from a...

Page 120: ...rency drop down list 3 Enter the tariff for each of the services 4 Click Apply The entered tariffs are used to estimate the charges for calls and data sessions The estimated charge is listed for each...

Page 121: ...reset the counters for the time connected do as follows 1 From the left navigation pane in the ADMINISTRATION page select Log Handling 2 To clear the Call log click OK next to Clear call log 3 To clea...

Page 122: ...automatically after a fixed amount of data or period of time For Standard data type in the number of mega bytes MB allowed For streaming classes select a period of time from the drop down list 6 Clic...

Page 123: ...TS 23 107 Quality of Service QoS concept and architecture The profiles are used in the network user groups To select the profiles for a network user group When you set up a network user group you sel...

Page 124: ...Chapter 4 To use the web interface 98 126882 F Administration 117 2 Click Edit next to one of the user defined profiles...

Page 125: ...teed download bit rate needed for this profile 6 In the Delivery order field select from the scroll list whether or not data should be delivered in the same order it was sent Yes means the data packet...

Page 126: ...different priorities to different types of traffic in order to optimize performance Example When you are browsing the Internet a Standard IP connection is normally sufficient However to have a video c...

Page 127: ...packets 0 is first then 1 2 etc 4 Select the Profile from the drop down list The available profiles are the profiles listed under ADMINISTRATION Profiles 5 Fill in one or more of the following fields...

Page 128: ...e page Example of a list of traffic flow filters Below is an example of a list of traffic flow filters In this example data packets are filtered in the following order 1 The filter with evaluation pre...

Page 129: ...e use of a PIN to access the terminal do as follows 1 Select ADMINISTRATION SIM PIN 2 Under REQUIRE PIN select Enabled or Disabled If you select Disabled you can access and use the terminal without a...

Page 130: ...hange the SIM PIN To change the PIN used to access the terminal do as follows 1 Select ADMINISTRATION SIM PIN 2 Under CHANGE PIN type in the Old PIN 3 Type in the New PIN and retype it on the next lin...

Page 131: ...ended changes Study this screen thoroughly and decide to which areas of the system you want to give non administrator users access To set up the user permissions do as follows 1 From the left navigati...

Page 132: ...ed to control modems in this case the EXPLORER 727 Terminal They are typically used during service and maintenance or when troubleshooting the terminal 4 Click Apply The settings to which access is de...

Page 133: ...de easy access to the terminal After preparing the terminal and activating the connection you can access the terminal from one of the trusted IP addresses using the incoming port defined in the Incomi...

Page 134: ...rmation by SMS should be Enabled or Disabled 4 Enter the password It can be up to 32 characters long The characters 0 9 a z and A Z are allowed The password is mandatory and must match the password in...

Page 135: ...er of Retries before the terminal reboots 5 Type in the Primary and optionally the Secondary IP address This is the IP address of the server s to which the terminal will send ping commands 6 Click App...

Page 136: ...for restricted dialing do as follows 1 From the left navigation pane select ADMINISTRATION Restricted dialing 2 Select whether restricted dialing should be Enabled or Disabled 3 Type in the allowed nu...

Page 137: ...the GPS positioning system by default but you can select between GPS Beidou GPS and Beidou and GPS and GLONASS 1 From the left navigation pane select ADMINISTRATION Positioning system 2 From the drop...

Page 138: ...er and click Apply If you need help with terminal or antenna related issues call your local distributor To generate a diagnostic report The diagnostic report contains relevant information for troubles...

Page 139: ...p of the web interface or select HELPDESK Event list from the left navigation pane The Event list page shows a detailed list of active events including the time of the first occurrence ID and severity...

Page 140: ...page shows the following information The antenna Product ID TT number Refer to the section System units on page 136 The status of the connection to the air interface IAI 2 This field should normally s...

Page 141: ...to contact your Airtime Provider or your local distributor Airtime support If you need assistance from your Airtime Provider please call the help desk To see the help desk number enter the web interfa...

Page 142: ...in the terminal do as follows 1 Connect a computer 2 Enter the web interface and see the Software version field in the Dashboard To upload software using the web interface You can upload software usi...

Page 143: ...Part numbers System units TT 3722A EXPLORER 727 system TT 3670A IP Handset Cradle wired Item Part number EXPLORER 727 antenna 403053B EXPLORER terminal or EXPLORER 19 Rack Terminal 403736A or 403736A...

Page 144: ...lation manual for details The antenna cable is not properly connected Check that both ends of the cable are connected properly according to the guidelines in the Installation manual Also check that no...

Page 145: ...use a proxy server For Microsoft Internet Explorer select Tools Internet Options Connections LAN Settings and select Use a proxy server for your LAN You have entered a wrong IP address Check the IP a...

Page 146: ...interface Make sure the call type used for calls to the terminal is selected in the web interface Access the web interface and select SETTINGS ISDN Then select the call type for incoming calls No phon...

Page 147: ...is 32 W if you are using a 12 V supply and 64 W if you are using a 24 V supply If possible disconnect other connected devices Incoming phone calls The call type used for the call is not selected in t...

Page 148: ...messages Event log Indicators event messages and logs are described in the following sections Light indicators Overview The terminal has a number of LEDs placed in the panel at the top of the termina...

Page 149: ...equired Red Critical error Check the event log If the problem is in the EXPLORER system and you cannot solve it contact your distributor and return the unit for repair Behavior Meaning Steady green Tr...

Page 150: ...ior Meaning Flashing green The LAN port is active Behavior Meaning Green Link speed is 100 Mbps Yellow Link speed is 10 Mbps Off The link is down Behavior Meaning Green The terminal is supplying power...

Page 151: ...n on the event log see To view the Event list or the Event log on page 132 List of events The following list explains most of the events that may show in the web interface of the terminal Note that th...

Page 152: ...heck the cable between terminal and antenna Reboot the terminal 01010 to 01019 Temperature too low critical Low ambient temperature is causing the performance of the terminal to be degraded or halted...

Page 153: ...r view to the satellite 01500 to 01509 SIM card missing No SIM card is detected in the SIM slot Insert SIM card If the SIM card is already inserted remove and reinsert it 01600 to 01609 SOS calls only...

Page 154: ...2 Put phone on hook 3 Check the wires 03600 to 03609 2 wire operational failure The Phone Fax interface fails to operate Possible reasons 1 Ground shorted 2 Power overload 3 Temperature overload 1 Che...

Page 155: ...0801B Lost connection to the GPS receiver Communication with the GNSS receiver in the antenna is lost Restart the terminal Contact your distributor if the warning persists 0801D Uploading firmware to...

Page 156: ...ed to start normally with the new firmware Reboot the terminal Contact your distributor if the problem persists 08035 Unable to open port for HPA burst monitoring There was an error communicating with...

Page 157: ...tended for use with your terminal 0804C The selected satellite is not visible at current GPS position The terminal is set up to use a satellite that is not visible at the current position Enter the we...

Page 158: ...me usage mode as before rebooting Using the IP Handset or the web interface reconfigure the usage mode of the terminal It will automatically restart in the selected usage mode For further information...

Page 159: ...web interface and select HELPDESK Then click Generate report Event log The event log holds information of events registered in the terminal or antenna The same events when active are also indicated i...

Page 160: ...tmask are temporarily set to the default value default IP address 192 168 0 1 With this function even if the IP address has been changed and you do not remember the new IP address you can still access...

Page 161: ...he terminal and connected equipment will not be able to communicate The following local IP subnets are reserved for internal use in the terminal The netmask for all of these subnets is 255 255 255 0 1...

Page 162: ...specify a specific APN different from the one on the SIM card Syntax AT CGDCONT cid protocol APN cid is the Context Identifier 1 11 Protocol is the transport protocol IP or PPP APN is the Access Poin...

Page 163: ...1 256 5121 Max bitrate DL is the maximum bit rate down link 32 64 128 1761 256 5121 Guaranteed bitrate UL is the guaranteed bit rate up link 32 64 128 1761 256 5121 Guaranteed bitrate DL is the guaran...

Page 164: ...ontext at which the Secondary is related to Example AT CGDSCONT 1 11 Application example This example shows the commands needed in order to establish a Primary Standard Data Context with a Secondary S...

Page 165: ...his device may not cause harmful interference and 2 this device must accept any interference received including interference that may cause undesired operation Part 15 21 Changes or modifications not...

Page 166: ......

Page 167: ...wo conditions 1 This device may not cause harmful interference and 2 this device must accept any interference received including interference that may cause undesired operation Part 15 21 Changes or m...

Page 168: ......

Page 169: ...witched Circuit switched networks require dedicated point to point connections during calls D DHCP Dynamic Host Configuration Protocol A protocol for assigning dynamic IP addresses to devices on a net...

Page 170: ...f MPDS with new bearer types which give a wide range of data rates from 16 kbps up to 492 kbps By utilizing different modulation schemes variable coding rate and power adjustment it is possible to cha...

Page 171: ...traffic A NAT module makes all necessary address translations P PDP Packet Data Protocol A network protocol used by external packet data networks that communicate with a GPRS network PIN Personal Iden...

Page 172: ...hone network cellular network etc SDU Service Data Unit Also known as a data packet SIM Subscriber Identity Module The SIM provides secure storing of the key identifying a mobile phone service subscri...

Page 173: ...ely track UT1 which is mean solar time at the Royal Observatory Greenwich V VPN Virtual Private Network A network that is constructed by using public wires to connect nodes You can create networks usi...

Page 174: ...r web interface 47 C call barring 80 closed user group 82 forwarding 79 holding 34 line identification 81 local 32 making or receiving 31 missed received outgoing 60 to the terminal 32 transferring 35...

Page 175: ...esk number 131 changing in web interface 131 holding a call 34 I ignition function 15 IMEI number 53 importing configuration 112 Inbox for SMS messages replying forwarding or deleting 63 indicator fun...

Page 176: ...s definitions 103 O on the move mode 92 on the pause mode 92 Outbox for SMS messages resending or deleting messages 62 P permissions setting for users 124 phone local call 32 making calls 31 phone boo...

Page 177: ...nding 62 SMS service number 65 software uploading with web interface 104 viewing version 53 Standard on the move 38 Standard IP 37 activating 39 40 definition 37 status air interface 133 connection 13...

Page 178: ...ewing 65 voice quality 29 setting for IP handsets 85 setting for ISDN 74 setting for Phone Fax interface 73 W waiting calls 34 81 web interface accessing 47 browser settings 47 definition 47 navigatio...

Page 179: ...98 126882 F www cobham com satcom...

Reviews: