49
N AV I G AT I O N T O O L S
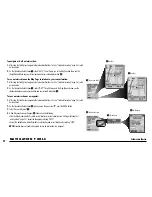
Points of Interest
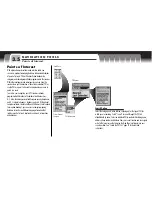
To navigate or GoTo a select POI:
1.
After using the Search or Sort Options to organize the Points of Interest List (see “Search the POI List,” page 47
or “Sort the POI List,” page 48), select a POI.
2.
On the POI Details Screen
1
, select “GOTO.” This will jump you to the Map Page and show you the straight-line
path between your current position and your selected POI
2
.
To see a select POI on the Map Page in relation to your current location:
1.
After using the Search or Sort Options to organize the Points of Interest List (see “Search the POI List,” page 47
or “Sort the POI List,” page 48), select a POI.
2.
On the POI Details Screen, select “MAP”
1
. This will jump you to the Map Page and show you the relationship
between your current position and your selected POI
3
.
To save the POI as a waypoint:
1.
After using the Search or Sort Options to organize the Points of Interest List (see “Search the POI List,” page 47
or “Sort the POI List,” page 48), select a POI.
2.
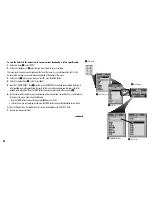
On the POI Details Screen
4
when you see the menu icon
, press the MENU button.
3.
Select “Save as Waypoint”
5
.
4.
A New Waypoint Screen will appear. Choose from the following
6
:
• Edit the default name, default symbol, current location or current elevation (see “Editing or Entering Text and
Symbols,” page 25.) Accept the changes by selecting “SAVE.”
• Accept the default name, default symbol, current location and current elevation by selecting “SAVE.”
NOTE:
Elevation does not need to be entered to save a POI as a waypoint.
1
POI Details
3
Map Page
4
POI Details
6
New Waypoint
5
Menu Option
menu
enter
p
2
Map Page

