background image

Replacing microphone protectors

Microphone protectors are designed to protect the microphones from 
dirt and moisture. A dirty or blocked microphone protector results in 
the gradual deterioration of sound quality. Replace the microphone 
protectors if you notice degradation in the sound quality, or if the 
protectors look dirty. Replace both protectors at the same time.

Removing microphone protectors

The Cochlear

 Nucleus

®

 CP800 Series Microphone Protector Removal 

Tool allows you to remove the microphone protectors from the 
processing unit. 

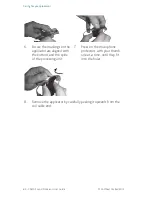
To remove the microphone protectors:

1. 

Remove the protective 
cap from the Microphone 
Protector Removal Tool.

2. 

Position the tip of the 
removal tool under 
the square tabs on the 
microphone protector. 
Do not insert the removal 
tool directly into the hole 
as it could damage the 
microphone.

3. 

Gently lift the microphone 
protector out.


WARNING


•  The Microphone Protector Removal Tool is a sharp object.


•   The Microphone Protector Removal Tool is not recommended 

for use by children under the age of 12 years.

82 - CP810 Sound Processor User Guide 

© Cochlear Limited 2015

Caring for your processor

Summary of Contents for Nucleus CP810

Page 1: ...Nucleus CP810 Sound Processor User Guide...

Page 2: ...e CAUTION no harm Special care to be taken to ensure safety and effectiveness Could cause damage to equipment WARNING harmful Potential safety hazards and serious adverse reactions Could cause harm to...

Page 3: ...rs 17 Wearing your processor 19 Placing your processor on your ear 19 Attaching the coil and coil cable 20 Attaching the coil cable to the coil 20 Attaching the coil to the processing unit 20 A secure...

Page 4: ...ry module from the processing unit 51 Attaching the battery module to the processing unit 52 Using your processor 53 Turning your processor on and off 53 Changing programs 53 Using the telecoil 54 Usi...

Page 5: ...mperatures 77 Protecting your processor from dust and water damage 78 Drying your processor 79 Cleaning your processor parts 80 Cleaning the battery charger 81 Replacing microphone protectors 82 Remov...

Page 6: ...Environmental Protection 95 Equipment classification 95 IP rating of processor 95 FCC Federal Communications Commission and Canadian IC compliance 96 Labelling symbols 97 Legal statement 98...

Page 7: ...entify and troubleshoot basic processor problems The CochlearNucleus CP810 Sound Processor The Cochlear Nucleus CP810 Sound Processor is used together with a Cochlear implant to transfer sound to the...

Page 8: ...8 CP810 Sound Processor User Guide Cochlear Limited 2015...

Page 9: ...rts sound signals for transfer to your implant Figure 2 Processing unit with earhook 1 Coil 2 Coil magnet 3 Coil cable 4 Lower button 5 Microphones 6 Upper button 7 Indicator light 8 Earhook 9 Process...

Page 10: ...e lower button Turn telecoil audio accessory on and off Press the upper button Press and hold the upper button Lock unlock processor buttons Briefly press both the upper and lower buttons at the same...

Page 11: ...gram The number of available programs may vary Steady orange while the lower button is pressed You are turning off your processor Short flash of green You are changing volume or sensitivity if availab...

Page 12: ...ld mean There is a fault with your processor There is a corrupt program in your processor Flash of orange when you press a button Your processor buttons are locked Continuous flashes of orange with a...

Page 13: ...evel You hear a single long high tone You are changing from using The microphones to using the telecoil The telecoil to using the microphones The microphones to using an audio accessory An audio acces...

Page 14: ...ess of sounds Telecoil microphones and accessory microphones mixing ratios that you can change using the remote assistant For more information refer to the Remote Assistant User Guide Your processor h...

Page 15: ...which uses two disposable batteries P675 zinc air batteries or a Rechargeable Battery Module to power your processor 1 Figure 3 Standard Battery Module 1 and Compact Rechargeable Battery Module 2 The...
Page 16: ...upplies a battery charger to recharge the rechargeable battery module For more information see Replacing and recharging batteries Coil and coil cable The coil is a small round disk that you place over...

Page 17: ...ch is processed by the processing unit for transfer to the implant Microphone protectors are designed to protect the microphones from dirt and moisture It is important that you keep the microphone pro...

Page 18: ...18 CP810 Sound Processor User Guide Cochlear Limited 2015...

Page 19: ...acing your processor on your ear To be able to hear sound from the processor it needs to be placed on the ear To place your processor on your ear 1 Place the processing unit over your ear while holdin...
Page 20: ...the coil cable plug in the other hand as shown 2 Align the coil end of the coil cable plug with the coil 3 Push the coil cable plug firmly into the coil until it clicks into place Attaching the coil...

Page 21: ...g unit when your processor is turned on your processor may turn off If this occurs turn your processor back on A secure and comfortable fit For a more secure and comfortable fit you may want to Change...
Page 22: ...the lower end of the earhook towards the processing unit until the earhook is removed 3 Hold the new earhook in one hand and your processor in the other hand as shown 4 Attach the earhook to the proc...

Page 23: ...pull feels the strongest You can change how firmly the magnet sits on your head by adjusting its depth in the coil If adjusting the depth of the magnet is not sufficient you can replace the magnet wit...

Page 24: ...anti clockwise direction until you remove it from the topside of the coil 3 Hold the new magnet between the thumb and index finger as shown 4 Hold the coil in the other hand 5 Insert the magnet gentl...

Page 25: ...find that the coil cable is too long or short for your comfort you can change the coil cable Regularly check to see if the coil cable is damaged If damaged you will need a new coil cable To change the...

Page 26: ...may help detach the coil from the coil cable 2 Firmly pull the coil and coil cable away from each other Do not rotate the coil cable plug CAUTION Removing the coil cable from the coil is not recommend...

Page 27: ...tery module is attached to the processing unit 2 Insert the processor through the Mic Lock band with the tubing facing downwards and towards the earhook end of the processing unit Move the band up unt...
Page 28: ...earlobe through the loop made by the processor and Mic Lock until it is in position on your ear Alternatively with the Mic Lock band in position on your processor place the processor on your ear Brin...

Page 29: ...hoice of different sizes to fit differently sized ears It is easily adjustable comfortable and robust enough to withstand an active lifestyle You can use the Snugfit with the Cochlear Nucleus CP800 Se...

Page 30: ...the processing unit into the Snugfit until it fits into place When fully inserted there should be no space between the processing unit and the Snugfit 4 Attach the coil cable to the processing unit Y...

Page 31: ...in the other hand as shown 2 Remove the coil cable by gently pulling the coil cable upwards 3 Hold the Snugfit and the processing unit as shown 4 Remove the Snugfit by pulling the processing unit awa...

Page 32: ...en and adults wear the processor It allows the battery module to be attached to the body The processing unit is worn behind the ear and is connected to the battery module by the Cochlear Nucleus CP800...

Page 33: ...touch The upper shoe should face to the left and the processing unit to the right of the final position 3 Gently twist the processing unit and the upper shoe until the two parts fit 4 Hold the batter...

Page 34: ...5 Gently twist the battery module and the lower shoe until the two parts fit 34 CP810 Sound Processor User Guide Cochlear Limited 2015 Wearing your processor...

Page 35: ...3 Gently twist the upper shoe of the LiteWear Cable to the left and the processing unit to the right until the two parts separate 4 Hold the battery module in one hand and the LiteWear Cable in the o...

Page 36: ...dren detaching the battery module or processing unit from the LiteWear Cable To lock the processing unit to the LiteWear Cable 1 Attach the LiteWear Cable to the processing unit 2 Lift the accessory s...

Page 37: ...teWear Cable to the battery module 2 Using a pair of tweezers or a screwdriver push the latch on the lower shoe of the LiteWear Cable to the left To unlock push the latch to the right Cochlear Limited...

Page 38: ...from the case WARNING Long cables may present a risk of strangulation in children Attaching the LiteWear Case to the body with a LiteWear Fixing Aid reduces the risk of strangulation by limiting movem...

Page 39: ...e LiteWear Fixing Aid 2 Hold the LiteWear Case in one hand and the lower end of the cable shoe in the other hand 3 Insert the battery module into the LiteWear Case by gently pushing on the lower end o...

Page 40: ...the LiteWear Case with both hands 2 Slightly pull the top of the LiteWear Case away from the lower end of the cable shoe 3 Remove the battery module by pushing it from the bottom 40 CP810 Sound Proces...

Page 41: ...available Cochlear Nucleus CP800 Series LiteWear Fixing Aid Alligator Clip Cochlear Nucleus CP800 Series LiteWear Fixing Aid Hook Loop Cochlear Nucleus CP800 Series LiteWear Fixing Aid Safety Pin 1 2...

Page 42: ...e LiteWear Fixing Aid in the other hand 3 Align the hooks on the side of the LiteWear Case with the hooks on the LiteWear Fixing Aid so they touch The LiteWear Fixing Aid should be positioned at a sli...

Page 43: ...ear Case 1 Remove the battery module from the LiteWear Case 2 Rotate the LiteWear Fixing Aid in an anti clockwise direction until you detach it from the LiteWear Case Cochlear Limited 2015 CP810 Sound...

Page 44: ...ry module to the processing unit reduces the risk of children detaching and swallowing the battery module To lock the battery module to the processing unit 1 Lift the accessory socket cover of the pro...

Page 45: ...ent choking risks if swallowed by children To lock the tamper resistant battery cover 1 Insert the battery holder into the battery cover as shown 2 Using a screwdriver gently rotate the lock in a cloc...

Page 46: ...amper resistant earhook to the processing unit Ensure that the hole on the earhook is aligned with the hole on the earhook end tip of the processing unit 2 Insert the earhook fitting pin into the hole...

Page 47: ...the earhook fitting pin Do not use too much force when pushing the earhook fitting pin out as it could damage the earhook fitting tool 4 Remove the tamper resistant earhook by pushing the lower end of...

Page 48: ...contact your clinician To place the label on your processor 1 Remove the earhook from the processing unit by pushing the lower end of the earhook towards the processing unit 2 Place the label on the e...

Page 49: ...l spacer can improve coil performance Your clinician will let you know if you need to use a coil spacer To place the coil spacer on the coil 1 Hold the coil between the thumb and index finger with the...

Page 50: ...from the coil 1 Hold the coil between the thumb and index finger with the coil spacer side facing up 2 Lift the coil spacer out with your fingers 50 CP810 Sound Processor User Guide Cochlear Limited 2...

Page 51: ...the processing unit Charging the rechargeable battery module Detaching the battery module from the processing unit To detach the battery module from the processing unit 1 Hold the battery module and...

Page 52: ...ght of the final position 2 Twist the battery module and the processing unit until the two parts fit into place 3 Make sure the battery module is correctly aligned Check for broken or bent contacts be...

Page 53: ...or you see a steady orange light Do not remove batteries or detach the battery module to turn off your processor Changing programs Programs help you hear better in different listening situations Up to...

Page 54: ...lifier TV or Hi Fi through an induction loop The telecoil is a feature that needs to be enabled by your clinician The telecoil is always turned off by default when you turn on your processor To turn o...

Page 55: ...Auto Telecoil icon on the remote assistant Home screen AUTO Everyday Noise Figure 13 Auto Telecoil icon displayed on the remote assistant Home screen CAUTION Certain electronic devices or machinery ma...

Page 56: ...hones If your clinician has enabled you to change the sensitivity you can Reduce the sensitivity of the sound to reduce background noise in noisy situations Increase the sensitivity of the sound to he...

Page 57: ...lock the buttons on your processor to prevent children from changing the controls or to avoid accidental button presses changing your processor settings Your clinician can have the processor buttons l...

Page 58: ...Remote Assistant User Guide Auto Processor Off Your processor automatically turns off when the coil is off e g coil is not placed on your head for more than two minutes The coil off indicator light f...

Page 59: ...ttery low or battery empty icon displays on the remote assistant screen You stop hearing sound The sound you hear becomes intermittent An empty battery may not be the only cause for not hearing sound...

Page 60: ...teries so that the coil magnet touches both batteries The coil magnet will lift both batteries out of the battery holder 2 Pull the batteries away from the coil To replace batteries 3 Remove the new s...

Page 61: ...eries into place When inserted correctly they should fit easily Positive terminal 1 and negative terminal 2 of zinc air batteries 6 Replace the battery cover by sliding it up from the bottom of the ba...

Page 62: ...charge the rechargeable battery module before using it A completely empty battery will take approximately four hours to recharge As the battery ages it may take longer to fully recharge it The battery...

Page 63: ...tion until it is vertically aligned 4 Connect the Global Power Adaptor to the battery charger 5 Plug the other end of the Global Power Adaptor into a mains power outlet Cochlear Limited 2015 CP810 Sou...

Page 64: ...n the battery charger There is no power When recharging the rechargeable battery module the battery charger mains power indicator light is green Battery life The battery life of your sound processor d...

Page 65: ...inside the battery module for extended periods If a battery has leaked fluid do not allow the fluid or liquid to come into contact with skin or eyes If contact is made wash with a lot of water and se...

Page 66: ...y charger supplied by Cochlear to recharge rechargeable battery modules When rechargeable battery modules no longer last for a reasonable period of time dispose of them carefully in accordance with lo...

Page 67: ...ccessory socket and place the other end near the sound source 1 2 Figure 15 Sound source end 1 and processor end 2 of the Lapel Microphone Cochlear Nucleus CP800 Series Monitor Earphones for use by an...

Page 68: ...es before connecting an accessory or FM system Cochlear Nucleus CP800 Series Personal Audio Cable for connecting a battery powered sound source e g portable CD player to your processor The Personal Au...

Page 69: ...to the battery powered sound source WARNING Do not use the Bilateral Personal Audio Cable to directly connect to a mains powered sound source 1 2 Figure 18 Sound source end 1 and processor end 2 of th...

Page 70: ...nce hearing performance and speech understanding in certain environments e g noisy environments at school etc For information on available FM cables contact your clinician You can also refer to the FM...

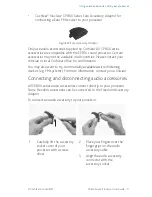
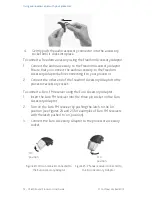
Page 71: ...isted listening devices e g FM systems For more information contact your clinician Connecting and disconnecting audio accessories All CP800 series audio accessories connect directly to your processor...

Page 72: ...onnect a Euro FM receiver using the Euro Accessory Adaptor 1 Insert the Euro FM receiver into the three pin socket on the Euro Accessory Adaptor 2 Turn on the Euro FM receiver by pushing the latch to...

Page 73: ...ins powered sound source e g TV 1 2 Figure 26 Mains powered sound source end 1 and Personal Bilateral Personal Audio Cable end 2 of the Mains Isolation Cable When you connect an audio accessory your p...

Page 74: ...hile connected to a PC for charging The Freedom Accessory Adaptor and the Euro Accessory Adaptor are small parts and can be a choking hazard if swallowed Cochlear does not recommend the use of these p...

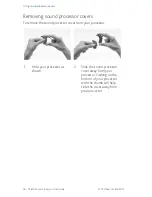
Page 75: ...rs and designs to suit different lifestyles Attaching sound processor covers To attach a sound processor cover to your processor 1 Hold your processor in one hand and the sound processor cover in the...

Page 76: ...or 1 Hold your processor as shown 2 Slide the sound processor cover away from your processor Pushing on the bottom of your processor with the thumb will help slide the cover away from your processor 7...

Page 77: ...in cold or hot temperatures Generally in cold temperatures your body heat is sufficient to keep your processor warm and working well In very cold weather wear a hat or headband over your processor Wh...

Page 78: ...m diameter Failure from splashing water When an audio accessory is attached your processor is not protected from dust and water damage To protect your processor from dust or water damage Ensure that m...

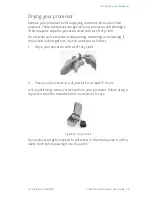
Page 79: ...es get wet dry the processor as follows 1 Wipe your processor with a soft dry cloth 2 Place your processor in a dry aid kit for at least 12 hours A dry aid kit helps remove moisture from your processo...

Page 80: ...heck the contacts between the processing unit and the battery module to ensure they are clean If the contacts are dirty you can gently tap or blow on them to remove any dirt If the battery module is d...

Page 81: ...m the battery charger sockets Gently blowing on the battery charger sockets may also help remove dirt 4 Wipe the battery charger sockets with a soft dry cloth If the battery charger gets splashed with...

Page 82: ...l Tool allows you to remove the microphone protectors from the processing unit To remove the microphone protectors 1 Remove the protective cap from the Microphone Protector Removal Tool 2 Position the...

Page 83: ...pplicator from its sleeve 2 Ensure the earhook and coil cable are attached to your processing unit 3 Insert the top end of the applicator side marked with an arrow through the earhook 4 Position the a...

Page 84: ...of the processing unit 7 Press on the microphone protectors with your thumb one at a time until they fit into the holes 8 Remove the applicator by carefully peeling it upwards from the coil cable end...

Page 85: ...n Using a dry aid kit to store your processor 1 Wipe the processor with a soft dry cloth before removing the battery cover 2 Remove the battery cover from the battery holder 3 Remove the disposable ba...

Page 86: ...r from the battery holder 3 Remove the batteries from the battery holder 4 Wipe the battery holder and battery cover inside and outside with a soft dry cloth to remove any water moisture or sweat 5 Re...

Page 87: ...1 Remove the batteries from the battery holder 2 Clean the battery contacts with a cotton bud 3 If the contacts are still dirty replace the battery holder with a new one Cochlear Limited 2015 CP810 S...

Page 88: ...ore placing it in a dry aid kit Using the Everyday Case You can use the Cochlear Nucleus CP800 Series Everyday Case for carrying your processor with you e g when travelling It is light and easy to car...

Page 89: ...If your processor earhook hooks onto any part of your body it may cause injury Wearing a tight fitting hat over the coil can cause skin damage beneath the coil Do not remove the battery module from th...

Page 90: ...ttached to their body Keep the drying chemical material away from young children Swallowing this material can cause serious internal injuries Do not place your processor in an oven e g microwave oven...

Page 91: ...gramming if needed Identify your processor as your own When the clinician opens your programming session they have access to this information This information can only be accessed in a programming ses...

Page 92: ...rocessor The following options are available for powering the processor Two disposable batteries Rechargeable battery module The coil acts as a transformer coupling that transfers energy and data info...

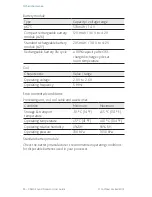
Page 93: ...ry module with batteries 7 5 g Compact rechargeable battery module 5 4 g Standard rechargeable battery module 10 7 g Coil without coil magnet 4 2 g Operating characteristics Processing unit Characteri...

Page 94: ...oltage 2 0 V to 2 6 V Operating frequency 5 MHz Environmental conditions Processing unit coil coil cable and accessories Condition Minimum Maximum Storage transport temperature 10 C 14 F 55 C 131 F Op...

Page 95: ...vant remote user guide for more information Environmental Protection Your sound processor contains electronic components subject to the Directive 2002 96 EC on waste electrical and electronic equipmen...

Page 96: ...le protection against harmful interference in a residential installation This equipment generates uses and can radiate radio frequency energy and if not installed and used in accordance with the instr...

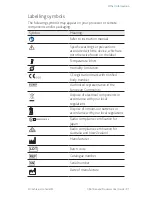
Page 97: ...on mark with notified body number Authorised representative in the European Community Dispose of electrical components in accordance with your local regulations Dispose of lithium ion batteries in acc...

Page 98: ...Legal statement The statements made in this guide are believed to be true and correct as of the date of publication However specifications are subject to change without notice Cochlear Limited 2015 98...

Page 99: ......

Page 100: ...00 Mechelen Belgium Tel 32 15 79 55 11 Fax 32 15 79 55 70 Cochlear France S A S 135 Route de Saint Simon 31100 Toulouse France Tel 33 5 34 63 85 85 International or 0805 200 016 National Fax 33 5 34 6...

Reviews: