5
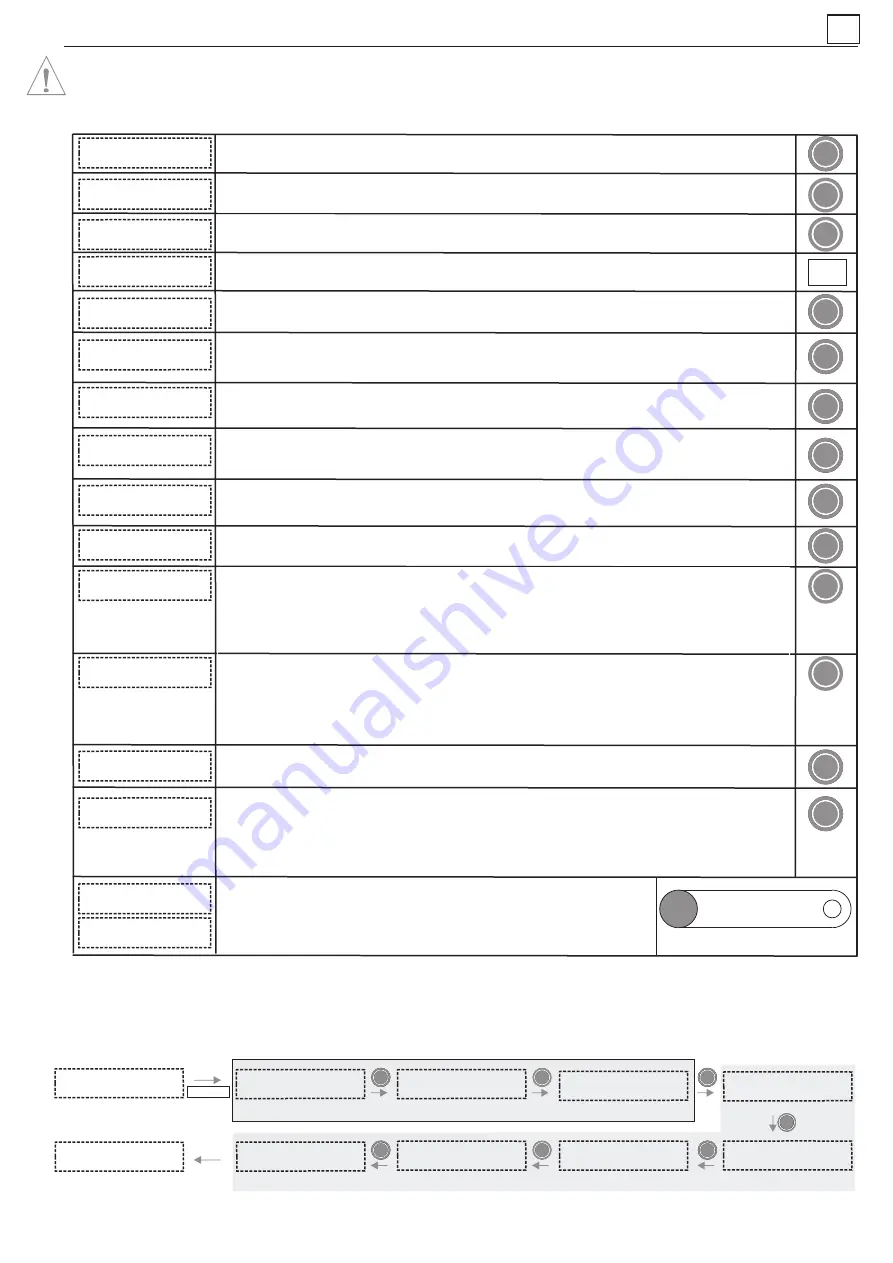
There are 2 view modes to choose::
-
Pressure
: it is visualized “P LINE” (real pressure of the installation) and “SET P” (working programmed
pressure).
-
Service
: it is visualized “Hz” (working frequency of the inverter), “LINE” (input pressure chosen), “SET P”
(real pressure of the installation) y “FL” (flow sensor state).
The default value is 0,3 bar. This value of pressure is the one that the system will subtract to the input
pressure, resulting the final pressure to which the system will set in motion when the hydraulic network
have a demand. Using keys
p
q
to modify the initial value. It is recommended to maintain this value
between 0,3 and 0,6 bar. Example:
The value should be greater as much as smaller be the accumulation and vice versa.
“TIMER STOP” default value is 5”. This will be the employed time by the system in stopping once ceased the
consumption in all the installation. Using keys
p
q
we can modify the initial value.
If the installation does not have level probe press ENTER to validate NOT. If the installation has a level probe,
by mean of keys
p
q
we can change NO by YES.
Follow instructions of the previous step. See intensity value in A over the characteristics plate.
By mean of keys
p
q
enter the nominal intensity value in A of pump 1 enabling the thermal protection. This
value is located over the characteristics plate of the motor. Press ENTER for validation.
Using the START/STOP pushbutton corresponding pump 1 verify its rotation sense. By mean of keys
p
q
(0/1)
we can change it. Press ENTER for validation.
This screen is not available if we have selected single-phase pumps.
Using
p
we can increase the lower limit of the speed of rotation of the pump´s motors.
Proceed identically for pump 2.
By mean of
p
q
we can change the values and press
ENTER
for validation. Whenever we want to quit the configuration sequence
press
MENU.
After every
ENTER
it will appear automatically the different screens that constitute the sequence of configuration.
This will be the system working pressure. Use keys
p
q
for modify the initial value (2 bar).
WARNING! input pressure must be al less 1 bar lower than the maximum pressure of the pumps. Set
pressure must be under 12 bar.
MENU
3"
ENTER
ENTER
ENTER
ENTER
ENTER
ENTER
ENTER
ENTER
ENTER
ENTER
ENTER
ENTER
3”
AUTOMATIC
Pushing simultaneously
MENU
+
p
during 3” we will get the register of functions and alarms, by mean of the pushbutton
ENTER
we are
able to advance inside the register, once we get the last register we can go back to the main menu pushing
ENTER
again. The
visualization sequence is as follows:
ALARM REGISTER
SHORTCIRC. 0
ALARM REGISTER
I MAX P1
0
ENTER
- Input pressure:
2 bar.
- Differential start:
0,3 bar.
- Final start pressure:
2 - 0,3 =
1,7 bar.
By mean of keys
p
q
we can choose the languages: “LANGUAGE ENGLISH”, “LANGUE
FRANÇAISE”, “LINGUA ITALIANA” e “IDIOMA ESPAÑOL”.
To start configuration sequence push MENU during 3”.
Being inside configuration menu we are having access to the phase of installation.
Being inside configuration menu we are having access to the phase of programming.
After pressing ENTER pushbutton, the system will remain configured showing the
type of view chosen in the previous section.
Press AUTOMATIC in order to quit manual mode.
ALARM REGISTER
TEMP.
0
ENTER
ENTER
ENTER
ENTER
FUNCTION REGISTER
CONNECTIONS
25
REGISTER OF FUNCTIONS AND ALARMS
ALARM REGISTER
I MAX. P2
0
ALARM REGISTER
NO WATER
ENTER
ENTER
FUNCTION REGISTER
HOURS 26 h
FUNCTION REGISTER
STARTS
32
Register of operational controls
Register of alarms
P LINE SET P
0,0 bar 0,0 bar
SET UP MENU
LANGUAGE ENGLISH
MAX. INT. PUMP 1
OFF
MAX. INT. PUMP 2
OFF
MIN. SPEED
15 Hz
ROTATION SENSE PUMP2
0
0 Hz
LEVEL PROBE
NO
PROGRAMMING MENU
SET PRESSURE
2,0 bar
DIF. START
0,3 bar
TIMER STOP
5 s
VIEW MODE
PRESSURE
ROTATION SENSE PUMP1
0
0 Hz
P LINE SET P
0,0 bar 0,0 bar
Hz LINE SET P FL
42 2,0 bar 2,0 1
P LINE SET P
0,0 bar 0,0
P LINE SET P
0,0 bar 0,0
MENU+
p
3
4
2
0
1
5
6
7
8
9
10
11
13
14
12
CONFIGURATION.
SPEEDMATIC ALT
EN


