background image

Italiano

4

Congratulations on having purchased a 

Coemar

 product. You have assured yourself of a fixture 

of the highest quality, both in componentry and in the technology used. We renew our invitation to 
you to complete the service information on the previous page, to expedite any request for service 
information or spares (in case of problems encountered either during, or subsequent to, instal-
lation). This information will assist in providing prompt and accurate advice from your 

Coemar


service centre. Following the instructions and procedures outlined in this manual will ensure the 

maximum efficiency of this product for years to come.

1. 

Packaging and transportation

1.1 

Packaging

Open the packaging and make sure that no part of the equipment has suffered any damage 
during the transportation. In case of damage to the fixture, contact your currier and your sup

-

plier immediately by telephone, fax or e-mail, and inform them you will formally notify them in 
writing through registered letter.

Packing list

Make sure the packaging contains:

1 ReLite Led Kit
1 Instruction manual 

2

. General information

2.1 

Important Safety information

Fire prevention:

1. 

Never locate the fixture on any flammable surface.

2. 

Minimum distance from flammable materials: 0,5 m.

3. 

Minimum distance from the closet illuminable surface: 0,5 m.

4. 

Replace any blown or damaged fuse only with those of identical values.   
Refer to the schematic diagram if there is any doubt.

5. 

Connect the projector, where the 

ReLite Led Kit

 is installed, to mains power 

protected by a thermal magnetic circuit breaker.

Prevention from electric shock:

1. 

Presence of high voltage inside of the fixture. Insulate the fixture from mains 

supply before opening or performing any function which involves touching 

the inside of the fixture, including lamp replacement.

2. 

For the connection to the mains, adhere strictly to the guidelines outlined in 
this manual.

1.2


Transportation

The 

ReLite Led Kit 

must be transported exclusively in its original packaging.

Summary of Contents for ReLite Led Kit 150

Page 1: ...ReLite Led Kit VariWhite ReLite Led Kit 150 version ...

Page 2: ...ou purchased your ReLite Led Kit this information will assist us in providing spare parts repairs or in answering any technical enquiries with the utmost speed and accuracy WARNING the security of the fixture is granted only if these instructions are strictly followed therefore it is absolutely necessary to keep this manual User Manual version 1 2 Edition January 2020 ReLite Led Kit VariWhite ...

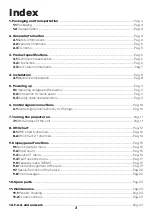
Page 3: ...y cable characteristics Pag 9 6 Control signal connections Pag 10 6 1 Control signal connection by XLR5 plugs Pag 10 7 Turning the projector on Pag 11 7 1 DMX address of the unit Pag 11 8 DMX chart Pag 12 8 1 DMX Chart 6 channels Pag 12 8 2 DMX Chart 2 1 channels Pag 14 9 Display panel functions Pag 15 9 1 Quick guide to menu Pag 15 9 2 Rapid count Pag 15 9 3 Quick CCT menu Pag 16 9 4 Main functio...

Page 4: ...fax or e mail and inform them you will formally notify them in writing through registered letter Packing list Make sure the packaging contains 1 ReLite Led Kit 1 Instruction manual 2 General information 2 1 Important Safety information Fire prevention 1 Never locate the fixture on any flammable surface 2 Minimum distance from flammable materials 0 5 m 3 Minimum distance from the closet illuminable...

Page 5: ...LED was turned off 2 Never install the fixture in an enclosed area lacking sufficient air flow the room temperature must not exceed 45 C 3 The projector contains electronic and electrical components which must un der no circumstances be in contact with water oil or any other liquid Failure to do so will compromise the proper functioning of the projector 2 2 Warranty conditions 1 The fixture is und...

Page 6: ...xture Color temperature CCT proportional control from 2 700 to 6 500 K Color Rendering Index CRI 95 up to 97 Weight Depending on the ReLite Led group Operating Ta C F range 20 to 45 C 4 to 113 F two thermal protection at 95 C 203 F LED and 85 185 F Board Connectors G22 GX9 5 G38 GY9 5 GY16 Custom IP rating 20 3 2 Dimensions 190 mm 7 48 in 110 mm 4 33 in 73 mm 2 87 in 210 mm 8 26 in 124 mm 4 88 in ...

Page 7: ...Italiano 7 3 3 Unit s main components A Components description A Display panel B DMX In C DMX Out D PowerCon In E PowerCon Out F Skintop B C D E F ReLite Led Kit 150 version ...

Page 8: ...life to your projector simply replacing the old lamp with the ReLite Led group The ReLite Box can be fixed to your projector s yoke through the fixing plates present on the box A A Warning Always ensure that your support structure and fixing bolts clamps etc are rated to support the weight of the fixture ...

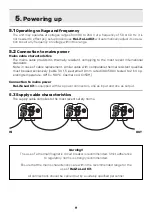
Page 9: ...nge for the use of ReLite Led Kit All connections should be carried out by a suitably qualified personnel 5 2 Connection to mains power Mains cable characteristics The mains cable provided is thermally resistant complying to the most recent International standards Note in case of cable replacement similar cable with comparable thermal resistant qualities must be used exclusively cable 3 X 1 5 ø ex...

Page 10: ... be connected to the power supply unit 6 1 Control signal connection by XLR5 plugs The digital control signal is transmitted to the projector via a two pole cable screened in ac cording to the International standards for DMX 512 data transmission The connection must be serial using connectors XLR5 male and female located on the back of ReLite Led Kit labelled DMX512 IN e OUT DMX In DMX Out ...

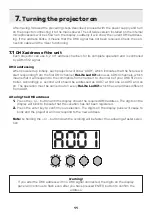
Page 11: ...ReLite Led Kit also uses 6 DMX channels which means that it will respond to the commands from channel 1 to channel 6 of your DMX 512 con troller Accordingly a second unit should be addressed as A007 a third one as A013 and so on The operation must be carried out on every ReLite Led Kit which has an address different from A001 Altering the DMX address 1 Press the or button until the display shows t...

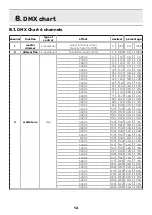
Page 12: ... 71 76 28 30 3800 K 77 82 30 32 3900 K 83 88 33 35 4000 K 89 94 35 37 4100 K 95 100 37 39 4200 K 101 106 40 42 4300 K 107 112 42 44 4400 K 113 118 44 46 4500 K 119 124 47 49 4600 K 125 130 49 51 4700 K 131 136 51 53 4800 K 137 142 54 56 4900 K 143 148 56 58 5000 K 149 154 58 60 5100 K 155 160 61 63 5200 K 161 166 63 65 5300 K 167 172 65 67 5400 K 173 178 68 70 5500 K 179 184 70 72 5600 K 185 190 7...

Page 13: ...om strobe effect with variable speed from slow to fast 210 255 82 100 6 special functions step no effect 0 9 0 4 600 Hz 10 84 4 33 fan at low noise speed 85 96 33 38 fan at auto silent speed 97 108 38 42 proportional fan speed control 109 120 43 47 step no effect 121 133 47 52 enables the automatic display blackout 134 185 53 73 disables the automatic display blackout 186 199 73 78 LED control fre...

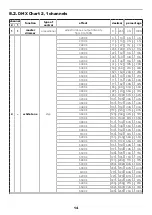
Page 14: ... K 71 76 28 30 3800 K 77 82 30 32 3900 K 83 88 33 35 4000 K 89 94 35 37 4100 K 95 100 37 39 4200 K 101 106 40 42 4300 K 107 112 42 44 4400 K 113 118 44 46 4500 K 119 124 47 49 4600 K 125 130 49 51 4700 K 131 136 51 53 4800 K 137 142 54 56 4900 K 143 148 56 58 5000 K 149 154 58 60 5100 K 155 160 61 63 5200 K 161 166 63 65 5300 K 167 172 65 67 5400 K 173 178 68 70 5500 K 179 184 70 72 5600 K 185 190...

Page 15: ...tions of the projector so that it will respond differently to the controller therefore carefully read about the functions described here before carrying out any possible selection 9 2 Rapid count Through the display panel of ReLite Led Kit it is possible to quickly change the various num bers displayed for the different functions in the following 3 manners 1 Pressing the or buttons will cause the ...

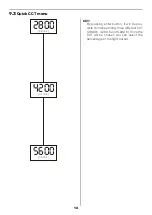
Page 16: ...u CCT By pressing enter button it will be pos sible to chose among three different CCT 2 800 K 4 200 K and 5 600 K Once the CCT will be chosen you can select the percentage of the light output 2800 2 800 K 4200 4 200 K 5600 5 600 K ...

Page 17: ...anually the white tempera ture Strobe manually sets the strobe DMX channel Store stores the modifications that will be set at the next times the fixture will be turned on Fan Speed Auto balance the fan speed to meet the maxim silence without compro mising the light performance Low noise sets the minimum fan speed to ensure a silent performance at the expense of light output the to tal power will d...

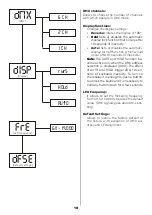
Page 18: ...function be come active only when the DMX address selection is displayed A001 The effect of AUTO and HOLD trigger after 10 sec onds of keyboard inactivity To turn on the display it is enough to push a button to unlock the keyboard it is necessary to hold any button down for a few seconds LED Frequency It allows to set the flickering frequency from 611 to 19 000 Hz besides the default value DMX sig...

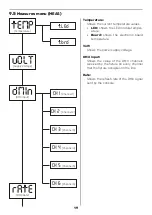
Page 19: ...e power supply voltage DMX Input Shows the value of the DMX channels received by the fixture on every channel that the fixture occupies on the line Rate Shows the refresh rate of the DMX signal sent by the console tEMP Temperature t LEd t brd uOLT Supply Voltage dMIn DMX input CH 1 Channel 1 CH 2 Channel 2 CH 3 Channel 3 CH 4 Channel 4 CH 5 Channel 5 rAtE DMX Rate CH 6 Channel 6 ...

Page 20: ...ounter of the fixture Unit shows the overall hours of life of the fixture LED life shows the overall LED mod ule life LED life reset shows the overall LED module life currently installed Note this items can be reset in case of LED module replacement Software version Shows the software version currently in stalled in the fixture ALrM Alarms LEd LED Status FrE LED Frequency FAn Fan Speed HOUr Usage ...

Page 21: ...ter should be considered for the exclusive use of technicians and qualified personnel 9 6 Electronic alignment of the leds The display panel of ReLite Led Kit allows the electronic alignment of the LEDs this procedure is performed by Coemar at the time of testing this procedure may be useful for special effects or in case of replacement of internal components PCBs LEDs etc Altering the settings ma...

Page 22: ...off after 10 minutes of fixture inactivity Error code Description noal No Alarm No alarm The projector self diagnostic routine didn t find any issue DTER Data Error Data error Initial data loading has failed the projector loaded the default data settings restart the fixture again and if the error persists contact the Coemar assistance center ADER Address Error Address error The projector does not ...

Page 23: ... worn parts Question Possible solution ReLite Led Kit does not emit light Projector not powered Make sure the power cord is plugged in or test the input voltage in the projector in which ReLite Led Kit is installed Make sure the ReLiteLedKit is well inserted into the socket The following list shows common issues that may be simply solved If issues persist the unit must be repaired by qualified per...

Page 24: ...Italiano 24 User notes ...

Page 25: ...Italiano 25 User notes ...

Page 26: ...g center for waste electrical and electronic equipment The treatment and disposal of environmentally friendly helps prevent potential negative environmental and health and promote the reuse and or recycling of materials making upthe equipment Illegal disposal bythe userincludesthe application ofadministrative sanctions provided by law ...

Page 27: ...Lighting s r l Via Carpenedolo 90 46043 Castiglione delle Stiviere Mantova Italia tel 39 0376 1514412 fax 39 0376 1514380 info coemar com Coemar reserves the right to change specifications without prior notice ...

Reviews: