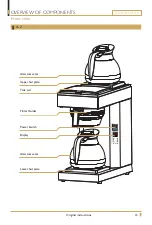
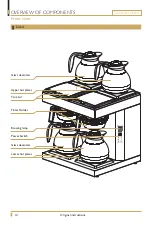
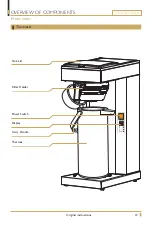
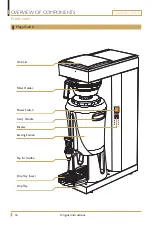
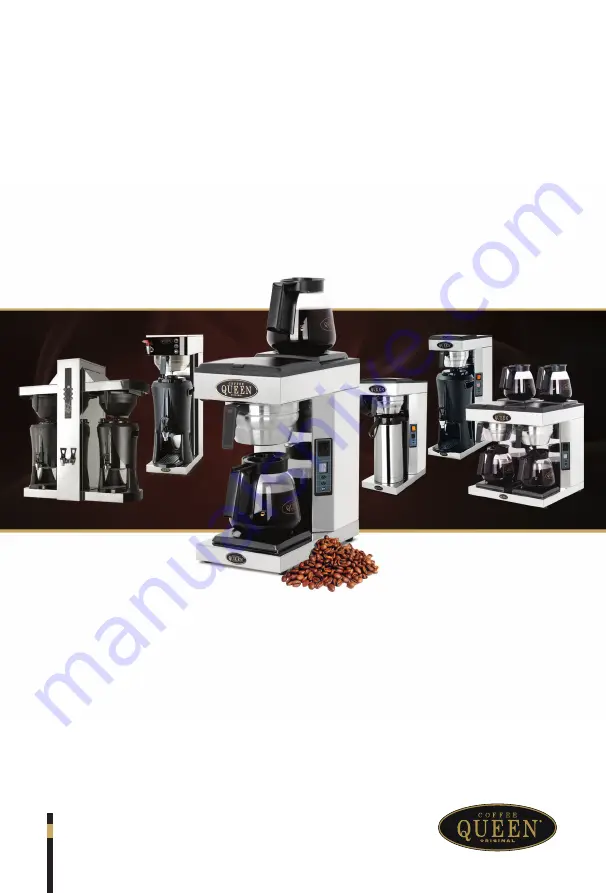
background image

ORIGINAL LINE A

USER MANUAL

UM_EN

Part No.: 1764024_03

Machines with automatic water filling 

Summary of Contents for A Series

Page 1: ...ORIGINAL LINE A USER MANUAL UM_EN Part No 1764024_03 Machines with automatic water filling ...

Page 2: ...y inspection 10 STORAGE AND DISPOSAL 11 Long term storage requirements 11 Machine disposal requirements 11 Caution 11 TECHNICAL SPECIFICATIONS 12 Facts weight 12 General function description 12 OVERVIEW OF COMPONENTS 13 Front view 13 A 2 13 DA 4 14 Thermos A 15 Mega Gold A 16 Function 17 A 2 DA 4 17 Mega Gold A Thermos A 18 INSTALLATION AND START UP 19 Positioning 19 Water connection 19 Electrical...

Page 3: ...ING AND CARE 25 Rinse thermos decanter and serving station 25 Daily cleaning 26 Weekly cleaning 26 Cleaning serving station 27 Exterior cleaning 27 PROGRAMMING 28 Adjust water amount 28 Adjust brew time 28 POSSIBLE SOLUTION 29 Fault and solution 29 DIMENSION 30 A 2 30 DA 4 31 Thermos A 32 Mega Gold A 33 Serving Station 34 ...

Page 4: ...LINE A 4 Original instructions MANUAL REVISIONS Rev Date TSB Change Description 03 Apr 26 2021 328 Update descaling instructions and general information Add notifications transport storage and disposal sections ...

Page 5: ...t unsafe practices Observe Important notifications to ensure food safety prevent possible minor personal injury or damage to the machine WARNING Indicates a potentially hazardous situation which if the WARNING is ignored could result in serious injury or even death DANGER INDICATES AN IMMINENTLY HAZARDOUS SITUATIONWHICH IF NOT AVOIDED WILL LIKELY RESULT IN SERIOUS INJURY AND EVEN DEATH Note Gives ...

Page 6: ...vice centre Owners are liable for ensuring that users have been properly trained to operate the machine and understand the potential risks involved The owner or installer will be liable for all non authorised modification of the machine Non authorised alteration or modification of the machine will immediately void the manufacturer s warranty This manual references the machine at the time of sale T...

Page 7: ...ed Maximum inlet water pressure 0 9MPa 9 Bar or 1 0MPa 10 Bar only for Norway Sweden Finland and Denmark Minimum inlet water pressure 0 2MPa 2 Bar Note For a suitable performance of machine maximum inlet water pressure should be kept between 0 8MPa 8 Bar Install a pressure reducer in case water pressure exceeds this range Maximum inlet water temperature 40ºC Ambient temperature between 10ºC min an...

Page 8: ...ction must be incorporated in the fixed wiring in accordance with the wiring rules Ensure that the power supply voltage does not fluctuate by more than 6 Position the power cable so that users cannot trip over it Keep the power cable away from sharp edges and heat sources Do not remove or disable any of the mechanical electrical or thermal protection safety equipment If supply cord is damaged it m...

Page 9: ...erson responsible for their safety Note safety regulation not valid for Europe Specific safety regulation for Europe This appliance can be used by children aged from 8 years and above and persons with reduced physical sensory or mental capabilities or lack of experience and knowledge if they have been given supervision or instruction concerning use of the appliance in a safe way and understand the...

Page 10: ...rton and machine from impact drops crushing shocks moisture and exposure to extreme temperature Upon receipt and delivery ensure that the machine is in the exact condition described in the enclosed documentation and that all accessories are included Missing items should be reported to the manufacturer or dealer immediately Damage caused during transport should be reported to the shipping agent and...

Page 11: ...here it will not be exposed to extreme temperatures or humidity When returning the machine to service after long term storage perform all weekly and periodic cleaning procedures and reconnect the water and power supplies this should be performed by a qualified person before use If the machine ever needs to be scrapped and disposed of be sure to Disconnect and roll up the power cord this should be ...

Page 12: ... 4 15 Cups 4 17 Cups Capacity 15 L h 30 L h 15 L h 19 L h Brew time 6min 6min 7min 8 5min Hot plates 2 4 None None Water connection Cold water 1 2 R MODEL NAME A 2 DA 4 Thermos A Mega Gold A Weight 9 kg 15 5 kg 10 kg 11 5 kg Facts weight The Coffee brewer is equipped with a key pad for automatic water filling The key pad allows you to adjust the number of cups for each brewing The water tank is fi...

Page 13: ...ORIGINAL LINE A 13 Original instructions OVERVIEW OF COMPONENTS A 2 Front view Display Power Switch Filiter Holder Tank Lid Glass decanter Glass decanter Lower hot plate Upper hot plate ...

Page 14: ...ORIGINAL LINE A 14 Original instructions OVERVIEW OF COMPONENTS DA 4 Front view Brewing lamp Power Switch Filiter Holder Tank Lid Glass decanters Glass decanters Lower hot plates Upper hot plates ...

Page 15: ...ORIGINAL LINE A 15 Original instructions OVERVIEW OF COMPONENTS Thermos A Front view Display Power Switch Filiter Holder Thermos Carry Handle Tank Lid ...

Page 16: ...ORIGINAL LINE A 16 Original instructions OVERVIEW OF COMPONENTS Mega Gold A Front view Display Power Switch Filiter Holder Serving Station Tap for Coffee Drip Tray Insert Drip Tray Carry Handle Tank Lid ...

Page 17: ...A 4 Shows the number of cups Display is blinking when brewing ON OFF button for display and lower hot plate Increase the number of cups Decrease the number of cups ON OFF button For upper hot plate Starts brewing During a brewing you may press this button to stop the brew process ...

Page 18: ...e number of cups Decrease the number of cups OVERVIEW OF COMPONENTS Function Mega Gold A Thermos A Starts brewing During a brewing you may press this button to stop the brew process Shows the number of cups Display is blinking when brewing ON OFF button ...

Page 19: ...re is no interference to the hose to ensure proper water flow Water supply to the machine is the customer s responsibility according to instruction and advice from the supplier In areas with high level lime problem a descaling filter should be mounted A Note Make sure air is able to circulate behind the machine minimum 10cm i Note The new hose set supplied with the appliance shall be used and that...

Page 20: ... authorized electrician Recommended install a line circuit breaker and a earth fault breaker to the machine WARNING Connection to a separate 2 phase only Brewer should be connected to 110V 220V with neutral and ground Use 10 Amp fuses Important Electrical installations must be done by a certificated electrician Hot plate function Turn on left power switch I for lower hot plate and right power swit...

Page 21: ...itch A Select 12 15 or 17 cups by adjusting or button Place the thermos or decanter under the filter holder Press the button to start the brew process After 20 30 seconds water shall start to pour into the filterholder and down in the thermos or decanter When brewing is completed empty the thermos or decanter A whole brew process takes around 6 8 minutes I A A WARNING A thermos or decanter must al...

Page 22: ...0mm filter in the filter holder Slide the filter holder into position Add coffee restaurant catering ground coffee Make sure that the coffee is evenly spread Turn on power switch I A to activate the dispaly and key pad Brewing with coffee I Recommended powder amount is 60g L ...

Page 23: ...using the buttons described below Press the button to increase number of cups Press the button to decrease number of cups When you have selected your desired number of cups press the button to start brewing During the brew process the number in the dispaly will blink When the brewing is completed the display will stop blinking and a 3 second beep will be heard from the machine It is now safe to re...

Page 24: ... is complete let it stand for about 1 hour Pour out the water Then start a brew with coffee Tips for achieving the best quality To keep temperature and aroma put the lid A back on the serving station immediately after the brewing Important The temperature in the serving station will decrease with 1 5 C h There is 30ml of coffee standing in the tubes from the inner container to the coffee faucet Th...

Page 25: ...os decanter or serving station with fresh tap water When cleaning the outside use a soft rag with liquid cleaning agent to prevent scratches Rinse thermos decanter and serving station WARNING The machine should not be submerged in water or washed in a dishwasher it will result in machine damage ...

Page 26: ...hat the particles from descaling solution disappear Regular descaling will ensure optimum brewing performance and a longer life of the machine When cleaning the decanter in a dishwasher remove lid and place decanter upside down in the dishwasher A Pitcher Pt no 110351 A B CLEANING AND CARE Daily cleaning Weekly cleaning Wash the thermos decanter B and the filter holder with liquid solution for cof...

Page 27: ... Tap out 2 3 of the cleaning solution Clean the serving station with the cleaning brush Rinse the serving station with fresh tap water several times before reuse Cleaning serving station Cleaning of serving station 2 5 L A Important Rinse the inside of the serving station several times with fresh tap water Exterior cleaning When cleaning exterior of the machine use a soft rag with liquid cleaning ...

Page 28: ...tton to decrease amount of water 1 step 5 Press the button to confirm the change Adjust the brew time Press the buttons and at same time in 5 seconds The buzzer beeps four times Display shows 0 Press the button to increase brewing time Press the button to decrease brewing time 1 step 5 Press the button to confirm the change Display shows and machine is ready to use ADJUSTMENTS 5 25 4 20 3 15 2 10 ...

Page 29: ...ive replace Machine will not brew Check overheating protection Check microswicth Check connection to boiler Boiler unit may need replacing The machine does not take in water Make sure water tap is open Make sure the water hose is not bent Check inlet valve Check that the display is blinking The machines does not stop taking in water Dirt in the inlet valve inlet valve is defective replace PCB is d...

Page 30: ...ORIGINAL LINE A 30 Original instructions A 2 DIMENSION A D E B C F Model A B C D E F A 2 595mm 205mm 410mm 428mm 578mm 360mm ...

Page 31: ...ORIGINAL LINE A 31 Original instructions DA 4 DIMENSION Model A B C D E F DA 4 410mm 410mm 428mm 595mm 578mm 360mm D C A E B F ...

Page 32: ...ORIGINAL LINE A 32 Original instructions Thermos A DIMENSION Model A B C D F Thermos A 557mm 205mm 410mm 708mm 360mm B A F D C ...

Page 33: ...ORIGINAL LINE A 33 Original instructions Mega Gold A DIMENSION Model A B C D E Mega Gold A 655mm 205mm 445mm 390mm 806mm A E B D C ...

Page 34: ...ORIGINAL LINE A 34 Original instructions DIMENSION Serving Station Model A B C D E Serving Station 205mm 273mm 436mm 400mm 105mm B E A C D ...

Page 35: ......

Page 36: ...sued without delay The affected equipment may not be used during awaiting service if there is any risk that the damage or defect would worsen The warranty will not cover consumption supplies such as glassware normal maintenance such as cleaning of filters contaminations in water lime incorrect voltages pressure or adjustment of water amounts The warranty will not cover damages of defects caused by...

Reviews: