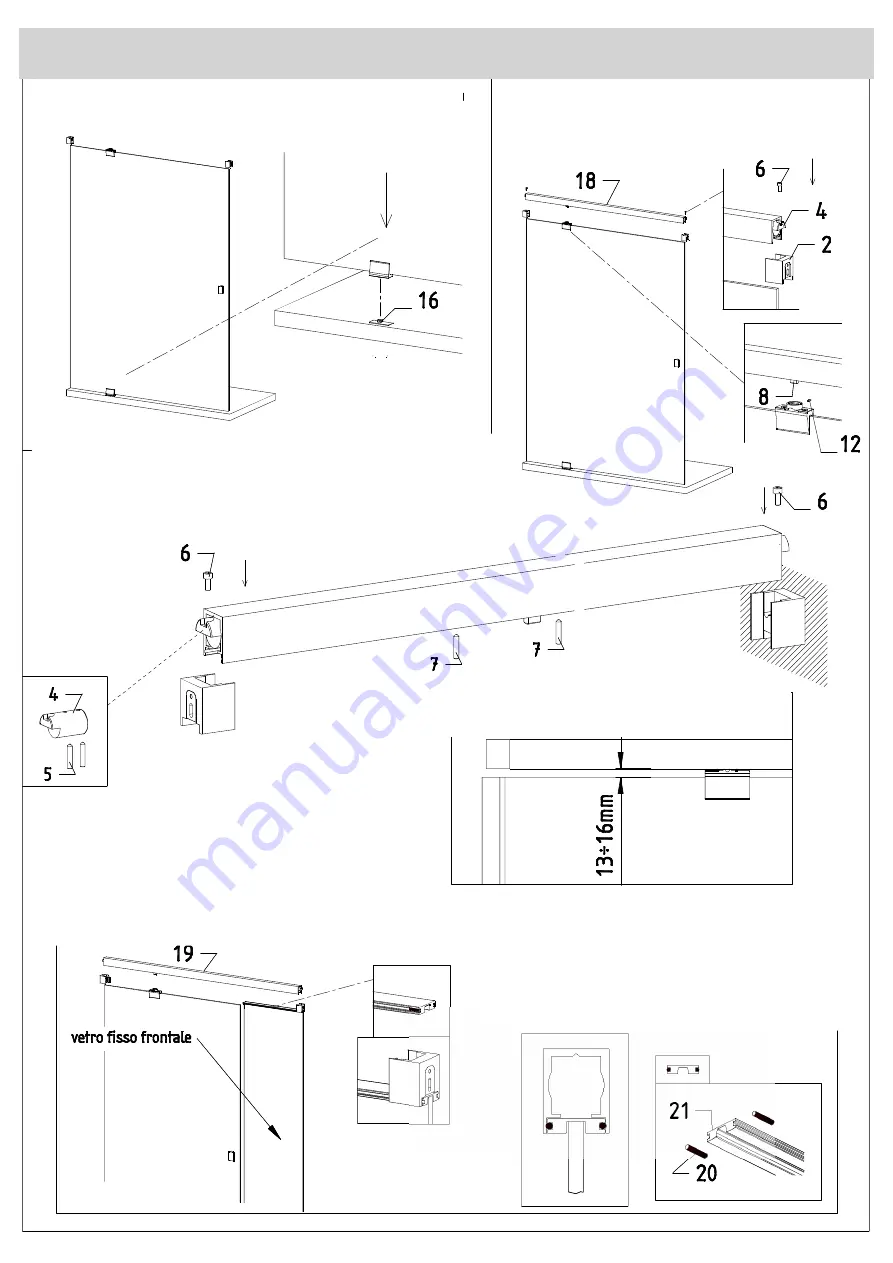
Posizionare l’anta centrando la cerniera inferiore sulla piastrina a terra (16) - Coloque la puerta centrando la
bisagra inferior sobre la placa en el suelo (16) - Place the door centering the lower hinge on the plate on the
ground (16) - Legen Sie die Tür, wobei Sie das untere Scharnier auf die Bodenplatte zentrieren (16) - Placer
la porte en centrant la charnière inférieure sur la plaque au sol (16)
Adagiare la barra negli attacchi laterali (2) curandosi di centrare il perno (8) nella cerniera
superiore - Ponga la barra de las conexiones laterales (2) teniendo cuidado de centrar el
pasador (8) a la bisagra superior - Lay the bar of the side ports (2) taking care to center
the pin (8) to the upper hinge - Verlegen Sie die Stange der Seitenanschlüsse (2) und
kümmern Sie sich dazu, den Stift (8) im oberen Scharnier zu zentrieren - Disposez la
barre des ports secondaires (2) en veillant à centrer l’axe (8) de la charnière supérieure.
DETTAGLIO Allentare i grani (5) dei tasselli (4) in modo che scorrano nella barra. Avvitare la vite (6), quindi bloccare i
grani (5). Poi avvitare e serrare il grano (12) nella pinza superiore.
DETALLE Afloje los tornillos (5) de los pasadores (4) así que fluyan en la barra. Apriete el tornillo (6) y, a continuación,
apriete los tornillos de presión (5). Atornille y apriete el tornillo de presión (12) en el maxilar superior.
DETAIL Loosen the grub screws (5) of the dowels (4) to make them flow into the bar. Tighten the screw (6), and then
tighten the grub screws (5). Screw in and tighten the grub screw (12) in the top gripper.
DETAILANSICHT Lösen Sie die Schrauben (5) der Dübel (4), so dass Sie in der Stange fließen. Ziehen Sie die Schrau-
be (6), und ziehen Sie dann die
Madenschraube (5). Einschrau-
ben und anziehen Sie die Ma-
denschraube (12) im oberen
Greifer.
DETAIL Desserrez les vis sans
tête (5) des ancres (4) si qu’elles
s’écoulent dans la barre. Serrez
la vis (6), puis serrer les vis sans
tête (5). Vissez et serrez la vis
sans tête (12) dans la mâchoi-
re supérieure.
QUOTA DI CONTROLLO - Distanza tra vetro e barra
CONTROL DE LAS PORCIONES - Distancia entre el vidrio y la barra
CONTROL PORTION - Distance between glass and bar
TEILSTEUERUNG - Abstand zwischen Glas und Stange
NOTA : Nel caso di vetro fisso frontale, tagliare la veletta (21) a misura (deve contenere il vetro fisso), inserire gli spezzoni di gomma (20) alle estremità, calzarla sul vetro fisso, poi assemblare la
barra (19) - IMPORTANTE: En el caso de cristal fijo frontal, cortar el velo (21) a la longitud (debe contener el cristal fijo), poner los trozos de goma (20) en cada extremo, pusarla en el cristal fijo,
luego armar la barra (19) - NOTE: In the case of fixed front glass, cut the veil (21) to length (it must contain the fixed glass), put the pieces of rubber (20) at each end, put it on the fixed glass, then
assemble the bar (19) - HINWEIS: Im Falle vom festen Frontglas, schneiden Sie den
Schleier (21) zur Länge (er muss das feste Glas enthalten), platzen Sie die Gummistü-
cke (20) an jeder Ende, fixieren Sie sie auf dem Glas, dann montieren Sie die Stange
(19) - REMARQUE: Dans le cas de façade en vitre fixe, coupez le voile (21) à la lon-
gueur (elle doit contenir la vitre fixe), mettez les morceaux de caoutchouc (20) à chaque
extrémité, adaptez-les sur le vitre fixe, puis assemblez la barre (19)
SCHEMA DI INSTALLAZIONE - ESQUEMA DE INSTALACIÓN - INSTALLATION SCHEME
INSTALLATIONSSCHEMA - SCHÉMA D’INSTALLATION
8


