background image

9

シェードスキンの各コーナーおよびサイドの中間にあるフックをポールにかけポールを固定します。

Fasten  the  shade  skin  to  the  poles  by  putting  the  hooks  that  are  attached  to  the  shade  skin  onto  the 
poles.

쉐이드 스킨의 각 모서리 및 측면 중간에 있는 후크를 폴대에 걸어서 고정하십시오.

9

10

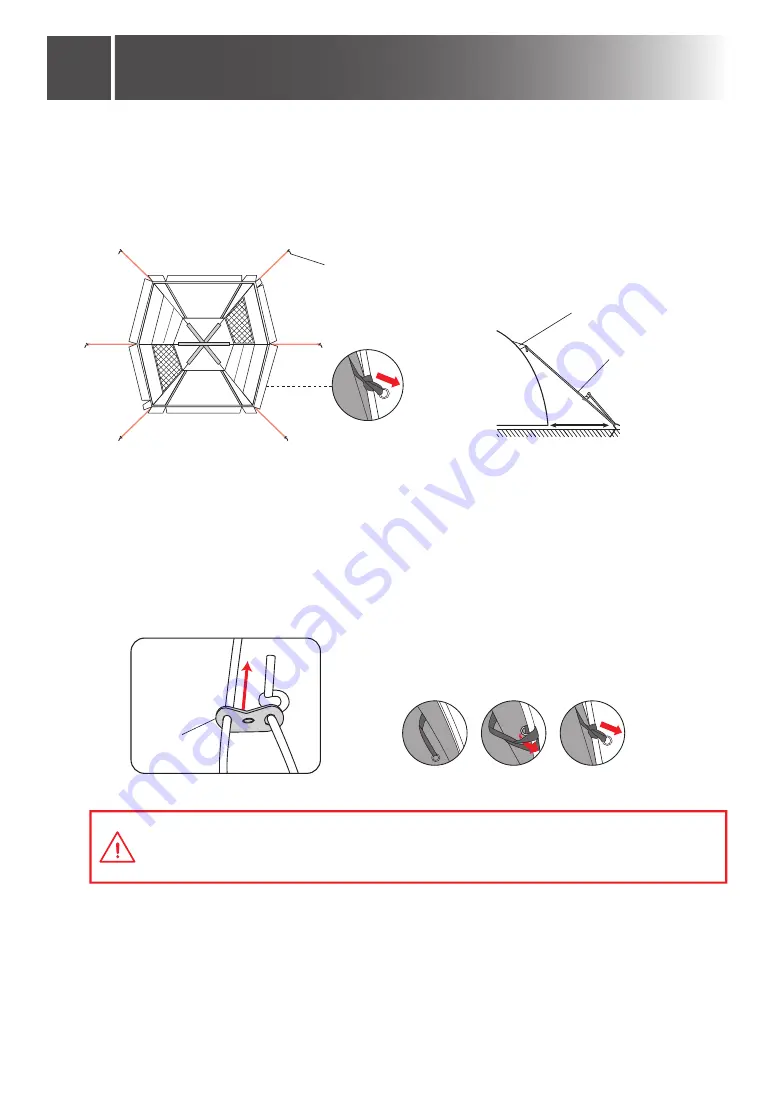
設置場所を決め、図のように6ヶ所のループを風上より順に(A~F)対角線にペグを打ち、本体を固定してください。

Decide the installation point. Install the tarp by driving the pegs into the ground through the 6 loops diagonally 
(A-F) as shown in the figure, starting from the most windward one.

설치할 장소를 정한 후, 그림과 같이 6곳에 루프를 순서대로(A~F) 바람이 부는 방향에 따라 대각선방향으로 팩를 박아서 본체를 고정하십시오.

10

シェードスキンとポールを固定する

Fasten the Shade Skin and Poles

쉐이드 스킨과 폴대를 고정한다

設置場所を決めペグで固定する

Decide the installation point and peg down the tarp

설치 장소를 정한 후, 팩로 고정한다

フックをポールにかける際、指を挟まないように注意してください。

When putting the hooks onto the poles, please be careful not to get your fingers caught.

후크를 폴대에 걸 때 손가락이 끼이지 않도록 주의하십시오.

ポール

Pole

폴대

フック

Hook

후크

B

E

F

D

A

C

ペグは60°~90°の角度に打ち込むと

風に対して強く設営できます。

It is recommended to drive
the pegs into the ground at a 60°to 90°angle, 
as it will make the tents and tarps most wind-resistant.

팩를 60°~90°의 각도로 설치하면 바람에 보다 강하게
대응할 수 있습니다.

ストームガードシステムはタープの安定性を高めます。各コーナーに付属のロープを結び、図のようにペグで固定します。

The storm guard system (i.e., fastening method that involves tying the ropes that comes standard in the product 
package to the storm guards and then pegging them down to the ground) improves the stability of the tarp.
Tie the ropes that are included in the package to the corner loops and storm guards on both sides of the 
tarp and peg them down to the ground.

스톰 가드 시스템은 타프의 안정성을 향상시킵니다. 각 모서리에 로프를 묶어서 그림과 같이 팩으로 고정하십시오.

11

ペグ

Peg

上図の要領にて6ヵ所にロープをセットし、本体から約1m程離れた位置にペグ打ちして固定します。

自在をしめあげて、ポールが前後左右に大きく動かなくなるよう調節してください。

Set up the ropes in the 6 spots as shown and drive the pegs into the ground approx. 
1 meter away from the tarp, as shown in the figure.
Tighten the ropes using the guyline adjusters to a point
where the poles will no longer move back and forth or sideways so much.

위쪽 그림과 같이 6곳에 로프를 설치하고, 본체에서 약 1m정도 떨어진 위치에 팩을 박아서 고정합니다.
로프로 단단히 묶어서 폴대가 앞뒤좌우로 움직이지 않도록 조절하십시오.

しめあげて調整する

Tighten and Adjust 

the tension

잡아당겨서 조절한다

自在金具

Guyline Adjuster

로프 핀

自在の使用方法


The usage of guyline adjuster

로프 사용방법

ストームガード|

Storm guard

스톰가드

ウェビングテープをポールに巻きつけることで、生地とポールに力を分散。

For this product, safety is enhanced by the strap-type storm guard

as it can be wrapped around the pole for more secure fastening.

웨이빙 테이프를 폴대에 감으면 패브릭과 폴대에 가해지는 힘이 분산됨.

大きなサイズのタープは構造上、風の抵抗を受けやすくなっています。「ストームガードシステム」を必ずご活用ください。

A large tarp is naturally prone to the effect of wind due to its structure. Be sure to use the storm guard each time 
you set up the tarp.

대형 사이즈의 돔은 구조상, 바람의 저항을 받기 쉽습니다.반드시 '스톰 가드'를 활용하십시오.

ロープを張り固定する

Tighten the ropes to securely install the tarp on the ground

로프를 묶어서 고정한다

VI

自在ロープの端をストームガードのループに結びます。

ペグを打ち、ロープをかけて自在をしめ

ロープの長さを調節します。

Tie the end of each guyline adjuster
to the loop attached to the storm guard.
Then drive the peg into the ground,
and then hitch the rope onto peg,
and tighten the rope using the guyline adjuster.

로프 끝을 스톰 가드의 루프에 묶습니다.
팩를 박고 로프를 걸어서 묶은 후, 로프의 길이를 조 절합니다.

自在ロープ

Guyline Adjuster

로프

1m

ストームガード

Storm Guard

스톰 가드

ループ

Loop

루프

ペグ

Peg

60°

~90°

3cm

プラスチックペグ

Plastic Peg

플라스틱 팩

地面│

Ground

지면

Summary of Contents for 2000033116

Page 1: ...rence Thank you for your purchase of the Coleman product When setting up the tents or tarps please choose an area where drainage is good and the ground surface is flat Be sure to remove any rocks tree...

Page 2: ...1...

Page 3: ...accident The pegs that come standard in the product package may not be usable depending on the area that has been chosen for installing the tent and tarp Please check the condition of the ground surf...

Page 4: ...3...

Page 5: ...Names of the items and what are included Shade Skin 1 Main Pole Silver Red 2 Center Pole Silver Gray 1 Standing Tape Joint Flap Guyline Adjuster 14 Steel Peg 18 Plastic Peg 6 Hammer 1 Pitched Image C...

Page 6: ...Make sure the standing tapes buckles are fasten If not fasten the tarp does not stand well Put together the main pole Silver Red respectively 2 1 2 When putting together the pole make sure that each...

Page 7: ...the rear side main pole Silver Red end respectively 2 When putting up each pole through the sleeve do not pull the pole but push the pole in 6 Main Sleeve Main Pole Silver Red A P 17 Go to A P 17 for...

Page 8: ...and push the pole in slowly using the other hand Poles and sleeves may be damaged if the sleeves are not held when putting the poles When inserting the poles through the assist clips please be careful...

Page 9: ...nter poles Silver Gray end 8 When inserting the poles through the assist clips please be careful not to get your fingers caught When putting up each pole pull the sleeve with one hand and push the pol...

Page 10: ...shown in the figure starting from the most windward one 6 A F 10 Fasten the Shade Skin and Poles Decide the installation point and peg down the tarp When putting the hooks onto the poles please be ca...

Page 11: ...djusters to a point where the poles will no longer move back and forth or sideways so much 6 1m Tighten and Adjust the tension Guyline Adjuster The usage of guyline adjuster Storm guard For this produ...

Page 12: ...are sold separately 12 Sold Separately When you use the canopy in the rain it tends to hold water To avoid such water accumulation set the canopy slightly at an angle to create a slope or tie a rope...

Page 13: ...nd the other inside with a peg It prevents the poles from spreading sideways After removing the standing tape store it in the pocket on the side 2 13 60 90 3cm 60 90 It is recommended to drive the peg...

Page 14: ...while maintaining good ventilation 14 The door moves along with the zipper preventing it from getting dirty when it is opened and closed 15 When the tarp is not connected to the tent roll up the join...

Page 15: ...he joint flap is attached and spread the joint flap This tarp is able to connect with a tent made by Coleman For connecting to a tent please follow the below steps after the tarp is pitched Joint Flap...

Page 16: ...as it covers the tent front pole well 4 Decide the installation point and peg down the tent Fasten the end of joint flap If there is a front pole at a tent hitch the loop of joint flap end at the peg...

Page 17: ...16 Adjust the position of a tent for covering the joint flap fully 5...

Page 18: ...es S shape the tarp can not stand up because of the overload to the pole Be sure to set up the pole with Arch shape S B 1m 3 Lift the center of crossed main poles Silver Red up around 1m from the grou...

Page 19: ...ide main pole Silver Red end When putting up each pole pull the sleeve with one hand and push the pole in slowly using the other hand When putting up each pole pull the sleeve with one hand and push t...

Page 20: ...nsion even throughout the shock cord rubber and allow it to last longer 1 After folding the shade skin at the 1 put the pole case on it and roll it up 1 Fold both ends inward to make a rectangular sha...

Reviews: